
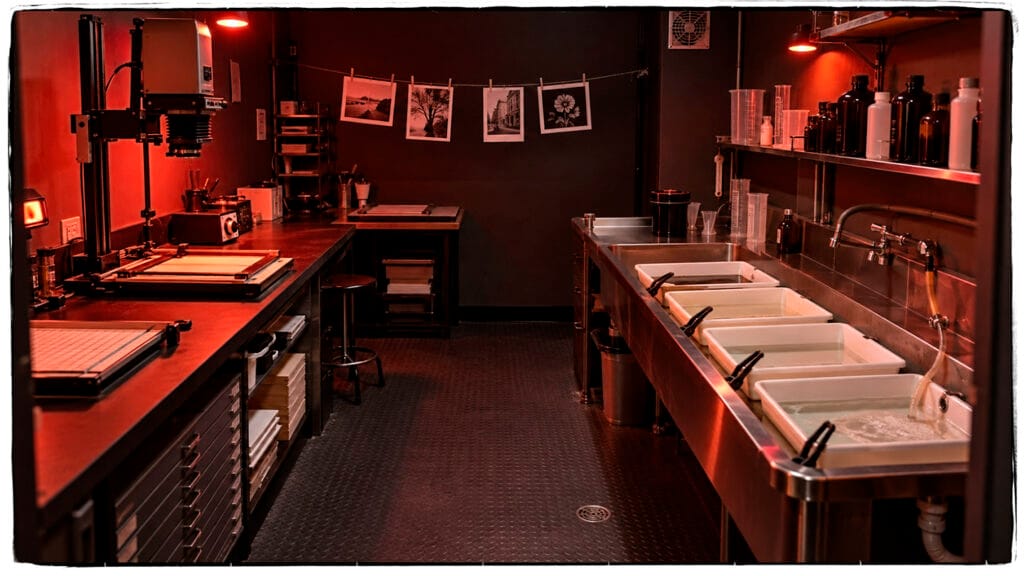
How to Set Up a Home Black-and-White Darkroom
A beginner guide to a temporary bathroom setup and a permanent printing room
Start small: process film in a daylight tank, then add an enlarger and four trays for paper printing. This guide explains room preparation, light control, ventilation, water, chemistry, paper choice, and a repeatable first printing session. This can be done in a home sink, but the chemicals can stain so a utility sink is suggested.
Choose your home darkroom setup
A black-and-white darkroom can be as simple as a changing bag and daylight developing tank, or as complete as a permanent room with an enlarger, sink, running water, filtered ventilation, and archival print-washing equipment. The right starting point depends on whether you want to develop film only or make traditional silver-gelatin prints.
Important distinction. Film must be loaded onto a reel in complete darkness. Once the lid is secured on a daylight tank, the rest of film processing can happen in normal room light. Black-and-white printing paper can usually be handled under the correct tested safelight, but the room must still be light-tight.
Start with film processing
If you are not ready to install an enlarger, start here. You need a changing bag (or a completely dark closet for loading), a daylight tank, reels, measuring graduates, a thermometer, timer, film clips, and chemistry. This teaches accurate measuring, temperature control, agitation, fixing, washing, and drying without converting an entire room.
Complete darkness: load the reel and close the daylight tank. Room light: process in the sealed tank, then wash and dry after adequate fixing.
Add a temporary printing space
A bathroom often works because it already has water, a drain, washable surfaces, and an exhaust fan. Place the enlarger on a dry, rigid table away from the sink. Put the trays in the tub or on a separate wet table. Install removable blackout material and weatherstripping, then test for leaks. Store all equipment and chemistry outside the bathroom when it returns to normal household use. This is a great way to start, but over time, the setup and teardown process can become tedious.
Do not make the room airtight. Blocking light is not the same as blocking air. Keep a safe path for makeup air through a baffled or light-trapped opening while an exhaust fan pulls air outdoors. A simple way to start in a bathroom is to turn on the exhaust fan and, whenever it is safe to expose the room to light, open the door briefly to allow fresh air to circulate.
Plan the room before buying equipment
Water and drainage: A utility sink is ideal. A bathroom or laundry sink can work if chemicals and tools are removed after use.
Ventilation to outdoors: Use an exhaust route that does not recirculate darkroom air into the house, attic, crawlspace, or another occupied room.
Enough floor area: You need space to move without carrying dripping prints across the enlarger or electrical cords.
Clean, washable surfaces: Avoid carpet. Dust harms negatives, enlargers, and wet film.
Electrical safety: Use properly grounded, code-compliant outlets with GFCI protection near water. Keep outlets, power strips, and cords away from splashes.
Temperature: A comfortable room near 20°C / 68°F makes standard black-and-white processing easier.
Separate Wet & Dry Areas
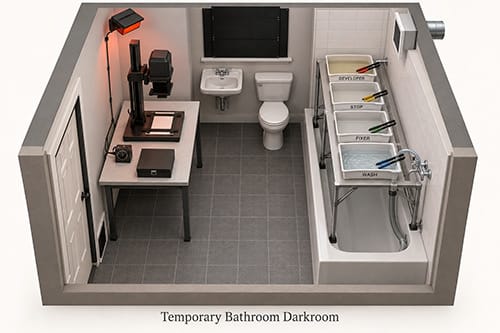
1. Temporary setup. Four trays on a securely supported waterproof board. The door swing and working aisle remain clear; the enlarger is shown from above.
The wash tray needs fresh-water changes or a suitable flowing-water arrangement. Fully fixed prints can be taken to another room for the final wash. A tray of unchanged water is not a complete washing method.
Build the temporary darkroom
1. Clear and clean the room. Remove towels, toothbrushes, food, medicines, and anything that can be contaminated. Wipe surfaces and control dust.
2. Black out the window. Use a removable opaque panel, blackout fabric backed by a rigid board, or layered black plastic. Overlap every edge; tape alone often leaks at corners.
3. Seal the door. Add removable foam weatherstripping at the top and sides. Use a weighted draft blocker at the bottom. If air must enter beneath the door, build a small baffled light trap instead of sealing the gap solid.
4. Test darkness. Turn off every light, wait at least five minutes for your eyes to adapt, and inspect seams, vents, outlets, and the door. Mark leaks with painter’s tape and correct them. Repeat from different positions.
5. Set up ventilation. Run the existing bathroom exhaust only if it vents outdoors and does not leak light. Add a removable light baffle if needed. Open makeup air should enter away from the trays so clean air crosses the worker before moving toward the exhaust.
6. Build separate tables. Use a steady table for the enlarger and a waterproof surface for trays. Never balance an enlarger on a sink or bathtub edge.
Install and test the safelight. Use only the safelight color and wattage/distance approved for your paper. Then perform a proper safelight fog test; visual inspection alone is not enough.
8. Lay out the workflow. Place developer, stop, fixer, and wash in order. Use dedicated labeled tongs—one per tray—to prevent contamination.
9. Run a dry rehearsal. Practice entering, closing the door, finding switches, moving paper with empty trays, and exiting without touching wet surfaces or cords.
10. Make a contact sheet first. A contact sheet helps you judge every frame, choose negatives, and plan enlargements before spending time and paper on full-size prints.
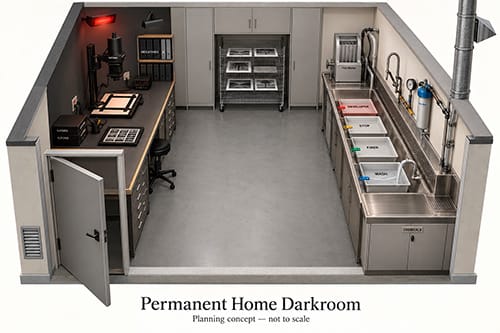
2. Permanent setup. Air enters from the clean side and moves toward extraction behind the trays. This is a planning schematic, not a scaled construction or ventilation specification.
Build the permanent darkroom
1. Draw the room to scale. Include the door swing, plumbing, drain, outlets, enlarger footprint, tray sizes, washer, shelving, and safe walking clearance.
2. Build durable light control. Use an opaque solid-core door or well-sealed existing door, overlapping stops, weatherstripping, and baffled light traps for intake and exhaust openings. Dark matte surfaces near the enlarger reduce stray reflections; the whole room does not need to be painted black.
3. Install a real exhaust path. Locate extraction close to and behind the wet work area so contaminants are pulled away from your breathing zone. Supply makeup air from the opposite side. Duct outdoors with code-compliant materials and a backdraft damper; use a light-tight baffle that does not choke airflow.
4. Add a darkroom sink or wet bench. A full-length sink contains spills and lets trays sit level. Include a mixing faucet, thermometer, drain board, and splash-resistant wall surface. A licensed plumber/electrician should handle work that requires permits or alters utilities.
5. Add controlled water. Use a thermostatic mixing valve if possible. Add a sediment filter when rust or grit is present. Consider activated carbon for chlorine taste/odor, but understand that it does not soften hard water. Use distilled or deionized water for the final wetting-agent rinse when mineral spots are persistent.
6. Protect electricity. Use GFCI-protected receptacles, proper grounding, splash-resistant placement, and overhead task lighting. Keep the enlarger, timer, and power strips on the dry side.
7. Create chemical storage. Use a cool, locked, labeled cabinet away from food and children. Store concentrates in original containers; working solutions go in compatible, clearly labeled bottles with chemical name, dilution, date mixed, and hazard notes. Chemical Storage Link.
8. Add print washing and drying. RC paper needs relatively short washing and dries flat quickly. Fiber paper needs substantially more washing and a dedicated method for blotting, screen drying, or flattening.
9. Commission the room. Test for white-light leaks, safelight fog, airflow direction, stable water temperature, drainage, GFCI operation, and spill response before the first session.
Ventilation and light control
Ventilation should remove contaminated air at its source and replace it with clean air. A fan across the room that only stirs air is not exhaust. A recirculating air purifier is not a substitute for ducting to outdoors, and a dust mask does not protect against chemical vapors.
A light-tight room must still breathe. A baffled inlet changes the air’s direction while blocking a straight light path; it must have enough free area for the exhaust system. Do not block required combustion-air openings or emergency exits. Have a qualified professional check any installation near fuel-burning equipment.
Light-trap principle. Alternating opaque baffles overlap in projection. Actual sizing, surface treatment, and leak testing determine whether a vent is suitable.
Air direction: clean inlet → working position → open trays → outdoor exhaust.
Place the exhaust pickup behind or just above the tray line, not behind your head.
Keep your face out of the airflow path from trays to exhaust.
Choose low-odor liquid concentrates when possible; avoid powdered chemistry in a small home space.
Keep bottles closed and cover trays during long pauses.
If odors linger, eyes or throat become irritated, or anyone develops symptoms, stop, leave the room, ventilate, and review the product Safety Data Sheet and the ventilation design.
Do not use selenium toner or other higher-hazard specialty processes in a casual, poorly ventilated temporary setup. Review the product-specific SDS and obtain appropriate controls first.
Fan-sizing note. Room volume and duct resistance affect fan performance. A bathroom fan’s advertised rating may fall sharply through long, narrow, or sharply bent ductwork. For a permanent installation, size the system with an HVAC professional and verify that air moves from the clean side toward the wet side.
Water and chemical disposal
Match filtration to the problem
Most potable tap water is suitable for black-and-white processing. Filtration is problem-solving, not an automatic requirement. Match the treatment to the problem:
| Water problem | Useful response | What it does not solve |
| Visible grit, rust, or sediment | Inline sediment cartridge, commonly 5 microns as a practical starting point | Hardness, dissolved salts, or microbes |
| Strong chlorine taste or odor | Activated-carbon stage rated for the intended flow | Hardness; exhausted carbon can stop working without obvious warning |
| Mineral spots on film | Distilled/deionized water for the final rinse plus correctly diluted wetting agent | Poor washing, dust, or squeegee damage |
| Very hard water | Use distilled/DI water for sensitive mixing or final rinse; consider a suitable treatment system | A sediment or carbon filter alone will not remove dissolved hardness |
| Unsafe or unknown water | Use a verified potable source | A simple photo filter is not a drinking-water safety system |
Temperature control
Many black-and-white instructions are standardized around 20°C / 68°F. Follow the exact film, paper, and chemistry data sheets; do not assume every product uses the same time or dilution. Keep developer temperature accurate and avoid sudden temperature changes during film washing, which can stress the emulsion. I always just used a thermometer. You can use a water bath the raise and lower temperatures.
Drainage and chemical disposal
Never pour used fixer away automatically. Used fixer contains silver. Collect it separately in a compatible, closed, labeled container for silver recovery or an approved household hazardous-waste program. Do not mix fixer with developer, stop bath, bleach, cleaners, or other wastes.
Check the chemical manufacturer’s current SDS and disposal instructions.
Ask your municipal sewer authority—not just a general internet forum—what small household quantities may enter the sanitary sewer.
Do not discharge photographic chemistry into a storm drain, yard, street, stream, or septic system.
Keep waste containers closed, upright, secondarily contained, and labeled with contents and date.
For Pennsylvania households, use county or municipal household hazardous-waste guidance when local sewer disposal is not explicitly approved.
Film development chemistry
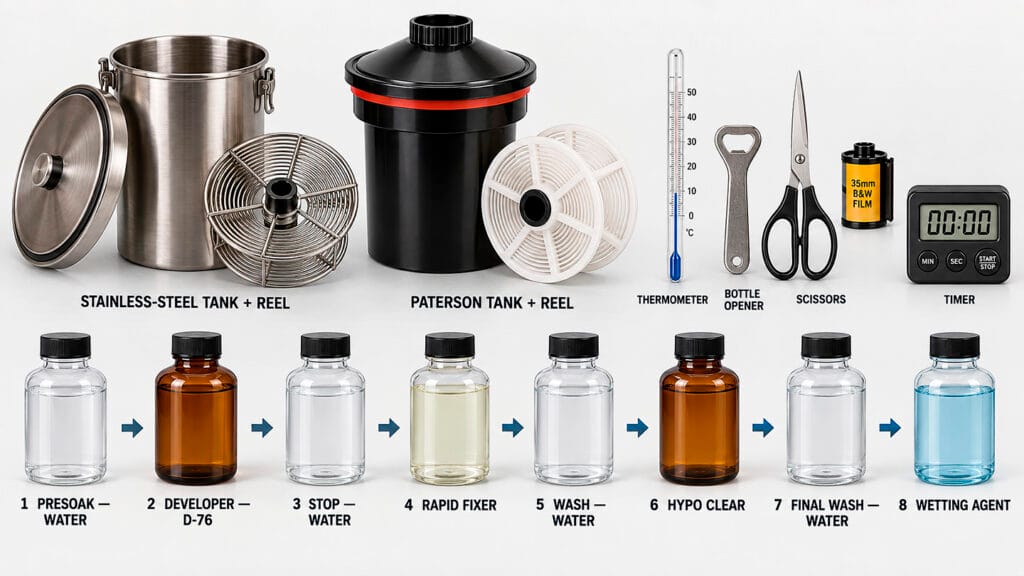
1. Develop — Black-and-white film developer. Converts exposed silver halide into the visible negative image. Choose one liquid developer and follow its film-specific time, temperature, dilution, and agitation chart. D-76 is the most commonly used film developer. (Links to B+H)
2. Stop — Citric/acetic stop bath or manufacturer-approved water rinse. Stops or slows development and reduces developer carryover. An indicator stop bath makes exhaustion easier to see; use only as directed. Personally, I always just used water throughout my career. Just one quick rinse and add the Fixer.
3. Fix — Rapid fixer. Makes the image light-safe by removing undeveloped silver halide. Confirm fixing time and capacity; exhausted fixer causes permanence problems. Note: Fixer is reusable, but you need to use hypo check to see if it is exhausted. Add a drop to the fixer, if it stays clear it is good, if it turns milky it is exhausted.
4. Wash — Running water or a validated fill-and-invert sequence. Removes residual processing chemicals. Keep wash temperature reasonably close to processing solutions. This can be hard to find. Essentially, the water inlet is at the bottom, and exits the top. Here is a link I found.
5. Wash Aid — Wash aid / hypo-clearing agent. Can shorten or improve washing in specified workflows. Useful for archival workflows; not a substitute for correct fixing and washing.
6. Final rinse — Wetting agent. Promotes even drainage and reduces drying marks. Mix accurately; too much can create foam and residue.
Film developer and paper developer are not interchangeable unless the manufacturer specifically supplies instructions for both. A fixer concentrate may serve both processes, but prepare and label separate working solutions for film and paper.
Follow the film processing sequence
Load in complete darkness → develop(D-76) → stop(Water) → fix(Kodak Rapid Fix) → wash(Water) → wetting-agent rinse(Ilford Wetting Agent) → dry(Take the film out of the roll, and hang straight. Add a close pin on the bottom so it will not curl.
Fix for the manufacturer’s specified time and dilution; first clearing is not the endpoint. After the tank is light-tight, follow its instructions for daylight processing.
The developer controls much of the negative’s density, contrast, grain, and effective speed. The fixer makes the film safe to view in room light. Never improvise development times: consult the current film/developer chart, and keep written notes for every roll.
Print development chemistry
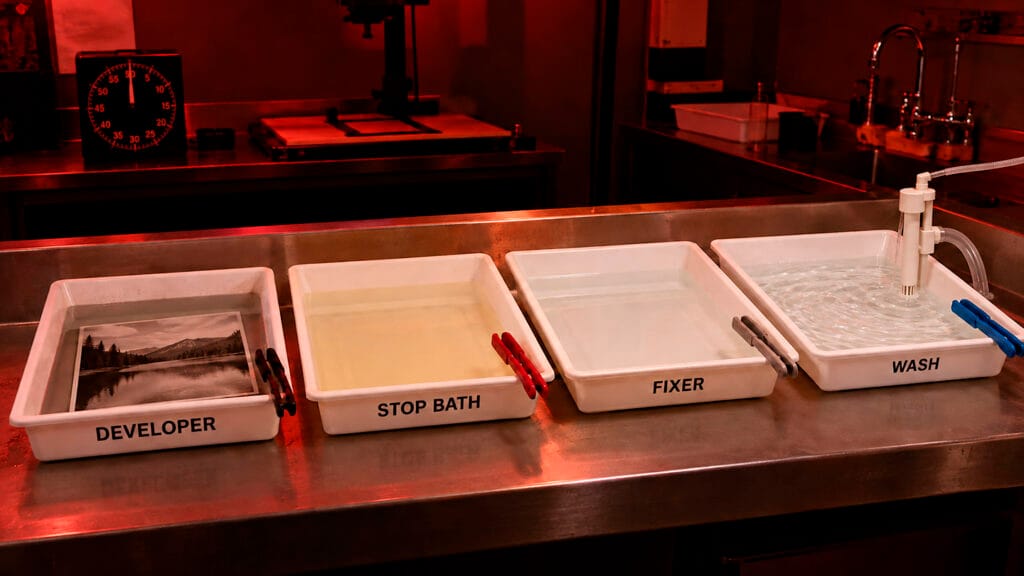
Tray 1 — Paper developer. The latent image becomes visible. Agitate gently and develop for the product’s full recommended time rather than pulling the print when it merely looks dark enough. 2minutes with agitation.
Tray 2 — Stop bath. Development stops and alkaline carryover is reduced. Drain the print briefly before transfer; keep developer tongs out of this tray. 30 seconds with agitation.
Tray 3 — Paper-Fixer. The print becomes light-safe and unexposed silver halide is removed. Observe the paper-specific dilution, fixing time, capacity, and agitation. 5 minutes with agitation. Light safe with RC paper after 2 minutes. I do not use Rapid Fixer for printing but you can. I use a different fixer that is purchased in a powder form. Link Below.
Tray 4 — Wash tray. Fresh water removes residual chemistry. If the tray is only a holding bath, finish with the paper manufacturer’s prescribed wash before drying. RC paper 5 minutes after all printing is finished. Fiber Paper 30min.-1 hour in archival washer. IMPORTANT NOTE: Do all your printing first them wash all you prints. You can use the wash tray shown above as a holding bath until you are ready to wash your prints. Do not leave RC paper in a water bath to long or it will separate. If you a a newly fixed print to a partially washed set of prints, you have to start the washing process over.
Tray 5 — Wash aid (hypo clear), toner, archival treatment. Supports specific permanence or aesthetic goals. Use only with product-specific ventilation, PPE, timing, and washing instructions. 2 minutes with agitation for both RC and Fiber paper.
Tray 6 — Wash tray. Fresh water removes residual chemistry. If the tray is only a holding bath, finish with the paper manufacturer’s prescribed wash before drying. 5-10 minutes after all printing is finished. 1 hour in archival print washer. If you see brown stains on your print that means you print was not fully washed.
Processing times are product-specific. A common tray sequence may look similar from one brand to another, but dilution, time, capacity, and washing instructions can differ. Print the current data sheets for your exact developer, fixer, and paper and keep them in the darkroom.
Choose RC or fiber paper
Both are real silver-gelatin black-and-white photographic papers. The difference is primarily the base construction and how water and chemistry move through it.
Paper construction. Both types have a light-sensitive silver-gelatin emulsion. The base determines much of the difference in washing and drying. Simplified from ILFORD’s photographic paper guidance.
| Feature | RC — resin coated | FB — fiber based |
| Construction | Paper core sealed between polyethylene layers, then coated with emulsion | High-quality paper-fiber base with a baryta layer and photographic emulsion |
| Best beginner use | Contact sheets, work prints, classroom exercises, fast finished prints | Fine-art exhibition prints and processes where the fiber base is preferred |
| Processing and washing | Faster; the paper core does not become saturated in normal processing | Longer; chemistry must be removed from the fiber base |
| Drying | Usually dries quickly and relatively flat | Tends to curl and wrinkle; needs careful drying and flattening |
| Handling | More forgiving when wet | More delicate, heavy, and easily creased when wet |
| Surface character | Clean, consistent, convenient | Often chosen for a richer paper feel and traditional fine-art presentation |
| Permanence | Can be highly durable when processed and stored correctly | Often preferred when maximum long-term archival confidence is the priority |
| Cost and time | Lower total labor and water use | Higher material cost, water/time use, and finishing labor |
Beginner recommendation. Start with variable-contrast RC paper. It lets you learn contact sheets, test strips, contrast filters, exposure, dodging, and burning with less washing and drying difficulty. Move to fiber paper after you can make repeatable RC prints. Ilford Brand paper is your best bet.
Equipment
| Film processing | Printing | Room + safety |
| Changing bag-B+H Link | 35mm or medium-format enlarger (I would look for a used Omega enlarger) | Opaque window panel.Black out cloth |
| Daylight tank and reels-B+H Link | Enlarging lens and negative carrier(Look for Used) | Weatherstripping / door draft block |
| Thermometer and timer | Timer and grain focuser | Paper-compatible safelight |
| Graduates and storage bottles | Easel and contrast filters | Outdoor-venting exhaust |
| Film clips(Clothes Pins) and scissors | Four trays plus dedicated tongs | Nitrile gloves, splash goggles, apron |
| Developer, stop, fixer, wetting agent | RC paper and paper chemistry. Dektol, Stop Bath, Fixer, Hypo Check | Spill tray, labels, waste containers |
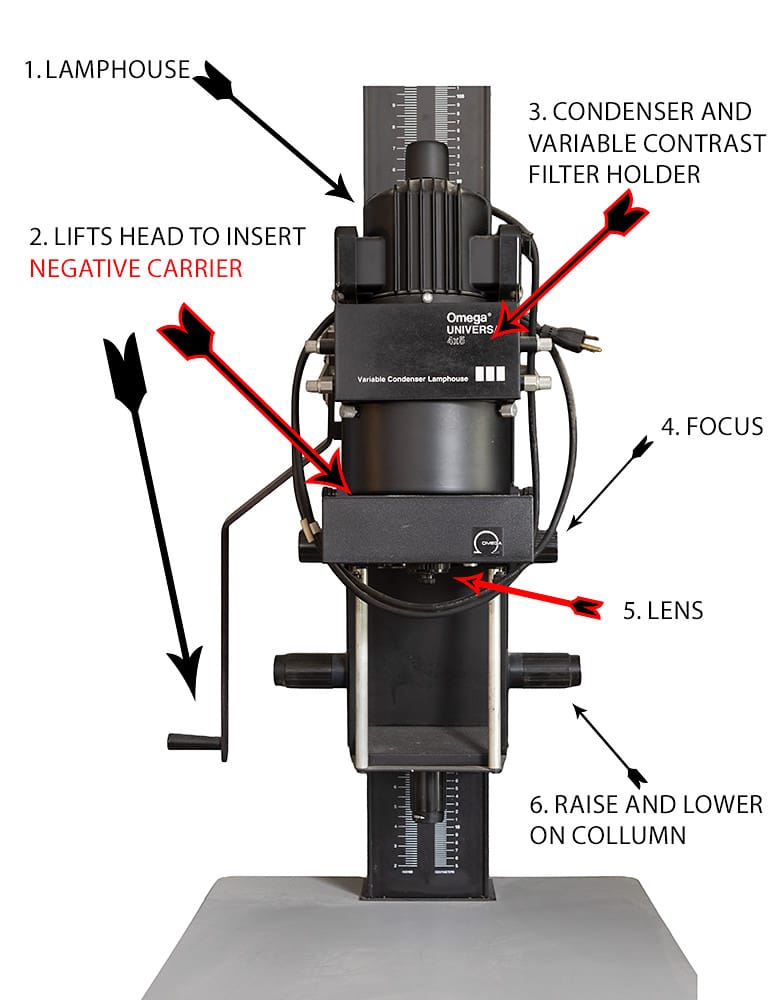
Additional equipment for a permanent room
Darkroom sink or full-length wet bench. I built my first darkroom sink with plywood and sealed it to be waterproof.
Thermostatic mixing valve(Not really needed, or an accurate dial thermometer
Sediment filter housing with bypass and pressure-rated plumbing, if needed (search on Amazon)
Purpose-designed exhaust pickup, duct, exterior termination, and light baffle
RC Print washer or Archival Print washer for Fiber Paper (look for a used one) I am not sure if any makes them.
Drying screens, blotters, print flattening method, and clean negative-drying cabinet or enclosure. You can make them with window screen material from Lowes or HomeDepot.
Lockable chemical cabinet and secondary containment. Nice but not needed.
Archival print storage boxes and negative sleeves
Test the room before opening paper
White light leak test
Close the room exactly as it will be used, including the exhaust system.
Turn off room lights and safelights. Wait at least five minutes for your eyes to adapt.
Inspect door edges, windows, vents, plumbing penetrations, switch plates, and the enlarger area.
Correct leaks and repeat. Also test after sunset and during bright daylight; conditions differ.
Safelight fog test
Use the paper manufacturer’s safelight test, not a judgment based on how dim the room looks. First find an enlarger exposure that produces pale gray. In darkness, expose one half of a test sheet; cover sections while exposing it to the safelight for increasing periods. Then, with the safelight off, give the other half the same enlarger exposure. Process in darkness and compare the steps. A change within your normal working time means the safelight arrangement needs correction.
Safelight rule. The paper data sheet—not the color you prefer—determines the correct safelight. Panchromatic film is not safe under a paper safelight and must be loaded in complete darkness.
1. Prepare everything in white light. Mix chemistry, label trays, set the temperature, start ventilation, clean the enlarger, and place tools where you can find them.
2. Turn off white light. Wait briefly and confirm the room is operating normally under the tested safelight.
3. Make a contact sheet. Place negatives emulsion-side down(matte side) against the emulsion side of the paper, expose, and process fully. Use it to select a contact print frame.
4. Focus and compose. Clean the negative with an anti-static cloth, Insert the negative, set the image size, focus with the lens wide open with a grain focuser(not they are hard to get used too), then stop down two or three stops(F-5.6 or F-8 for a manageable exposure. 7-15 seconds.
5. Make a test strip. Expose different sections in equal increments. Process the entire strip for the full standard time. A test strip can be a full sheet of paper or paper cut into thirds long ways.
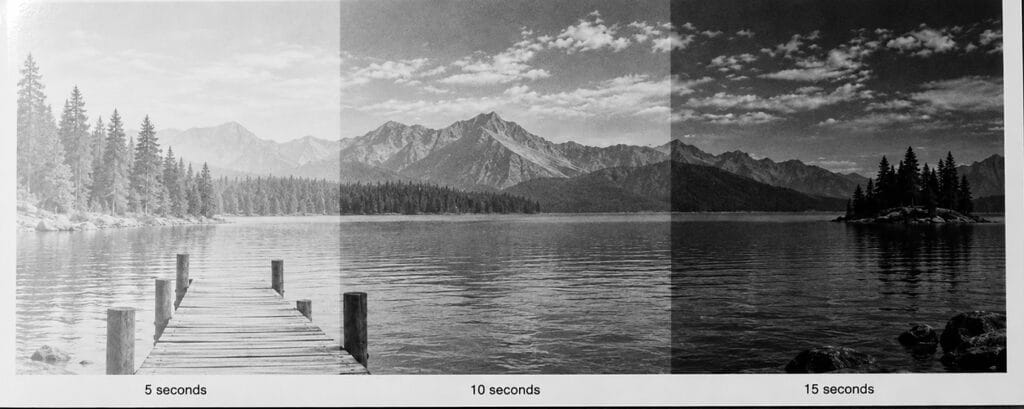
6. Choose exposure and contrast. Evaluate under neutral white viewing light after adequate fixing; safelight viewing can mislead you.
7. Make a work print. Record enlarger height, lens aperture, filter grade, base exposure, and any dodging or burning.
8. Wash and dry correctly. Follow the exact paper data sheet. Keep RC and fiber workflows separate when their wash and drying requirements differ.
Troubleshoot common problems
| Problem | Likely cause | Correction |
| Gray paper borders | White-light leak, safelight fog, old paper, or paper left out too long | Run light-leak and safelight tests; keep paper in its light-tight package |
| Flat, muddy prints | Weak negative, wrong contrast filter, fog, exhausted chemistry, or stray light | Check negative, chemistry, filter, enlarger leaks, and safelight |
| Uneven development | Too little solution, delayed immersion, weak agitation, or tray too small | Use enough fresh solution and immerse smoothly with consistent agitation |
| Film drying spots | Hard water, incorrect wetting-agent dilution, contaminated final rinse, or dusty drying area | Use accurately mixed wetting agent and distilled/DI final rinse if needed |
| Chemical stains / poor permanence | Exhausted fixer, overused fixer, inadequate washing, or cross-contamination | Track capacity, use dedicated tools, and follow the product sequence |
| Strong odor or irritation | Inadequate source exhaust, open bottles, spills, or unsuitable chemistry | Stop work, leave, ventilate, review SDS, clean spills safely, and improve controls |
Clean up after every session
Return reusable chemistry only to its correctly labeled storage bottle; never pour tray leftovers into concentrate. Dektol, Stop Bath and Fixers are reusable.
Place exhausted fixer and other collected waste in separate labeled containers.
Rinse trays, graduates, reels, tank, and tongs thoroughly; clean spills according to the SDS.
Dry equipment before storage and return paper to its light-tight inner bag and box.
Wipe the dry side with a clean damp cloth; do not create airborne dust.
Run exhaust long enough to clear the room, then close all chemical bottles and shut utilities down safely.
Record film, paper, chemistry, dilutions, temperatures, times, and results for the next session.
Darkroom safety
Darkroom safety. No food or drink. Wear appropriate nitrile gloves, splash protection, and an apron when mixing or handling chemistry. Read the label and Safety Data Sheet before use. Never store chemicals in beverage containers. Label every bottle. Keep children and pets out. Wash hands after the session. Never mix chemical wastes. Provide outdoor exhaust and clean makeup air. Stop immediately if you feel unwell.
A practical order of purchase
| Stage | Buy first | Add later |
| 1. Film only | Changing bag, tank/reels, graduates, thermometer, timer, film chemistry, clips. If your room is light tight you do not need a changing bag (But turn off red or amber safelight) | More tanks, larger graduates, archival sleeves, filtered final-rinse water |
| 2. Temporary printing | Enlarger kit, stable table, trays/tongs, safelight, blackout materials, exhaust, RC paper chemistry | Grain focuser, better easel, paper safe, print washer |
| 3. Permanent darkroom | Wet bench, proper ducted exhaust, controlled water, code-compliant electrical, storage | Fiber washer, drying screens, larger enlarger, archival finishing tools |

John Whitehead
Leave a Reply