Mastering Astrophotography Edits: Non-Destructive Layers, Blending Modes, and Masks
Mastering Astrophotography Edits: Non-Destructive Layers, Blending Modes, and Masks
Whether you’re working on astrophotography edits, infrared images, or other layered compositions, Photoshop offers powerful tools for creative control. In this guide, we’ll walk through essential techniques: loading files into a stack, using non-destructive layers, blending modes, masks, and colorizing layers with Hue/Saturation and clipping masks.
Step 1: Load Files into a Stack
Starting with multiple images? Stack them in one file for efficient editing:
Open Photoshop and go to File > Scripts > Load Files into Stack.
In the dialog box, select Browse, and choose the images to stack.
Optionally, check Attempt to Automatically Align Source Images for aligned layers.
Click OK, and Photoshop will create a single document with each image on a separate layer.
Step 2: Use Non-Destructive Layers
Non-destructive workflows let you edit freely without permanently altering your original images:
Duplicate Layers: Right-click a layer and choose Duplicate Layer to work on a copy.
Adjustment Layers: Use Layer > New Adjustment Layer to apply changes like exposure or color grading. Adjustment layers are editable at any time.
Step 3: Enhance with Blending Modes
Blending modes allow layers to interact visually, creating striking effects:
Select a layer and go to the Layers Panel.
Use blending modes like:
Screen: Brightens and enhances lighter details, perfect for stars in astrophotography.
Lighten: Retains the brightest pixels between layers, ideal for blending images with highlights.
Step 4: Create and Use Layer Masks
Layer masks offer precision control over visibility:
Click the Add Layer Mask icon at the bottom of the Layers Panel.
Use a black brush to conceal parts of the layer and a white brush to reveal them.
For subtle transitions, reduce brush opacity or hardness.
Step 5: Colorize Layers with Hue/Saturation
Transform grayscale or infrared layers with vibrant color using the Hue/Saturation tool:
Add a Hue/Saturation Adjustment Layer:
Go to Layer > New Adjustment Layer > Hue/Saturation.
In the Properties Panel, check Colorize to apply a uniform color across the layer.
Adjust:
Hue: Select the base color.
Saturation: Control intensity.
Lightness: Adjust brightness.
Step 6: Apply Clipping Masks for Targeted Adjustments
Clipping masks link adjustments to specific layers, ensuring precise control:
Add an Adjustment Layer (e.g., Hue/Saturation) above the target layer.
Right-click the adjustment layer and select Create Clipping Mask.
The adjustment now affects only the layer directly beneath it.
Combine with masks for even finer control.
Step 7: Refine the Composition
To finalize your image, stack techniques:
Stacked Blending: Combine blending modes with masks for dramatic effects.
Selective Coloring: Use multiple Hue/Saturation layers and clipping masks for diverse color ranges.
Final Grading: Apply curves or levels for contrast and brightness.
Conclusion
Photoshop’s tools for stacking, blending, masking, and colorizing offer infinite creative possibilities. By mastering these techniques, you can transform raw files into visually compelling images that stand out. Whether you’re editing astrophotography, infrared images, or composites, this workflow ensures precision and flexibility.
Experiment, create, and let your imagination guide your edits!
Understanding StarNet
StarNet is a software application developed by Nikita Misiura, designed to remove stars from astrophotography images, leaving only the background nebulae and galaxies. This feature is particularly beneficial for enhancing the visibility of faint deep-sky objects without the distraction of stars.
Terminal on a Mac

I am not a programmer. I got this information from this YouTube tutorial. It worked for me, but it was difficult to follow.
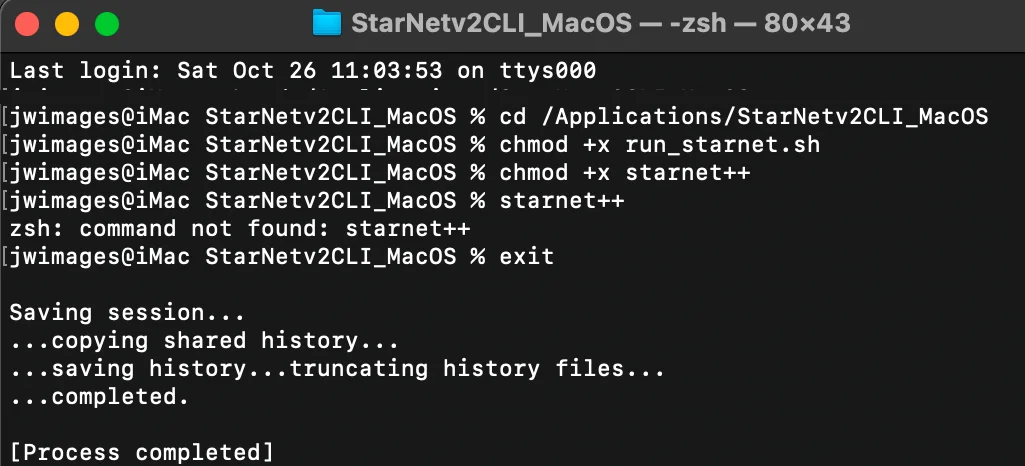
- Open Terminal on a Mac.
- Type cd, space and Drag the StarNetv2CLI_Mac OS folder into terminal and hit return
- Type chmod +x run_starnet.sh and hit return
- Type chmod +x starnett++ and hit return
- Type exit and hit return.
- Move to Security on right.
System Settings

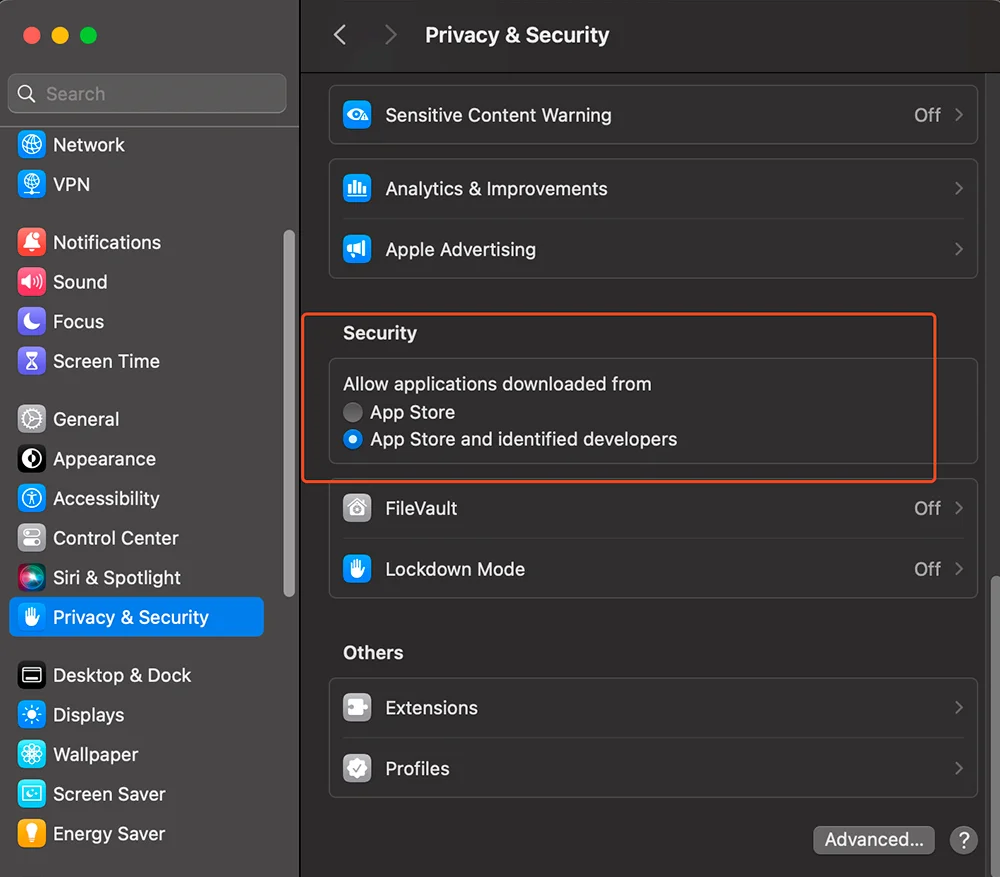
- Goto Privacy an Security
- Under Security on you will see starnet++, you need to allow it to be opened because it is a third party application. You will need to enter your password. This should allow you to install the folder.
- Mine gave me another error, and I had to return to this location and allow on the. lib files in the main folder.
- It worked after that.
There are two primary versions of StarNet:
- StarNet++: The original version, released under a free and open-source license.
- StarNet v2: A more recent release that has become proprietary, though it remains free to use. This version offers improved performance, especially with dense star fields and wide-field images. Cloudy Nights
Integrating StarNet with Siril
Siril is an open-source astrophotography processing software that, starting from version 1.2.0, integrates StarNet’s functionalities. This integration allows users to perform star removal and recomposition directly within Siril’s environment.
Setting Up StarNet in Siril:
- Download StarNet: Obtain the command-line version of StarNet from the official website.
- Install StarNet: Extract the downloaded files to a convenient directory on your computer.
- Configure Siril:
- Open Siril.
- Navigate to Preferences > Miscellaneous.
- Under Software Location (starnet), set the path to the directory containing the StarNet executable. Mad Scientist Guy
Using StarNet within Siril:
- Star Removal: With your image open in Siril, go to Processing > Star Processing > StarNet Star Removal. This will create a starless version of your image, facilitating the enhancement of nebulosity and other deep-sky features.
- Star Recomposition: After processing the starless image, you can recombine it with the original stars using Processing > Star Processing > Star Recomposition. This allows for a balanced final image that highlights both the deep-sky object and the surrounding stars. Siril
By integrating StarNet with Siril, astrophotographers can streamline their workflow, efficiently removing stars to focus on deep-sky objects and seamlessly recombining images for stunning results.
For a visual guide on integrating StarNet with Siril, you might find the following tutorial helpful:
Cherry Springs State Park
Cherry Springs State Park in Pennsylvania is renowned for its exceptionally dark skies, making it one of the top stargazing spots in the eastern United States. Located in Potter County, this 82-acre park sits at an elevation of 2,300 feet on the Allegheny Plateau, away from urban light pollution. The park’s Dark Sky Preserve designation attracts amateur astronomers and astrophotographers, as well as visitors eager to see the Milky Way and other celestial sights with remarkable clarity.
The park has specialized stargazing fields equipped with benches, shaded areas, and dedicated observing spots that include power outlets for telescope setups. Cherry Springs State Park hosts astronomy events and provides resources for stargazing, with prime viewing periods from spring through fall. In addition to stargazing, the park also offers hiking, camping, and picnic areas, making it a year-round destination for nature lovers.
I hope you enjoy this tutorial on how to apply Siril & Photoshop to your astrophotoraphy images.


