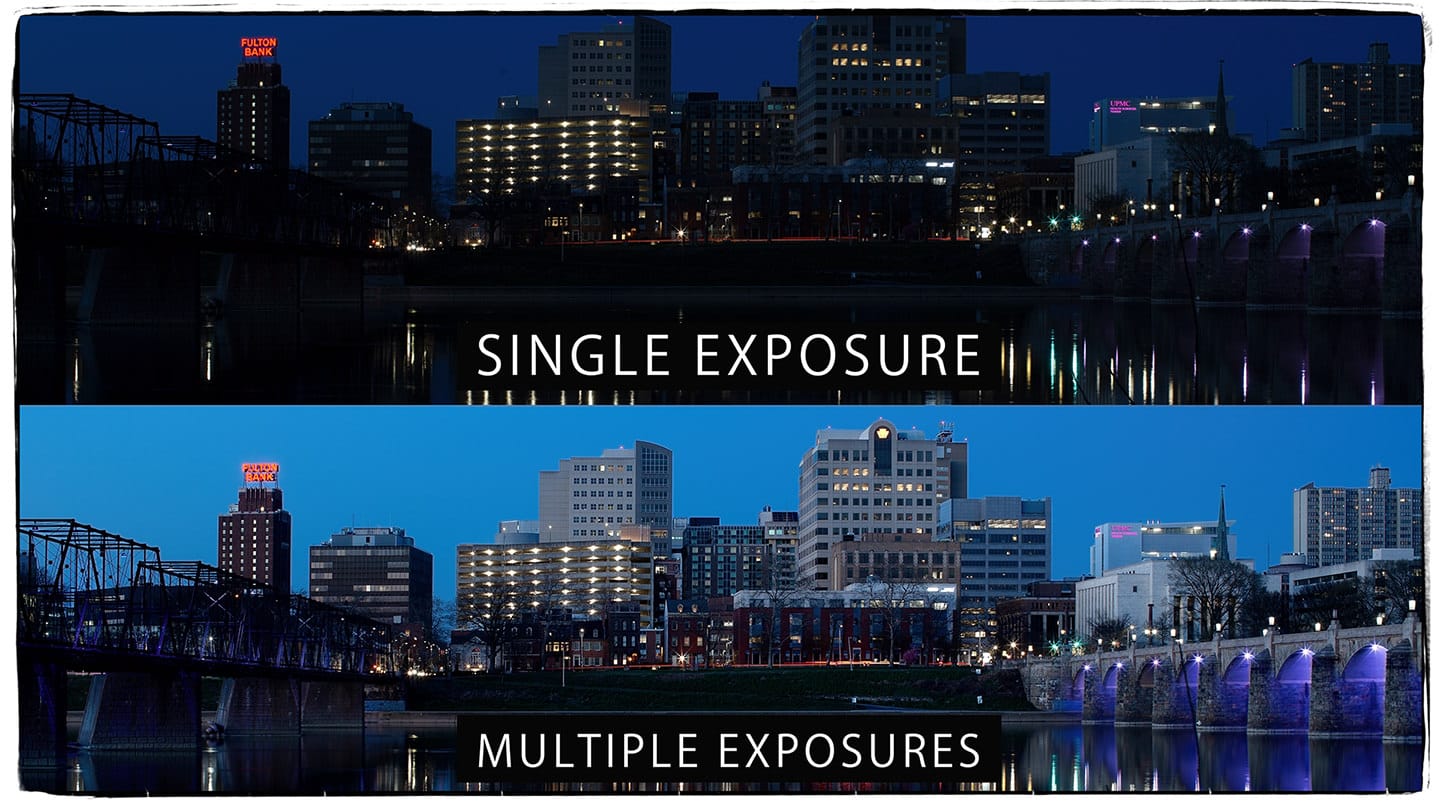
Cityscape Photography Over Time: Blending Light and Time with the Lighten Mode
How to Boost Dynamic Range with Multiple Exposures Over Time. Capturing the soul of a city in a single photo is nearly impossible — because the city is always changing. From golden hour glow to neon-lit night, the urban landscape transforms dramatically. But what if you could capture that entire transformation in one striking image?
In this tutorial, we’ll explore how to photograph a cityscape over time and use stacked images with Photoshop’s Lighten blending mode to seamlessly blend shifting light, color temperature, and dynamic range. No HDR. No tone mapping. Just simple stacking and creative blending.
🔧 What You’ll Need
- A DSLR or mirrorless camera
- A sturdy tripod (absolutely essential)
- Remote shutter or interval timer
- Adobe Photoshop
- Optional: Lightroom or Adobe Bridge for file organization
📍 Step 1: Find the Scene & Set the Stage
Choose a static composition with visual interest across the frame — city skylines, iconic buildings, traffic-heavy intersections, or rooftops with sky access are perfect.
Plan to shoot during a period of light transition, such as:
- Golden hour → Blue hour
- Dusk → Night
- Late afternoon → Twilight
Lock your camera on a tripod, set your focus manually, and disable image stabilization.
📸 Step 2: Capture a Time Stack
Take a series of shots at intervals over time (e.g., one photo every 5 minutes for an hour). You’ll capture:
- Shifts in natural light
- Transitioning sky color
- Buildings lighting up
- Traffic trails (if timed right)
Each image captures a different moment in the scene’s evolution.
Optional: Manually adjust white balance and exposure slightly as the light changes, or shoot in RAW and adjust later.
🗂 Step 3: Organize and Select Your Frames
Once imported into Lightroom or Bridge:
- Choose 5–10 images that best represent key transitions (warm light, cool shadows, artificial lights turning on, etc.).
- Export to Photoshop as layers (
Photo > Edit In > Open as Layers in Photoshop).
🖥 Step 4: Blend Using Lighten Mode
Now the magic begins.
- Stack Layers
Select File/Load Files into Stack. Select add open files, and tick auto align images. Click OK. - Adjust Order
Arrange your layers from earliest (bottom) to latest (top) based on time captured. - Set Blending Mode to Lighten
For every layer above the base layer, change the blending mode to Lighten.
What happens?
Photoshop compares each pixel of the current layer with the one below it and keeps the brighter pixel. This allows brighter parts of later photos (like windows turning on or sky colors deepening) to blend naturally into the scene.
🧠 Why Lighten Mode Rocks for This
- No masking required: Bright elements blend in automatically.
- Easily handles mixed white balance: Warm street lights and cool skies blend without color shift issues.
- Greater control: Choose which elements appear from each moment in time.
- No HDR artifacts: No unnatural halos or crunchiness.
🎨 Optional Enhancements
- Layer Masks: Add black masks to top layers and manually brush in only the areas you want (like turning on specific lights or traffic).
- Adjustment Layers: Use Curves or Color Balance to subtly shift tones for mood and consistency.
- Sharpening & Noise Reduction: Stack blending can increase noise — a light pass of noise reduction can clean things up.
🧪 Advanced Tip: Time Slice or Gradual Transitions
Want to blend time even more dramatically?
- Add gradient masks to each layer to gradually reveal light transitions (e.g., left side is early golden hour, right side is night).
- Use diagonal or radial masks for a more artistic blend of time across the frame.
This creates a surreal but stunning “day to night” or “golden to neon” look that’s become a favorite of cityscape artists.
🖼 Final Image: A Story in Layers
The final result? A high-impact image showing a city’s personality over time — warm light, neon signs, dynamic skies, glowing windows — all blended into one seamless shot.
🚀 Wrap-Up
This technique is a creative, non-HDR method of expanding your cityscape photography into the fourth dimension — time. With just a tripod, a little patience, and the Lighten blend mode, you can craft images that feel both cinematic and authentic.
Try it on your next urban shoot — and let the city tell its full story.
Want a step-by-step video breakdown or downloadable PSD example? Let me know in the comments!
Or tag me in your results — I’d love to see how you blend the city with time.


