Mastering Milky Way Editing: Single Image Workflow in SiriL & Photoshop
SiriL & Photoshop: The Astrophotography Tools You Need
Introduction
Mastering Milky Way Editing: Single Image Workflow in SiriL & Photoshop. Astrophotography is a unique blend of science and art. Capturing the beauty of celestial objects requires a blend of patience, technical skill, and sometimes a touch of post-processing magic to reveal all the details in your starry captures. One of the tools that have made waves in the astrophotography community recently is SiriL—an open-source software designed to help both beginners and experts achieve high-quality astro images.
What is SiriL?
SiriL (short for “SIrius Rendering Interface Library”) is specialized software for astrophotographic processing. Created by developers who are passionate about both astrophotography and open-source technology, SiriL is a free, cross-platform tool available for Windows, macOS, and Linux. Its primary goal is to provide a suite of features that makes it easier to pre-process and process astronomical images, unveiling the vibrant colors and details of the night sky with minimal noise and maximal detail.
Key Features of SiriL
1. Pre-Processing
- Stacking: SiriL’s stacking capabilities combine multiple images of the same scene, which increases signal-to-noise ratio and reduces grainy noise. This is essential in astrophotography because it allows the details of faint stars and celestial objects to emerge with clarity.
- Calibration Frames: SiriL supports the use of calibration frames—darks, flats, and bias frames—to help reduce imperfections and even out the lighting in the final image. Calibration frames are a key step in creating balanced astrophotography shots.
- Registration (Alignment): Star alignment is crucial when stacking multiple frames. SiriL includes automatic star registration tools that allow for precise alignment of stars from frame to frame, even in images that may have slightly shifted due to tracking errors or other factors.
2. Post-Processing
- Histogram Adjustments: Adjusting the histogram in SiriL can help pull out details from the shadows and mid-tones, giving depth to the image and making faint stars more visible.
- Color Calibration and Balance: SiriL has powerful color calibration tools that can make colors appear more natural or help accentuate certain color ranges to match the user’s vision.
- Background Extraction: Light pollution and other factors can add unwanted brightness to the background. SiriL has an excellent background extraction tool that helps users eliminate unwanted gradients and create a smooth backdrop, making stars and nebulae stand out.
3. Automation and Scripting
For advanced users, SiriL offers a scripting capability that allows you to automate repetitive tasks. This can save a lot of time, especially for those who work with large datasets of astrophotography images.
4. User-Friendly Interface
While other professional astrophotography software options might be complex and expensive, SiriL is designed to be relatively user-friendly while still offering advanced features. Its layout is intuitive, with dedicated modules for each stage of the workflow. The developers also offer tutorials and community forums where users can get help and share tips.
How to Get Started with SiriL
- Download and Install: Head over to the SiriL website to download the latest version for your operating system.
- Capture Your Images: Before processing, gather a series of images of your subject along with calibration frames.
- Load and Process: Use SiriL’s pre-processing tools for calibration, alignment, and stacking.
- Fine-Tune with Post-Processing: Adjust histograms, calibrate colors, and use background extraction to perfect the final image.
- Export and Share: Once you’re happy with your final product, you can export it in various formats for sharing or further editing.
Conclusion
Whether you’re a novice just starting out in astrophotography or a seasoned enthusiast, SiriL offers a powerful, cost-effective, and user-friendly solution for processing images of the night sky. With a variety of features that range from stacking and alignment to advanced color calibration and noise reduction, SiriL can help bring out the celestial wonders in every photo. Best of all, it’s completely free, making it an invaluable tool for astrophotographers at any level.
If you haven’t tried it yet, download SiriL and give it a go on your next astrophotography session!
Integrating StarNet with Siril & Photoshop for Enhanced Astrophotography Processing
In the realm of astrophotography, the integration of StarNet with SiriL & Photoshop have provided enthusiasts with powerful tools to refine their celestial images. Let’s delve into what StarNet is and how it functions within Siril.
Understanding StarNet
StarNet is a software application developed by Nikita Misiura, designed to remove stars from astrophotography images, leaving only the background nebulae and galaxies. This feature is particularly beneficial for enhancing the visibility of faint deep-sky objects without the distraction of stars.
Terminal on a Mac

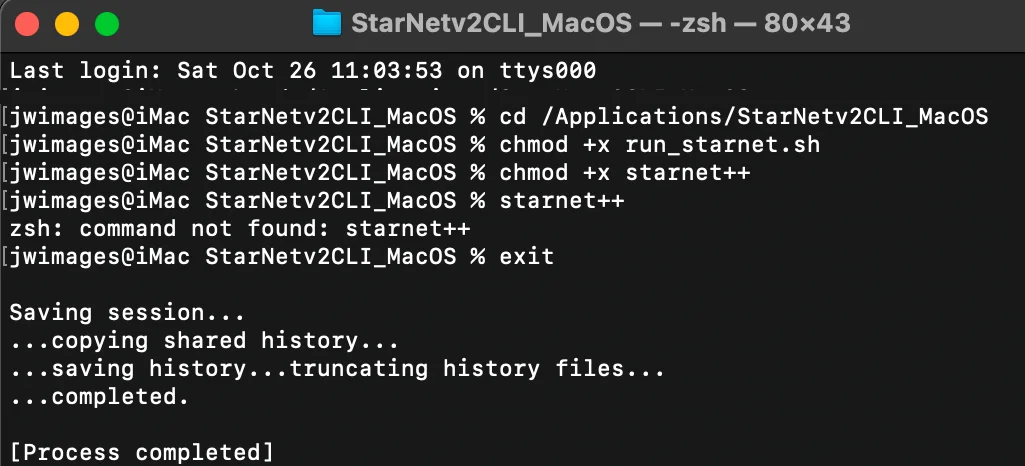
I am not a programmer. I got this information from this YouTube tutorial. It worked for me, but it was difficult to follow.
- Open Terminal on a Mac.
- Type cd, space and Drag the StarNetv2CLI_Mac OS folder into terminal and hit return
- Type chmod +x run_starnet.sh and hit return
- Type chmod +x starnett++ and hit return
- Type exit and hit return.
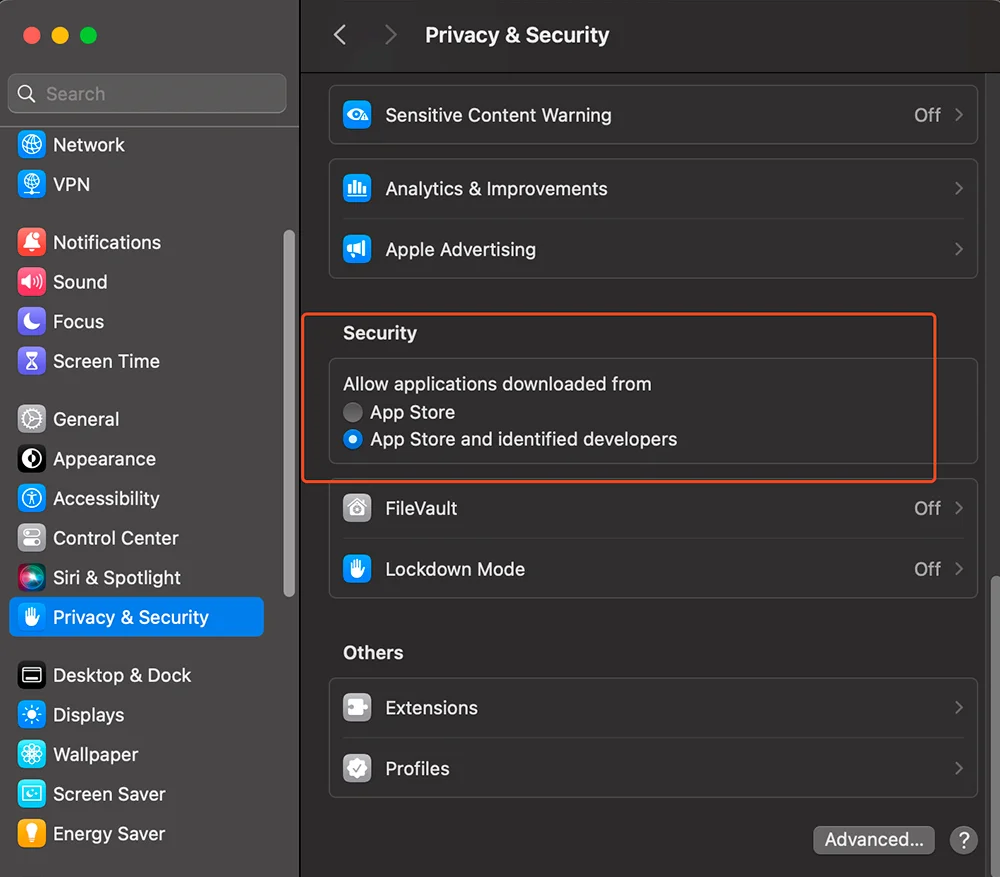
- Move to Security on right.
System Settings

- Goto Privacy an Security
- Under Security on you will see starnet++, you need to allow it to be opened because it is a third party application. You will need to enter your password. This should allow you to install the folder.
- Mine gave me another error, and I had to return to this location and allow on the. lib files in the main folder.
- It worked after that.
There are two primary versions of StarNet:
- StarNet++: The original version, released under a free and open-source license.
- StarNet v2: A more recent release that has become proprietary, though it remains free to use. This version offers improved performance, especially with dense star fields and wide-field images. Cloudy Nights
Integrating StarNet with Siril
Siril is an open-source astrophotography processing software that, starting from version 1.2.0, integrates StarNet’s functionalities. This integration allows users to perform star removal and recomposition directly within Siril’s environment.
Setting Up StarNet in Siril:
- Download StarNet: Obtain the command-line version of StarNet from the official website.
- Install StarNet: Extract the downloaded files to a convenient directory on your computer.
- Configure Siril:
- Open Siril.
- Navigate to Preferences > Miscellaneous.
- Under Software Location (starnet), set the path to the directory containing the StarNet executable. Mad Scientist Guy
Using StarNet within Siril:
- Star Removal: With your image open in Siril, go to Processing > Star Processing > StarNet Star Removal. This will create a starless version of your image, facilitating the enhancement of nebulosity and other deep-sky features.
- Star Recomposition: After processing the starless image, you can recombine it with the original stars using Processing > Star Processing > Star Recomposition. This allows for a balanced final image that highlights both the deep-sky object and the surrounding stars. Siril
By integrating StarNet with Siril, astrophotographers can streamline their workflow, efficiently removing stars to focus on deep-sky objects and seamlessly recombining images for stunning results.
For a visual guide on integrating StarNet with Siril, you might find the following tutorial helpful:
What is the 500 Rule?
The 500 Rule is a simple guideline for astrophotography that helps photographers capture sharp, star-filled skies without noticeable star trails. It’s especially useful when you’re shooting the night sky with a standard DSLR or mirrorless camera on a tripod, without a star tracker.
The 500 Rule states:
Shutter Speed=500/Focal Length
This means that to avoid star trails, you should set your camera’s shutter speed to 500 divided by the focal length of your lens. The resulting number is the maximum number of seconds you should expose your shot to keep the stars looking like points of light rather than streaks.
How to Use the 500 Rule
- Set the Focal Length: Choose the focal length of your lens. (For example, a 24mm lens.)
- Divide by 500: Use the formula to calculate your maximum shutter speed:
Max Shutter Speed=500/24=21 - Adjust and Shoot: Set your shutter speed to 21 seconds or shorter to keep the stars sharp.
Adjusting for Crop-Sensor Cameras
If you’re using a crop-sensor camera (APS-C or micro four-thirds), you’ll need to factor in your camera’s crop factor. The modified formula is:
Shutter Speed=500/Focal Length X Crop Factor
For instance, on an APS-C camera with a 1.5x crop factor, using a 24mm lens:
Shutter Speed = 500/24 times 1.5 = 14 seconds
Limitations of the 500 Rule
While the 500 Rule is useful, it isn’t perfect. It’s based on general observations and doesn’t account for variables like sensor size, pixel density, or the direction you’re shooting in (star movement varies based on proximity to the celestial equator). For more precise results, some photographers use the NPF Rule, which considers sensor and pixel size, focal length, and aperture, often calculated with apps.
In Summary
The 500 Rule is a great starting point for beginner astrophotographers aiming to capture clear, crisp stars without trails, especially when shooting wide fields.
Cherry Springs State Park
Cherry Springs State Park in Pennsylvania is renowned for its exceptionally dark skies, making it one of the top stargazing spots in the eastern United States. Located in Potter County, this 82-acre park sits at an elevation of 2,300 feet on the Allegheny Plateau, away from urban light pollution. The park’s Dark Sky Preserve designation attracts amateur astronomers and astrophotographers, as well as visitors eager to see the Milky Way and other celestial sights with remarkable clarity.
The park has specialized stargazing fields equipped with benches, shaded areas, and dedicated observing spots that include power outlets for telescope setups. Cherry Springs State Park hosts astronomy events and provides resources for stargazing, with prime viewing periods from spring through fall. In addition to stargazing, the park also offers hiking, camping, and picnic areas, making it a year-round destination for nature lovers.
I hope you enjoy this tutorial on how to apply Siril & Photoshop to your astrophotoraphy images.


