Lightroom Classic to Photoshop: Lightroom Crop, Remove, and Red Eye Tools
Mastering the Crop, Remove, and Red Eye Tools in Adobe Lightroom Classic
Adobe Lightroom Classic includes powerful yet easy-to-use tools that help photographers refine composition, remove distractions, and correct common problems without ever leaving the Develop module. In this guide, we’ll take a deep dive into three essential tools every photographer should master:
- The Crop Tool – for composition and straightening
- The Remove Tool – for cleaning up distractions
- The Red Eye Tool – for correcting flash-related eye issues
These tools are often used early in the editing workflow and can dramatically improve the quality and professionalism of your images.
The Crop Tool in Lightroom Classic
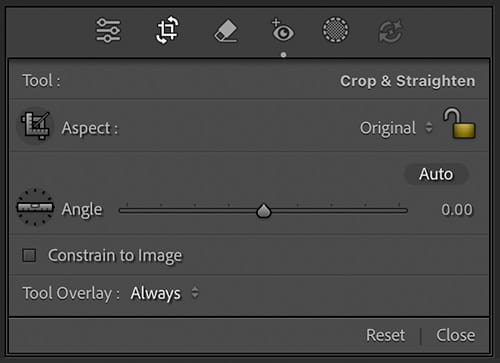
The Crop Tool is one of the most fundamental tools in Lightroom Classic. It allows you to improve composition, fix crooked horizons, and prepare images for specific output sizes.
Accessing the Crop Tool
You can access the Crop Tool in two ways:

- Press R on your keyboard
- Click the Crop Overlay icon in the Develop module toolbar
Once activated, a crop box appears over your image.
Aspect Ratios and Cropping for Output
Lightroom Classic provides several preset aspect ratios, including:
- Original
- 1:1 (Square)
- 4:5 (Popular for portraits and social media)
- 16:9 (Widescreen)
- Custom ratios
You can choose an aspect ratio from the drop-down menu or create your own by entering custom values. Locking the aspect ratio ensures the image maintains consistent proportions when cropping.
Freeform Cropping
If the aspect ratio is unlocked, you can drag any side or corner of the crop box freely. This is useful when you want full creative control over composition.
Straightening Images
The Crop Tool includes a Straighten Tool, perfect for:
- Crooked horizons
- Tilted architecture
- Slightly misaligned compositions
Select the straighten tool, then click and drag along a line that should be level (such as a horizon or building edge). Lightroom automatically rotates and crops the image.
Composition Overlays
To help with composition, Lightroom offers several crop overlays, including:
- Rule of Thirds
- Golden Ratio
- Golden Spiral
- Diagonal
- Grid
Press O to cycle through overlays and Shift + O to rotate them. These overlays help guide subject placement and balance within the frame.
Non-Destructive Editing
Cropping in Lightroom Classic is completely non-destructive. You can always revisit the Crop Tool and adjust or reset the crop without losing image data.
The Remove Tool in Lightroom Classic
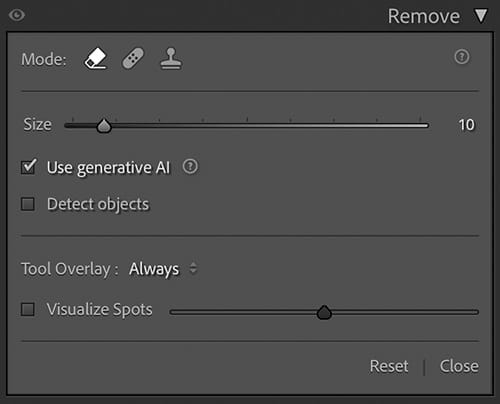
The Remove Tool is used to eliminate unwanted elements such as dust spots, sensor spots, blemishes, or small distractions.
Accessing the Remove Tool
You can access the Remove Tool by:

- Pressing Q on your keyboard
- Clicking the Remove icon in the Develop module
Remove Tool Modes
Lightroom Classic offers multiple remove modes depending on your version:
Heal
- Blends texture and color from the sampled area
- Best for skin blemishes and organic textures
Clone
- Copies pixels exactly from the sampled area
- Best for edges, patterns, or structured elements
Content-Aware Remove (Newer Versions)
- Uses AI to intelligently fill in removed areas
- Excellent for more complex distractions
Brush Size, Feather, and Opacity
You can refine your removal work using:
- Size – Adjusts the brush diameter
- Feather – Controls edge softness
- Opacity – Determines how strongly the correction is applied
Use the bracket keys [ ] to quickly resize the brush.
Visualize Spots
The Visualize Spots option is extremely helpful for:
- Finding sensor dust
- Identifying subtle imperfections
It displays a high-contrast view of the image, making spots easier to see. This is especially useful for skies and studio backgrounds.
Best Practices for the Remove Tool
- Zoom in for precision work
- Use Heal for natural textures and Clone for hard edges
- Keep removal subtle to avoid noticeable edits
The Red Eye Tool in Lightroom Classic
The Red Eye Tool is designed to fix red-eye issues caused by on-camera flash reflecting off the retina.
Accessing the Red Eye Tool

The Red Eye Tool is located within the Remove Tool panel. Once selected, your cursor changes to a crosshair.
How to Use the Red Eye Tool
- Zoom into the subject’s eyes
- Click and drag a small box around the red pupil
- Lightroom automatically detects and corrects the red eye
Pet Eye Correction
Lightroom Classic also includes a Pet Eye option, designed to correct green or yellow eye reflections commonly seen in animals.
Simply check the Pet Eye option before applying the correction.
Adjusting Red Eye Settings
You can fine-tune the correction using:
- Pupil Size – Adjusts the correction area
- Darken – Controls how dark the pupil becomes
The goal is to create a natural-looking eye without making it appear flat or unnatural.
Recommended Workflow Order
For best results, consider using these tools in the following order:
- Crop Tool – Establish composition and framing
- Remove Tool – Clean up distractions and imperfections
- Red Eye Tool – Final corrections for portraits and flash images
Using this sequence ensures that you don’t waste time removing areas that may later be cropped out.
Final Thoughts
The Crop Tool, Remove Tool, and Red Eye Tool are essential building blocks of an efficient Lightroom Classic workflow. Mastering these tools allows you to:
- Improve composition
- Eliminate distractions
- Fix common portrait issues quickly
Because Lightroom Classic is non-destructive, you’re free to experiment, refine, and revisit your edits at any time. With consistent practice, these tools will become second nature and significantly elevate your photo editing results.


