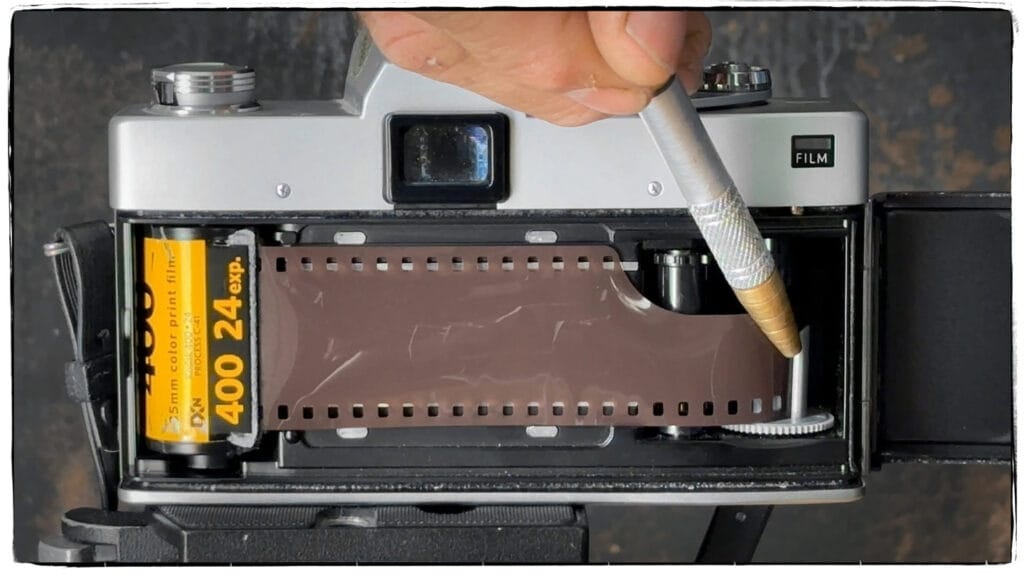
A multiple exposure records two or more photographs on the same frame of film. It can combine a portrait with a woodland, place translucent flowers over a building, or show one subject in several positions. The result begins with a mechanical task: cock the shutter again while keeping the same piece of film behind the lens. The creative task is deciding where each exposure will contribute light.
Some cameras provide a dedicated multiple-exposure control. The Nikon F4 is one example. With certain manual-wind cameras, you can instead use the rewind-release button while holding the rewind crank stationary and operating the advance lever. These are different procedures, and neither should be applied blindly to another camera.
First understand what the film records
Exposure adds. The second photograph does not cover the first like an opaque sheet of paper. Where both scenes supply substantial light, the combined exposure increases. Where one scene is nearly black, it contributes little light and allows the other scene to remain more distinct.
Think in terms of the finished positive photograph or print: a bright area in one scene can overwhelm detail from the other. On the negative itself, greater exposure normally produces greater density, not a whiter patch of film. A dark shape against a bright background is useful because that shape leaves a relatively lightly exposed area for another subject.
A silhouette is not a physical mask. Light from the second exposure still reaches the whole frame. Its detail simply becomes more conspicuous in the darker region of the first image and less conspicuous in the already bright background. This distinction explains why a second photograph cannot restore a dark outline that was washed out by too much light.
Choose the camera method before loading important film
Check your camera’s exact model manual. A bottom rewind-release button does not guarantee that a camera supports this technique. Film transport, take-up clutches, rewind controls, and automatic winding systems differ. Prefer a dedicated multiple-exposure feature when one is provided.
The original Canon F-1 manual describes taking up slack, pressing the bottom rewind button, and gently making a single advance stroke; it also warns that registration can shift and excludes its motor-drive configuration. The Pentax K1000 manual explicitly describes holding the rewind knob while releasing the transport and recocking the shutter. These are model-specific precedents, not permission to force every SLR. [1, 2]
Practice with a sacrificial roll before using valuable film. A test with already exposed waste film can reveal how the transport behaves; a short photographed test roll reveals alignment and spacing after development. Do not open a camera containing pictures you intend to keep.
The rewind-release method, step by step
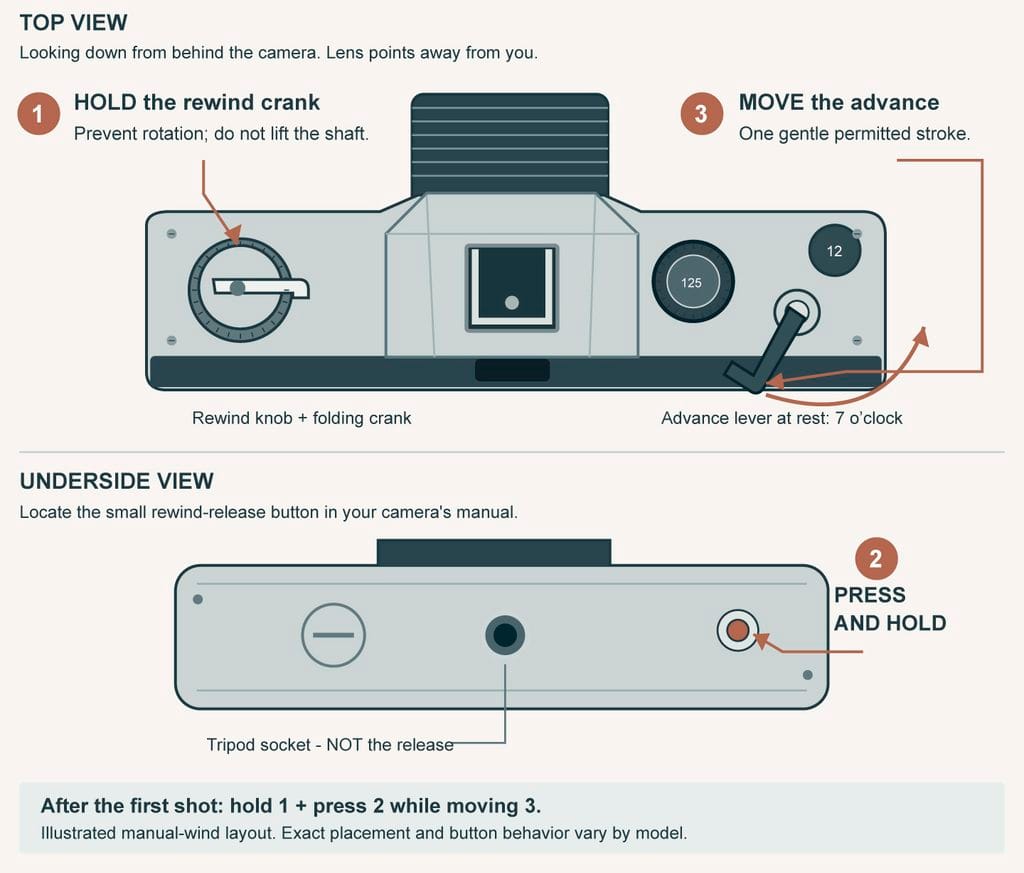
This procedure is for a compatible manual-wind 35mm camera whose instructions allow recocking with the rewind release. Keep the camera back closed throughout. Disable or remove an accessory winder only as its instructions permit.
- Plan and meter both pictures. Decide how they overlap and choose the exposure allowance before shooting. For two similarly bright, broadly overlapping scenes, begin at one stop less than each scene’s normal metered exposure.
- Remove loose slack gently. Following the camera manual, turn the rewind crank in its marked rewind direction only until you first feel light resistance. Ideally establish this before the first exposure. Do not keep winding, pull hard, or deliberately rewind a frame. Some manuals place this step after the first exposure; follow the model’s sequence.
- Make the first exposure. Do not advance normally afterward. Note the main subject’s position, camera orientation, focal length, and exposure.
- Hold the rewind crank stationary. Restrain its rotation gently. Do not pull up the rewind shaft: on many cameras that opens the back. The crank holds the cassette spool; it is not a positive lock on the film at the gate.
- Press and hold the bottom rewind-release button. While holding the crank, press the release as required by your model. Some buttons latch and reset during winding; others need continued pressure. Never tape the button down.
- Operate the advance lever slowly to cock the shutter. Maintain the required holds during one smooth permitted stroke. The goal is to reset the shutter while the film transport is disengaged. Use normal light operating pressure only. If you encounter unusual resistance, stop immediately.
- Release the controls and make the next exposure. Recompose and use the planned setting for that scene. Repeat the permitted recocking sequence for additional exposures, keeping a written count.
Holding the crank and releasing the sprocket drive helps keep the same frame in place. It does not guarantee perfect registration: slack and movement in the take-up mechanism can still shift the film. Even a frame counter that advances does not prove that a fresh frame has reached the gate. [1, 2]
Protect the sprocket holes: never force the lever!!!
The film’s perforations engage the camera’s transport teeth. If the release has not disengaged correctly, or a perforation catches while you restrain the rewind side, force can tear the holes or the film. Stop if the lever binds, feels much stiffer than normal, or produces a tearing sensation. Do not try to overcome the problem by holding the crank harder.
A small alignment error is preferable to a torn roll or damaged transport. Keep the back closed. If winding or rewinding remains abnormal, have the film removed in total darkness by a lab or a competent technician. This is a mechanical precaution, not a claim that every camera using the method will tear film.
After the final exposure: what “advance twice” means
With a rewind-release workaround, the first return to normal winding may leave uncertain spacing. A buffer frame can reduce the chance that the next photograph overlaps the completed multiple exposure. The K1000 manual specifically calls for a blank exposure after the sequence. [2]
Use this sequence only after the final intended exposure:
- Stop pressing the rewind-release button and let the rewind crank turn freely. Allow the transport to re-engage as the camera manual specifies.
- Advance normally once, without restraining the crank.
- Fit an opaque lens cap, select a short manual shutter speed, and release the shutter. This is the blank, sacrificial frame; do not add another scene.
- Advance normally again. Remove the cap, restore your intended exposure settings, and continue photographing.
That is advance -> capped release -> advance. Most cameras will not accept a second full advance until the cocked shutter has been released. Never force it. The buffer costs film, does not repair a damaged transport, and cannot correct shifting within the double exposure. A working dedicated multiple-exposure mode generally needs only its normal completion procedure.
Nikon F4: use its dedicated multiple-exposure lever
The Nikon F4 has motorized film transport and a dedicated multiple-exposure lever. Do not apply the manual rewind-button workaround to it. For a simple double exposure, use single-frame advance mode:
- Set your planned exposure adjustment.
- Pull the multiple-exposure lever toward you before the first shot, then release the shutter. The film stays on that frame; the lever resets automatically.
- Make the second shot without re-engaging the lever. The film then advances.
For three or more exposures, re-engage the lever before each shot that must leave the film in place; leave it disengaged for the last shot. Nikon states that the photographer must determine the necessary exposure compensation. The lever prevents transport; it does not automatically balance the combined exposure. Continuous advance has a different hold-and-release procedure, so consult page 73 before using it. [3]
Exposure: divide the light, not the film speed
For similarly bright images that overlap broadly, share one normal exposure among the component shots. Two half-exposures add to one; four quarter-exposures do the same. The useful starting calculation is: reduction per exposure = log2(number of equal exposures).
| Exposures on one frame | Light per exposure | Reduction from each scene’s normal reading |
|---|---|---|
| 2 | 1/2 | 1 stop less |
| 3 | 1/3 | About 1.6 stops less; test 1.5 or 1 2/3 stops |
| 4 | 1/4 | 2 stops less |
| 8 | 1/8 | 3 stops less |
This is an exposure-budget starting point, not a guarantee that every subject combination will look balanced. Meter each scene separately. If the second scene is brighter, it needs its own normal reading before you apply the reduction. Do not simply repeat the first scene’s camera settings. Canon’s EOS-1V manual gives the familiar one-stop reduction for two exposures and two stops for four. [4]
Worked example: Scene A meters at 1/125 second at f/8. For a two-image equal blend, expose A at 1/250 at f/8, or 1/125 at f/11. Scene B meters at 1/500 at f/8; expose B at 1/1000 at f/8, or 1/500 at f/11. Each receives half its own normal exposure. Change either shutter speed or aperture for a one-stop reduction, not both by one stop.
In manual exposure, deliberately set the required aperture and shutter speed. In automatic exposure, use the camera’s supported negative exposure compensation. As an alternative, doubling the meter’s ISO setting also asks for one stop less exposure: ISO 400 film metered at EI 800, for example. Use only one of these approaches, then restore the setting afterward. The film itself has not changed speed, and this is not a request to push-process the roll.
Develop normally for the film and your established processing method unless you separately planned a push or pull. If you normally give color-negative film an extra 1/3 stop, treat that as a separate total-exposure preference. A two-shot equal blend at minus 2/3 stop per shot, relative to box-speed readings, totals about plus 1/3 stop; it is a personal test choice, not a universal multiple-exposure rule.
When the one-stop rule does not fit
Exposure adds locally, at each part of the frame. A lit object photographed against true black contributes mainly where the object sits. If two objects occupy different regions against black, each may need close to its normal exposure, rather than half exposure. Backgrounds that look black to your eye may still record; overlapping halos and stray light also add.
A silhouette-and-texture picture is another exception. First create a genuinely dark shape against a much brighter background, then give the texture enough exposure to read inside that shape. Automatically cutting both pictures by one stop may weaken the bright surround or make the texture too thin. Meter the contrasting areas intentionally and test the result. ILFORD’s silhouette tutorial emphasizes contrast and subject placement rather than a universal exposure recipe. [5]
For unequal blends, allocate more light to the dominant picture. As a mathematical starting point for comparable scenes, two-thirds of normal exposure for the main image and one-third for the texture total one normal exposure. That is about minus 0.6 stop and minus 1.6 stops respectively. Film response, local brightness, and the desired appearance still determine the best settings.
What you photograph matters more than how many layers you add
Give each scene a role. One might supply a recognizable shape, while the other supplies texture. Or one might establish a location while the other adds an emotional association. Two equally busy pictures often compete everywhere.
Try a profile with a clear nose and forehead, a lone tree, an industrial structure, a hand, or a building with large shadow areas. Pair it with branches, rippling water, clouds, lettering, flowers, or another subject with an intentional connection. Place the brightest texture away from facial features you want to preserve.
Use a tripod when edges or repeated positions must align. For an intentional change of viewpoint, note where important objects sit relative to viewfinder marks before moving. Keep the orientation consistent unless rotation is part of the design. A quick sketch is more dependable than memory alone.
Does shooting order change the result?
For ordinary short exposures made close together, reversing two otherwise identical, identically aligned exposures generally produces the same additive exposure. The second image is not automatically the dominant one. Brightness, exposure allowance, and spatial overlap govern that relationship. Order is still useful as a working strategy. [5]
Photograph the structural image first if it is easier to remember its outline, then compose the texture to suit it. Photograph a fleeting subject or changing light first when timing matters. For a repeated person or object, shoot the positions in a recorded sequence so you do not omit or duplicate one. If light or framing changes while you reverse the order, you are no longer making the same pair of exposures.
“Silhouette first, texture second” is a practical teaching sequence, not a physical requirement that film demands. Long exposures, unusual film behavior, and long delays between exposures deserve separate tests.
Example 1: one tree, two slightly different views
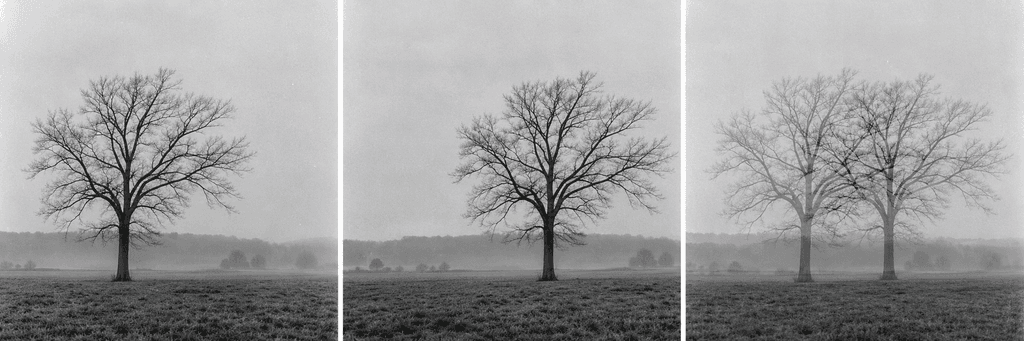
Choose a lone tree with a readable trunk and branches against a simple, bright sky. Start with the tree slightly left of center and note the horizon height. Meter the scene and make the first exposure one stop below that normal reading.
Recock the shutter without advancing the film. From the same camera position, pan slightly so the tree appears a little farther right in the viewfinder. Keep the same focal length, focus, and horizon height. Make the second exposure at one stop below its normal reading. A tripod with a controlled pan makes the amount of displacement easier to repeat.
Both exposures cover the entire frame. Where one exposure records dark branches and the other records bright sky, the added sky exposure makes the branches appear lighter in the finished positive. Where dark branches coincide, they can remain darker. The result is a pair of translucent, overlapping tree forms, not a tree cut out and pasted over another image.
Start with a small shift. Too much displacement makes two unrelated-looking trees; too little may resemble accidental camera movement. Bracket complete pairs with different amounts of pan, then compare their rhythm and separation. The triptych shows two source compositions and a simulated combined appearance; it is an AI-generated teaching illustration, not a measured film test.
Example 2: architecture and blossoms
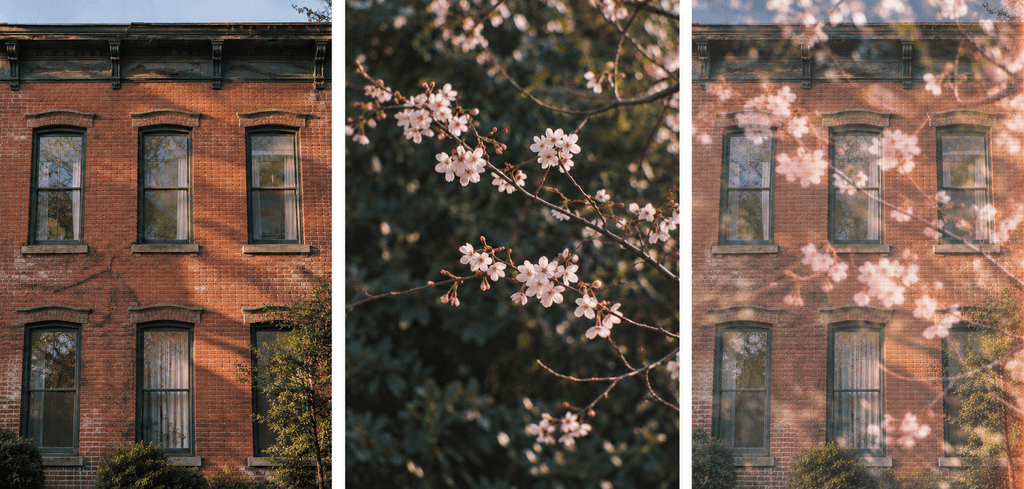
First photograph a simple building facade with readable windows and shadow areas. Then photograph a sparse arrangement of bright blossoms against darker foliage. Start with each image one stop below its own normal reading. Choose the second composition so blossoms avoid covering every important architectural edge.
The intended result is a translucent blend across the frame, not flowers pasted over the building. To make the architecture more dominant, test a smaller light contribution from the blossoms while keeping the building’s exposure allowance consistent. Record that changed balance; do not assume that shooting the flowers second makes them stronger.
Example 3: two positions in one scene
Mount the camera on a tripod and lock the composition. Photograph a person or an illuminated object on the left, reset without advancing, then place the subject on the right. Against a lit background, the background receives both exposures, so the equal half-exposure starting point is useful. Each non-overlapping subject receives only one half-exposure and can appear translucent or weak.
For more solid repeated subjects, work against a genuinely dark background and light each position separately, allowing closer to a normal exposure for each subject. Keep light spill out of the other position. With flash, remain at or below the camera’s sync speed and calculate each flash exposure separately.
A first-roll exercise and troubleshooting
Begin with two exposures per frame and one deliberate idea. Photograph a normal reference for each scene, then make three complete double exposures with a recorded change: equal half exposures; a more dominant first image; and a reduced texture contribution. Keep film stock, processing, subject placement, and viewing method consistent. Ask the lab to preserve unusual overlapping frames when scanning rather than automatically treating them as mistakes.
A washed-out result suggests too much combined light or too many bright overlaps. Two faint images suggest too little exposure in the areas that matter. An indistinct silhouette suggests insufficient contrast or poor placement. A shifted boundary indicates registration movement. Overlap with the following photograph points to transport or spacing uncertainty; use the documented buffer method on a compatible manual-wind camera and investigate recurring problems.
Write down the camera, film, frame-counter indication, order, subject positions, meter readings, actual settings, number of exposures, and whether you used a buffer frame. The counter may count shutter cycles rather than distinct film frames during the workaround. After processing, compare the negative as well as the scan: automatic scan corrections can hide exposure differences.
The aim is a considered relationship between photographs. Once the mechanical sequence becomes familiar, you can concentrate on shape, light, timing, and the story the two pictures tell together.
Sources and image notes
- Canon, original F-1 instruction manual, printed page 45, multiple exposures; page 34, film transport precautions. Manufacturer publication, hosted copy: https://www.cameramanuals.org/canon_pdf/canon_f-1-original.pdf
- Asahi Pentax, K1000 instruction manual, printed page 23, multiple exposure and blank-frame precaution. Manufacturer publication, hosted copy: https://www.manualslib.com/manual/1735062/Pentax-K1000.html?page=25
- Nikon, F4/F4S instruction manual, page 73, multiple-exposure lever: https://cdn-10.nikon-cdn.com/pdf/manuals/archive/F4-F4S.pdf
- Canon, EOS-1V instruction manual, multiple exposures and compensation guide: https://files.canon-europe.com/files/soft03-48541/Manual/EOS_1V_Instruction_Manual_EN.pdf
- Euan Grimley, Taking a Double Exposure, ILFORD Photo, January 21, 2025: https://www.ilfordphoto.com/taking-a-double-exposure/
Camera manuals establish model-specific operation. Exposure calculations and worked shooting exercises are teaching examples; actual film, lighting, metering, and scanning affect results. The control drawing is a generic schematic, not an exact camera model.