Shooting Color Negative Film in Artificial Light: When One Extra Stop Helps
By John Whitehead | Shutter Bug Academy | Learn Film Photography
Shooting color negative film in artificial light can give a photograph atmosphere that daylight cannot: the amber glow of an interior, a pool of light on a table, or the warmth of a room after sunset. It can also make color negative film harder to expose and print well.
Giving daylight-balanced color negative film one extra stop of exposure is a useful technique to test under warm tungsten lighting. The extra light can improve shadow recording and create a more substantial negative. It does not, however, correct the difference between the film’s color balance and the light illuminating your subject.
Think of exposure and color balance as two separate decisions. Exposure controls how much light the film records. Filtration changes the mixture of wavelengths reaching it.
This article focuses on daylight-balanced color negative film, processed normally. It is not a blanket recommendation for slide film, black-and-white film, or every artificial light source.
Film has a fixed color balance
Color film is manufactured for a particular kind of illumination. Daylight-balanced film is generally designed around approximately 5500 K. Tungsten-balanced film is commonly designed for 3200 K. These are color-temperature references, not temperatures at which you store or process the film.
Unlike a digital camera, a film camera cannot change the emulsion’s white balance with a menu setting. Changing the ISO dial changes the meter’s exposure recommendation; it does not change the film’s color balance.
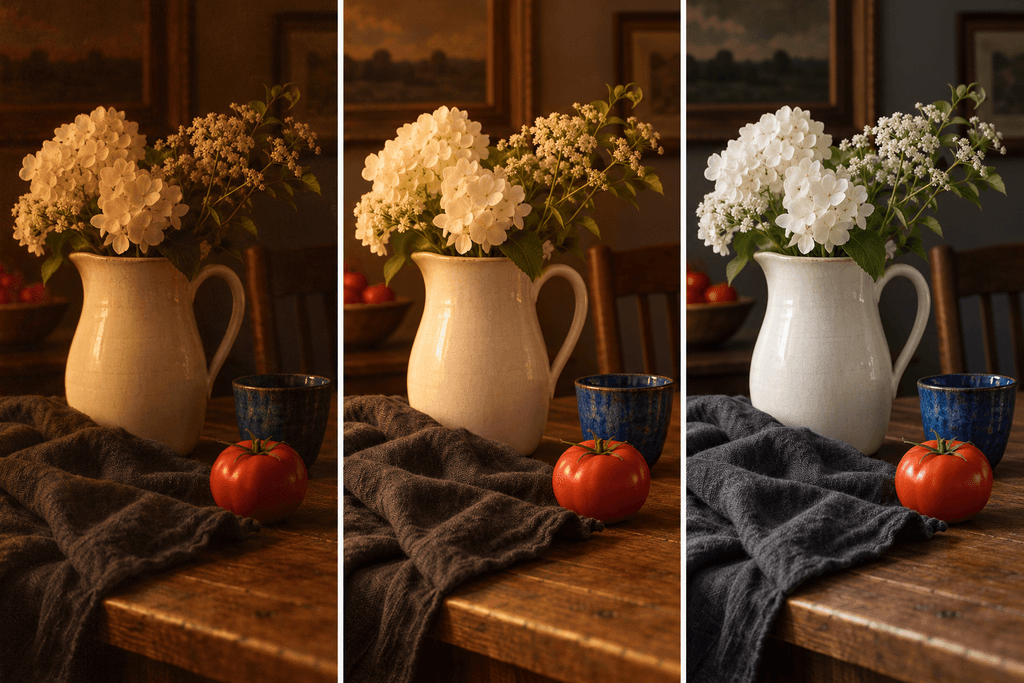
A tungsten lamp sends a different mix of red, green, and blue light toward the subject than daylight does. When daylight film records that warmer illumination without correction, neutral subjects often reproduce with a yellow-orange cast. A white pitcher may look cream or amber, while a blue object may lose its clear blue appearance.
Not every indoor lamp is 3200 K. Household incandescent lamps are often warmer, around 2700–3000 K. LEDs and fluorescent lamps can have uneven spectra, even when their stated color temperatures match. Kelvin describes part of the problem; it does not fully describe the color-rendering behavior of every lamp.
Why a meter reading can still leave weak shadows
A light meter gives an exposure recommendation. It does not guarantee that every color-sensitive layer receives an ideal exposure under an unfamiliar light source.
Tungsten illumination contains relatively little blue light compared with daylight. With daylight-balanced film, the blue-sensitive record can be weak relative to the other color records. A bright bulb in a reflected-meter reading can also cause the camera to reduce exposure even though the subject itself is dimly lit.
These are different problems: the spectrum of the light and how you meter the scene. They can occur together.
It would be misleading to say that a normal exposure always creates a thin negative in artificial light. Properly metered film under suitable illumination can produce excellent density at box speed. A negative may also look reasonably dense overall while one color record or the important shadow areas remain weak.
A more useful statement is: Under warm artificial light, a box-speed meter reading may leave insufficient shadow information, especially when the lighting and the film’s color balance do not match.
What does a thin negative look like?
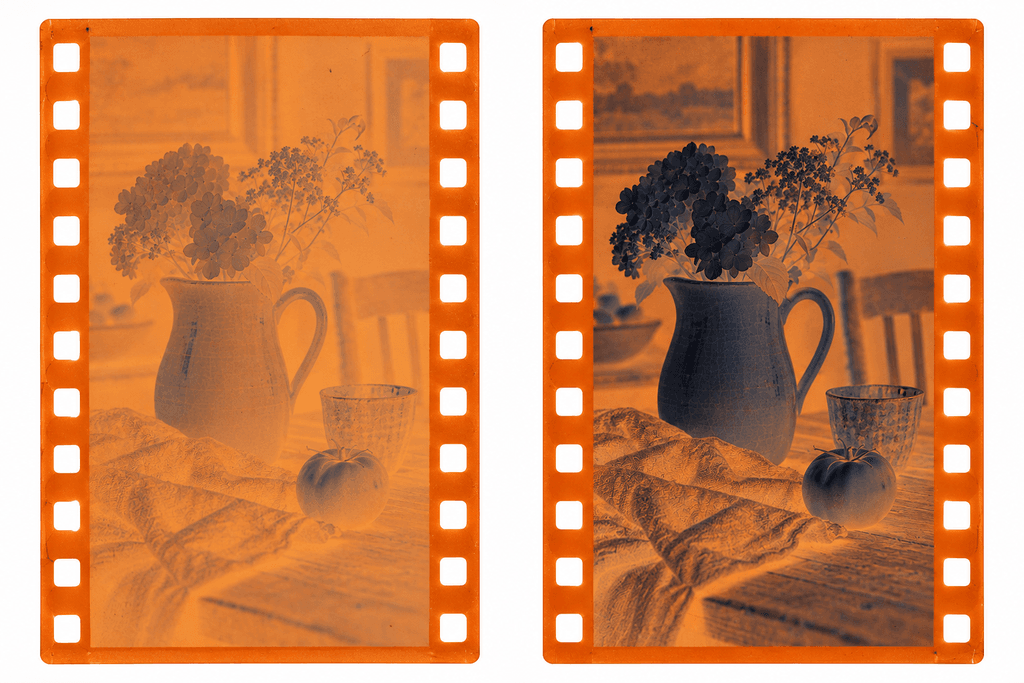
“Thin” describes low image density, not the physical thickness of the film. Viewed on a light table, an underexposed color negative often looks unusually transparent, with a faint image above its orange base.
Remember that tones reverse on a negative:
- Bright areas of the subject form darker, denser areas on the negative.
- Dark areas of the subject form lighter, more transparent areas.
- In an underexposed negative, important shadow detail may barely separate from the unexposed film base.
Look for tonal separation within the image, particularly in places where you remember seeing texture. An evenly orange frame is not evidence of useful density. Nor does a very dark negative automatically mean a better exposure.
Illustration note: The accompanying negative diagrams are simplified teaching illustrations. They show the direction of the differences, not an exact response for a specific film.
Why thin negatives are difficult to print
A thin negative lets more enlarger light reach the paper. At the same enlarger settings used for a denser negative, the print becomes darker. You can shorten the printing exposure to bring the overall brightness back, but you cannot manufacture shadow separation that the film failed to record.
This creates several practical problems:
Weak or empty shadows. A dark fabric may print as a solid patch instead of showing folds and weave. Lightening that area may produce a dull patch rather than reveal detail.
Less convincing tonal separation. When the negative records only tiny differences between adjacent dark tones, making a print with both depth and readable shadows becomes harder.
More difficult color balancing. A weak color record can make neutral color harder to obtain, especially in shadows. Correcting the midtones may leave other tones looking wrong. Severe imbalance can exceed what a single overall filtration adjustment can solve.
More visible defects in scans. When a lab lifts underexposed areas, grain and color mottling may become conspicuous. Scanner characteristics and software also affect the result. A brighter scan is not proof of a well-exposed negative.
RA-4 color paper does not offer the same variable-contrast filtration system used with black-and-white multigrade paper. Adjusting enlarger filtration changes color balance; it cannot replace missing exposure information.
What one extra stop actually does
One stop more exposure doubles the light reaching the film. You can obtain it by opening from f/4 to f/2.8, slowing from 1/125 to 1/60 second, or metering ISO 400 film at EI 200. Use one method, not all three together.
EI means exposure index: the speed setting you choose for metering. The film remains an ISO 400 product.
Where shadows were receiving marginal exposure, the extra stop can move more of their information into a useful recording range. After normal development, the negative becomes denser and may be easier to print or scan with convincing shadow detail.
But +1 stop is a starting point, not a guarantee. It cannot restore wavelengths that the lamp barely emits, rescue every severely underexposed scene, or correct a meter pointed at the wrong part of the room. More density is helpful only when it represents useful image information.
For a practical test, photograph the same subject at the meter reading and at +1 stop. Include textured dark material and something neutral. Keep the lighting unchanged and have both frames processed normally.
Extra exposure does not remove the warm cast
The warmer color in these examples is primarily caused by photographing with daylight film under tungsten illumination. It is not created simply by adding one stop.
Extra exposure may change the way color and saturation reproduce, depending on the stock and subsequent printing or scanning. However, it does not turn daylight-balanced film into tungsten-balanced film.
The +1-stop, unfiltered example therefore shows stronger shadow detail while retaining the warm cast. That warmth may be exactly what you want. If so, tell the lab to preserve it. If you want neutral whites and more accurate object colors, address the color balance as well as the exposure.
Labs often compensate for casts automatically. To compare your own test frames fairly, request consistent brightness and explain which versions should remain uncorrected for color. Otherwise, automatic corrections may conceal the very difference you are trying to study.
Use a blue conversion filter for tungsten light
An 80A blue conversion filter is a standard way to use daylight-balanced film under approximately 3200 K tungsten light. It reduces the excess longer-wavelength light relative to blue. It does not create blue light or make the room brighter.
With the correct exposure compensation, a white object can reproduce closer to white, and other colors can appear more natural. The negative itself will still have an orange mask; corrected color is judged in the positive print or scan.
The cost is light. A typical 80A correction requires approximately two stops of compensation, meaning four times the unfiltered exposure. Check the film and filter instructions. Kodak’s PORTRA 400 data sheet specifies an 80A filter and a meter setting of 100 for 3200 K tungsten illumination when metering without the filter. That recommendation already accounts for the filtration adjustment.
An 80A filter is not a universal indoor-light filter. It may not fully correct a warmer household bulb, and it cannot solve every green cast, discontinuous LED spectrum, or mixture of daylight and artificial light.
Keep filter compensation separate from extra exposure
Suppose an unfiltered meter reading at ISO 400 gives 1/125 second at f/4. The following settings use conventional full-stop shutter markings:
| Approach | Camera setting at f/4 | Meaning |
|---|---|---|
| No filter, meter reading | 1/250 sec | Baseline exposure |
| No filter, +1 stop | 1/125 sec | Extra exposure; warm cast remains |
| 80A, no compensation | 1/250 sec | Color correction attempted, but substantial light loss |
| 80A, +2 stops | 1/60 sec | Compensates for the assumed two-stop filter loss |
| 80A, +3 stops total | 1/30 sec | Filter compensation plus an optional extra stop |
The fourth row restores a normal filtered exposure. It is not two stops of deliberate overexposure. The fifth row adds your extra-stop preference after paying for the filter.
With a handheld meter that does not read through the filter, you can use the published effective EI instead of manually adding the filter factor. For this PORTRA 400 example, EI 100 accounts for the filter; EI 50 would add a further stop. Do not lower the EI and also apply the same compensation again.
With through-the-lens metering, the camera generally sees the filter’s light loss. Keep the normal speed setting for the baseline filtered reading rather than automatically adding two more stops. Strong colored filters can affect meter accuracy, so check the camera instructions and bracket a test.
A practical workflow
- Identify the film and light. Confirm that the film is daylight-balanced color negative stock. Distinguish tungsten lighting from LEDs, fluorescent lamps, flash, and mixed light.
- Meter the subject. Use an incident reading in the subject’s illumination or a careful reflected reading that excludes misleading bright lamps.
- Choose the color you want. Keep the warm cast, plan a printing/scanning correction, or use a suitable conversion filter.
- Apply filtration compensation once. Follow the film/filter instructions and account for whether the meter sees the filter.
- Test the optional extra stop. Compare the baseline with +1 stop when shadow recording is a concern.
- Protect sharpness. A slower shutter can require a tripod; subject movement still causes blur. Opening the lens reduces depth of field. If exposure times become long, consult the film’s reciprocity guidance.
- Develop normally. Giving more exposure is not push processing. Do not ask the lab to push one stop simply because you exposed one stop more.
- Compare the negatives and results. Examine shadow separation, neutral objects, printability, and the look you prefer. Keep notes for your particular film, lamps, meter, and lab.
The aim is a negative that contains enough information to support the print you want. One extra stop can help you get there under warm artificial light. Color correction is a separate choice, and its light loss must be included in the exposure.
References
[1] Kodak, The Essential Reference Guide for Filmmakers, sections on light, film structure, and exposure: https://www.kodak.com/content/products-brochures/Film/kodak-essential-reference-guide-for-filmmakers.pdf
[2] Tiffen, Film Enhancement Guide, 80-series color conversion filters: https://tiffen.com/pages/film-enhancement-guide
[3] Kodak Alaris, KODAK PROFESSIONAL PORTRA 400 Film, E-4050, January 2025: https://kodakprofessional.com/sites/default/files/2025-07/e4050.pdf
Further reading: Kodak, Exploring the Color Image: https://www.kodak.com/content/products-brochures/Film/Exploring-the-Color-Image.pdf