SHUTTER BUG ACADEMY / FILM PHOTOGRAPHY
Handheld Light Meters for Film Photography: Why Incident Metering Works
By John Whitehead | Shutter Bug Academy
A white wedding dress, a black coat, and a gray wall can all sit in exactly the same light. Yet your camera’s built-in meter may suggest a different exposure for each one. The light has not changed. What changed is how much light the subject reflects.
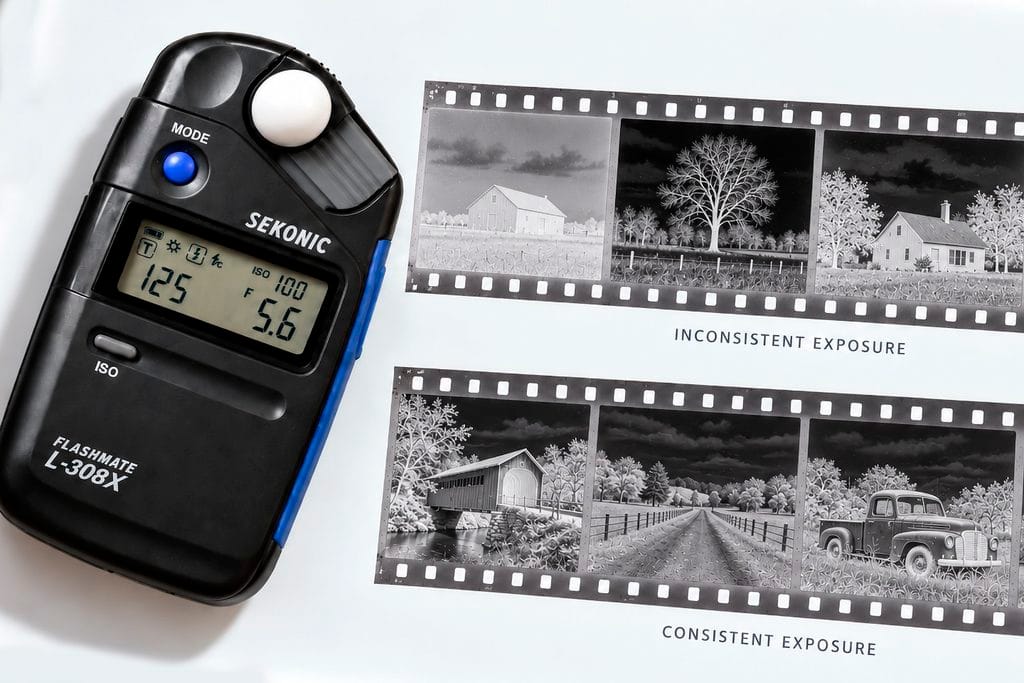
This is one of the strongest reasons to use a handheld incident light meter for film photography. It measures the light falling on your subject, helping you set a consistent exposure without letting the subject’s color or brightness dictate the reading.
For film photographers, that consistency matters. You cannot check a histogram after every frame, and a scan cannot recover shadow information that never reached the negative.
Ambient and incident: two different terms
Ambient light is continuous light already illuminating the scene: sunlight, an overcast sky, window light, or household and studio lamps. An ambient reading measures that continuous illumination rather than a brief flash burst.
Incident metering describes the measurement method. The meter usually uses a white dome to measure light arriving at the subject. Reflected metering measures light bouncing off the subject toward the meter or camera.
You can measure ambient light with either method. An incident meter may also measure flash, depending on its features. For this guide, we are concentrating on incident readings of ambient light.
Why your camera can misread a white or black scene
Most built-in film-camera meters measure reflected light. The reading depends on both the illumination and the subject’s reflectance. A basic reflected meter cannot tell whether it is seeing a dark surface in bright light or a lighter surface in weaker light.
Following a reflected reading of a uniform area without adjustment tends to reproduce that area as a middle tone. That works well for many everyday scenes, but it can misplace subjects that should look very light or very dark. More sophisticated camera metering patterns can reduce these errors, so the outcome is a tendency rather than a certainty. [1]
Why scenes with lots of white tend to be underexposed
Imagine a white wall filling the frame. Its surface returns a lot of light to the camera. The reflected meter recommends less exposure, pulling the white wall toward gray. Snow, pale sand, and white clothing can cause the same problem.
The result may be dull-looking whites and insufficient exposure for darker details elsewhere in the photograph. To preserve the intended bright appearance using a reflected reading, you generally need more exposure than that reading suggests.
Why scenes with lots of black tend to be overexposed
Now fill the frame with black fabric under the same illumination. It returns much less light. The meter recommends more exposure, pulling the fabric toward gray.
The black subject becomes too light, and brighter objects in the composition receive extra exposure as well. To keep a predominantly dark scene dark using a reflected reading, you generally need less exposure than that reading suggests.
What dominates the reflected reading?
Meter’s tendency
Likely result
Correction direction
| White or very light surfaces | Recommend less exposure | Whites look too dark | Add exposure |
| White or very light surfaces | Recommend more exposure | Blacks look too light | Reduce exposure |
| A representative middle tone | Provide a useful baseline | Often close to the intended tone | Evaluate the scene |
The correction is not always a fixed number of stops. It depends on the surface, lighting, framing, and metering pattern. These directions apply when the light or dark area dominates the reflected reading; they are not adjustments you automatically add to an incident reading.
Why incident metering gives you a more dependable baseline
An incident meter measures illumination before the subject’s reflectance changes what reaches the camera. In unchanged lighting, a white shirt and a black shirt therefore receive the same basic exposure. Their different reflectances create their different tones in the photograph.
This is especially useful when a portrait subject changes clothes or when you recompose to include more of a bright or dark background. If the illumination on the subject stays constant, the exposure can stay constant too.
An incident reading is often superior as a quick, consistent starting point. A carefully interpreted reflected or spot reading can be equally accurate and is more useful for some subjects. The advantage comes from choosing the measurement that answers your exposure question.
How to use a handheld incident meter
1. Set the film speed
Start with the film’s marked ISO. If you deliberately rate the film differently, enter that working exposure index instead. For my color-negative preference, ISO 400 film is metered at EI 320, which gives approximately 1/3 stop more exposure. For black and white film I use the recommended ISO.
2. Select ambient mode and the incident receptor
Choose the ambient setting, often marked with a sun symbol, rather than flash mode. Position the white dome according to your meter’s instructions. On meters with a retractable dome, the raised position is normally used for general three-dimensional subjects.
3. Meter at the subject’s position
Place the meter near the part of the subject that matters, such as the face in a portrait. For a standard camera-facing exposure reading, point the dome toward the light. Keep your hand and body from blocking light that should reach it. If you want to over-expose highlights, and expose for mid-tones and shadows, meter in the mid-tone area.
If you cannot reach the subject, use a position with equivalent illumination. Standing in shade while the subject is in direct sun does not provide a matching reading.
4. Choose a shutter speed and read the aperture
Set a shutter speed that suits subject movement and your ability to handhold the camera. Take a reading and transfer the indicated aperture to the lens. Some meters also let you select the aperture and read the shutter speed.
For example, if the reading is 1/125 second at f/8, equivalent full-stop combinations are 1/250 at f/5.6 and 1/60 at f/11. Choose the combination that gives you the motion rendering and depth of field you want.
5. Recheck when the illumination changes
A passing cloud, a move into shade, or a change in window light calls for a new reading. A change from white clothing to black clothing under the same illumination does not.
With backlighting or strong side lighting, decide which part of the subject needs detail. A reading for the face may leave the background very bright. Incident metering does not measure the entire scene’s brightness range or guarantee detail everywhere. [3]
Why I give color negative film an extra 1/3 stop (Do not do this for Black and White Film)
For color negative film, I prefer a modest 1/3 stop of additional exposure relative to a reliable box-speed reading. This is a small adjustment, not a recommendation to overexpose every roll by several stops.
One-third stop adds approximately 26 percent more light. That slight increase provides a cushion against small exposure errors and gives the darkest recorded areas a little more exposure.
Shadows receive the least light and form the thinnest image areas of a negative. If exposure is insufficient, subtle differences in those areas become difficult or impossible to reproduce. Brightening the scan may reveal weak color, coarse-looking texture, or scanner noise without restoring the missing subject detail.
Giving a color negative a little more exposure can move marginal shadow information farther above the film’s minimum density. That is the practical reason for my preference: I would rather provide a small amount of extra exposure than accidentally starve the shadows.
Color negative film generally offers useful highlight latitude, although it varies by stock and scene. Kodak’s published information for Gold 200, for example, describes broad exposure latitude, including substantial tolerance for overexposure. Portra 400 is also designed to perform at its stated ISO 400 speed. Extra exposure is a working preference, not proof that the manufacturer’s speed is wrong.
The expected benefit at only 1/3 stop is subtle. This recommendation is a practical inference from negative-film exposure behavior, not a manufacturer requirement or a guarantee of finer grain, richer color, or visibly better results in every photograph. Your film, camera, processing, and scanning all affect the outcome.
Set a lower exposure index on the meter
| Film’s marked ISO | Meter setting for approximately +1/3 stop |
|---|---|
| 100 | EI 80 |
| 160 | EI 125 |
| 200 | EI 160 |
| 400 | EI 320 |
| 800 | EI 640 |
These are conventional rounded settings. The film’s physical sensitivity has not changed; the lower number tells the meter to recommend more exposure.
Apply the adjustment once. If you meter ISO 400 film at EI 320, use that reading as your final baseline. Do not also add another +1/3 stop unless you intentionally want more exposure. Changing only the ISO dial on a fully manual camera will not change the exposure when you are transferring settings from a separate meter.
Process the film normally in C-41. This small exposure adjustment does not require push or pull processing.
Some older cameras offer only full-stop shutter speeds, and some lenses have half-stop aperture clicks. The meter can recommend a third-stop value that the camera cannot precisely set. Use an intermediate aperture only if the lens permits it; do not assume a mechanical shutter dial works between marked speeds. Consistent technique matters more than pretending every old camera can deliver laboratory precision.
This preference applies to color negative film. Do not automatically transfer it to slide film, which has less tolerance for excess highlight exposure, or treat it as a universal rule for black-and-white film.
When a reflected or spot meter is the better tool
You cannot always stand in the same light as your subject. A distant mountain, a lit theater stage, or a building across a river may call for a reflected reading. A spot meter also lets you compare small highlight and shadow areas and decide where those tones should fall.
A properly used gray card can make reflected metering more consistent. Meter the card in the subject’s light, avoid glare, and follow the card’s positioning instructions. A camera-based phone app usually makes reflected readings too; it does not become an incident meter without appropriate hardware and calibration.
Which brands make handheld light meters?
Sekonic and Gossen are the main current manufacturers covered here for photographic incident metering. Minolta made excellent handheld meters that remain useful used purchases, although the Auto Meter models discussed below are discontinued. Buy Minolta for the condition and capability of the individual meter, rather than expecting a current new-product support experience.
An exposure meter is not the same as a color-temperature meter or a general-purpose lux meter. Many small camera-shoe meters measure reflected light only. For the incident workflow in this article, confirm that the meter has the correct incident dome or diffuser.
Good new light meter options
These are editorial recommendations based on the manufacturers’ published features, not claims from a hands-on comparison test. Product listings were checked September 25, 2026. Current-model status does not guarantee immediate U.S. dealer stock; verify availability and warranty before ordering. The Gossen Luna Star F2 was my favorite light meter.
| Model | Why consider it? | Main compromise | Best fit |
|---|---|---|---|
| Sekonic L-308X-U Flashmate | Compact incident/reflected ambient and flash meter; direct digital settings; one AA battery | Fixed head; broad reflected reading rather than a built-in spot finder | My strongest general starting recommendation for a new meter |
| Gossen Digipro F2 | Swivel head, digital settings, ambient and flash readings | Larger than a tiny pocket meter; no built-in narrow spot finder | Portraits and work where flexible meter positioning is useful |
| Gossen Sixtomat F2 | Compact digital ambient/flash meter with incident and reflected modes | Fixed head; check version when buying older stock | A conventional Gossen digital alternative |
| Sekonic L-208 TwinMate | Small incident/reflected ambient meter with a needle and exposure dial | No flash metering; limited dim-light capability | A simple daylight kit |
| Gossen Digisix 2 | Very small and light; digital EV measurement with an exposure calculator dial | Ambient only; transfer the EV reading to the dial | Travel and minimal camera bags |
| Sekonic L-398A Studio Deluxe III | Battery-free amorphous sensor, swivel head and classic analog controls | Ambient only; less suitable for very dim scenes; requires learning its slide/accessory workflow | Daylight and brighter continuous-light setups |
The L-308X-U is the practical starting point if you want a clear digital reading and room to learn flash later. Choose the Digipro F2 if a swivel head matters to you. The L-208 and Digisix 2 favor portability, while the L-398A favors battery-free, tactile operation. Sekonic’s L-308X-U listing showed replenishment pending at the time of checking, so compare current authorized-dealer stock.
Good used light meter options (Minolta Auto Meter IV and V are my choice)
| Model | Strengths | What to check |
|---|---|---|
| Minolta Auto Meter IV F | Ambient and flash; rotating head; readable digital controls; AA power | Complete spherical diffuser, clean battery contacts, working LCD and consistent readings |
| Minolta Auto Meter V F | Later Auto Meter option with ambient/flash capability and additional functions | Compare the exact functions and condition with an IV F before paying more |
| Sekonic L-308S / L-308S-U | Small, direct and capable of incident/reflected ambient and flash readings | Fixed head; lacks the newer L-308X’s aperture-priority mode; inspect the sliding dome |
| Sekonic L-358 | Rotating/retractable dome, memory, backlit display and a useful low-light incident range | Larger body; inspect the head mechanism; optional spot finders and radio modules may not be included |
| Gossen Luna Star F2 | Accuracy, ease of use, and durability | Low Light Limitations, spot attachment value |
For a used digital meter, begin by comparing tested examples of the Minolta Auto Meter IV F and Sekonic L-308S. The L-358 is worth considering when you want its more flexible head and controls. A Minolta Auto Meter V F is another strong candidate when its condition and price make sense. The Gossen Luna-Pro F suits photographers who enjoy an analog exposure dial.
Used-meter buying checklist
- Compare readings at several light levels. Use a trusted meter in steady bright and dim light with matched ISO, mode and dome orientation. Turning on is not an accuracy test.
- Inspect the diffuser. A missing, cracked or badly discolored dome can be more important than cosmetic wear on the body.
- Check the controls and battery compartment. Look for corrosion, broken doors, fading displays, sticking needles and unreliable buttons.
- Verify the exact model and battery. Some early Gossen Luna-Pro/Lunasix versions used mercury batteries. The Luna-Pro F is a different model that uses a standard 9V battery. Consult Gossen’s legacy battery guidance before substituting cells in an older meter.
- Buy a complete working kit with a return window. Missing accessories, calibration or repairs can erase the savings. Check recent sold prices for comparable tested examples, rather than treating an old catalog price as today’s value.
A simple exercise that makes metering click
Place white, gray, and black cards side by side in even light. Take an incident reading at the cards and keep the camera exposure fixed. Then meter each card separately with a reflected meter, filling the reading area with that card and avoiding your own shadow.
The incident exposure stays tied to the illumination. The individual reflected readings shift with the cards’ reflectance. Make photographs and compare the results: this exercise shows why a meter reading needs to be understood, not simply obeyed.
Once you can separate the brightness of the subject from the light illuminating it, exposure becomes much more predictable. That leaves more attention for composition, timing, and the photograph you actually want to make.