How to Tether a Camera to Adobe Lightroom Classic: Step-by-Step Guide
A camera’s rear screen is useful, but it is easy to miss slightly soft focus, distracting reflections, or a small problem with a subject’s pose. Tethering lets you review photographs on a larger computer screen as you shoot.
This is especially helpful for portraits, product photography, still life, and studio lighting. You can examine a photograph, make an adjustment, and immediately see what changed.
In this Shutter Bug Academy guide, you will learn how to tether a camera to Adobe Lightroom Classic, check your first photographs, and troubleshoot common connection problems.
What Is Tethered Photography?
Tethered photography connects your camera to a computer so photographs can transfer as you capture them. This guide covers a wired USB connection.
Think of it as an ongoing cycle: take a photograph, inspect it on the computer, and adjust your lighting, camera settings, or composition.
Tethering is particularly useful when you need to:
- Check critical focus and depth of field.
- Examine shadows, highlights, and reflections.
- Review clothing, hair, hands, and posing.
- Compare small changes in lighting.
- Show a client or student what you are creating.
A larger preview helps you notice problems while you can still correct them.
Step 1: Check Whether Your Camera Supports Tethering
Before purchasing a cable or changing settings, check Adobe’s supported tethered camera list.
Look for your exact model, the minimum Lightroom Classic version, and any camera-specific notes. Being able to open a camera’s RAW files does not automatically mean Lightroom Classic can tether that camera. Adobe maintains specific tethering support requirements.
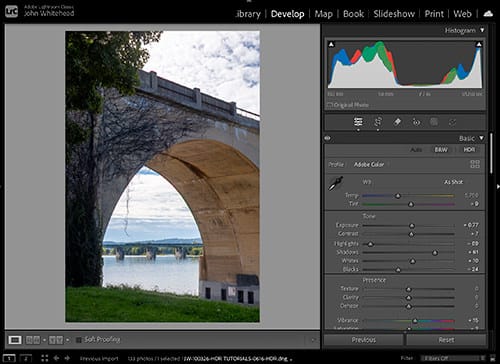
This tutorial uses Adobe Lightroom Classic, identified by the LrC icon. Make sure you are following instructions for the application you have open.
Step 2: Gather Your Equipment
You will need:
- A compatible camera and lens.
- A computer running a compatible version of Lightroom Classic.
- A USB data cable with the correct connectors.
- A charged camera battery or an approved continuous power solution.
- Available storage for the photographs.
- A secure place for the computer.
A cable that fits is not necessarily suitable. Some USB cables only provide power, and a USB-C connector alone does not tell you the cable’s transfer speed.
For your first test, keep the setup simple. Once it works, add the cable length and accessories you need for your studio.
Protect the camera’s USB port. Use suitable cable strain relief, leave enough slack to move comfortably, and route the cable away from walking paths. A tether cable should never be pulling against the camera connection.
Step 3: Prepare the Camera
Start with still-photo mode and choose your file format. RAW is a good starting point when you want flexibility during editing.
For controlled studio lighting, manual exposure makes it easier to compare results. Keep shutter speed, aperture, and ISO consistent while evaluating changes to the light.
If you are using strobes, stay within the camera’s normal flash sync speed unless you are deliberately using a compatible high-speed-sync setup.
The USB connection mode also matters:
Camera system | What to check |
Canon and Nikon | Follow the connection requirements for your exact model. Do not assume every camera uses the same USB menu setting. |
Sony | Supported models generally require PC Remote mode. Adobe also specifies Original for PC Save Image Size when importing RAW files. I am pretty sure that Sony only will save .jpg file via a tether. |
Fujifilm | Adobe specifies USB Tether Shooting mode for native tethering. Physical exposure dials may affect whether Lightroom can change settings. |
For Fujifilm cameras with the relevant controls, Adobe identifies shutter speed T, aperture A, and ISO C as settings to check when control from the tether bar is unavailable. Follow the instructions for your particular model.
Step 4: Connect the Camera
Turn the camera off, attach the USB cable securely, and connect it to the computer. Turn the camera on.
Close other camera-control applications before starting native Lightroom tethering. Software such as the manufacturer’s remote-capture utility may compete for the connection. Check the camera’s transfer mode if it is not detected.
Keep the computer within comfortable viewing distance. For a portrait session, position it so you can check photographs without repeatedly turning your back on the subject.
Step 5: Start Tethered Capture
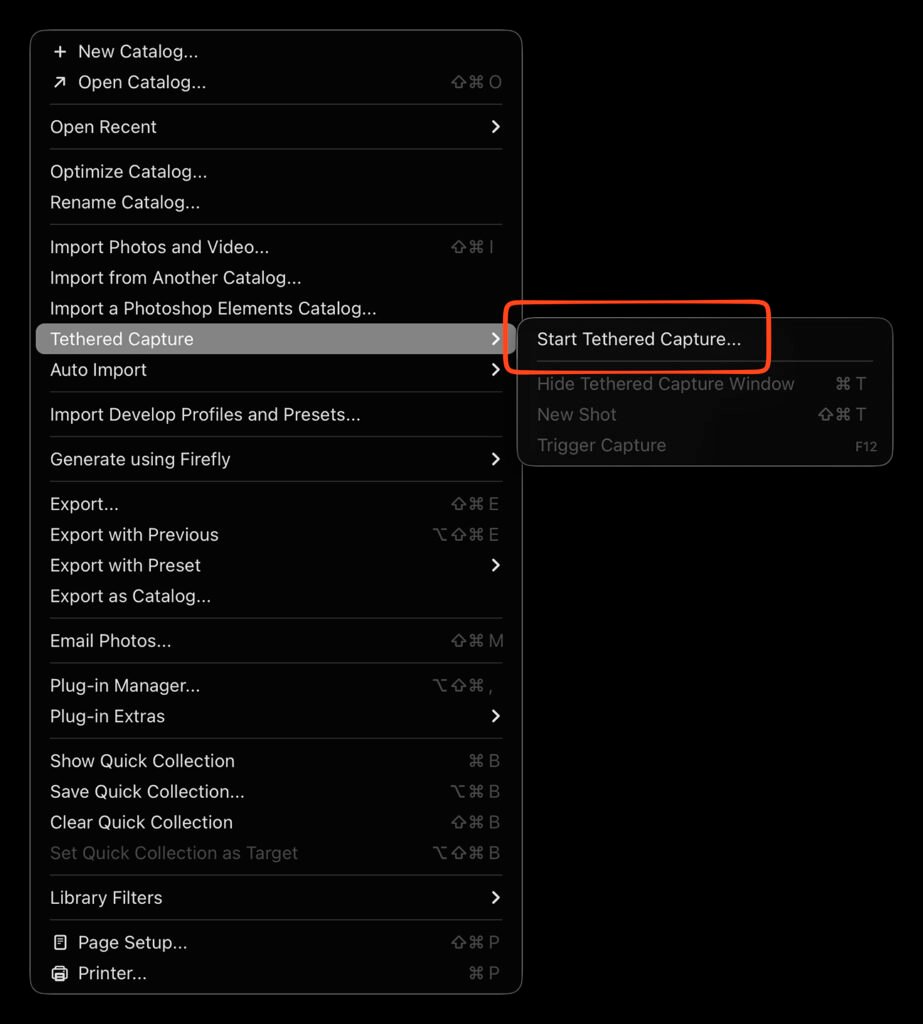
Open Lightroom Classic and choose:
File → Tethered Capture → Start Tethered Capture
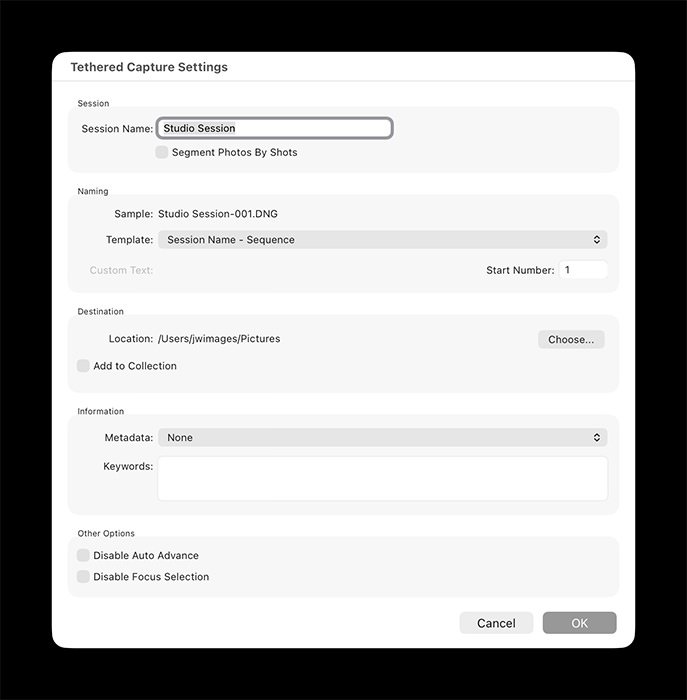
Configure the session:
Setting | What to enter |
Session | A descriptive folder name. |
Destination | Where the captured photographs will be stored. |
Segment Photos By Shots | Optional subfolders for different setups. |
Information | Optional metadata and keywords. |
Disable Auto Advance | Leave unchecked to display the newest capture automatically. |

Click OK and wait for the tether bar as seen above.
A useful session name might be 2026-11-16_Portrait-Lighting. For a class exercise, you could separate photographs into Hard-Light, Soft-Light, and Reflector-Fill groups.
Choose a destination you can locate easily afterward. A folder buried among unrelated downloads makes reviewing and backing up a session unnecessarily difficult.
Step 6: Take a Test Photograph
Release the shutter on the camera or use the round capture button in the tether bar. Supported controls in the bar include exposure settings and white balance; available operation depends on the camera.
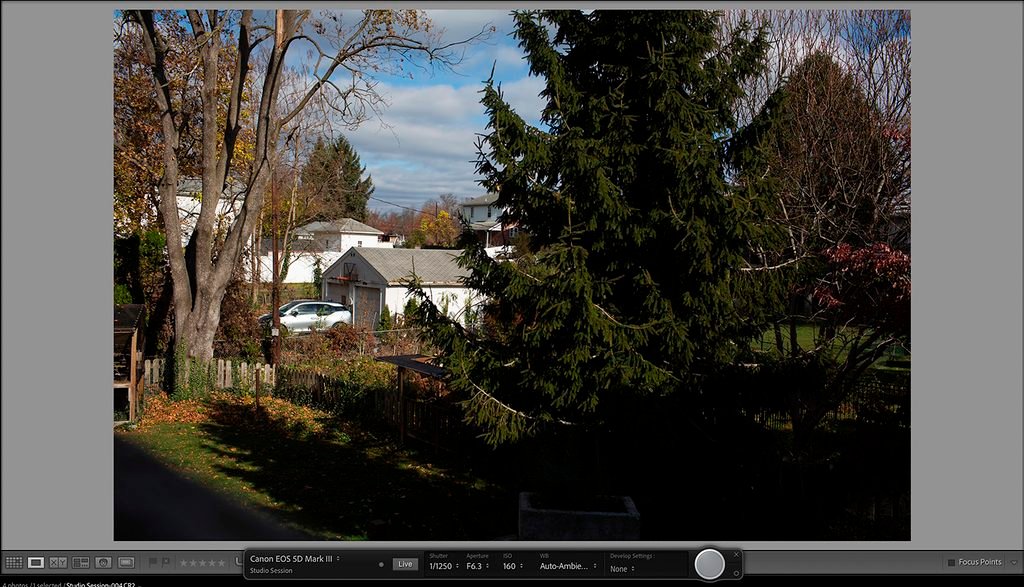
Before beginning the session, confirm:
- The photograph appears.
- You are receiving the intended file type.
- The photograph is stored in the correct folder.
- A second and third photograph transfer successfully.
Then enlarge a photograph to 100% and inspect the important details.
For a portrait, check the intended eye. For a product, inspect lettering, edges, and the area that needs to appear sharp. An image that looks sharp when fitted to the screen can reveal missed focus at full size.
Step 7: Evaluate Lighting and Exposure
Use tethering to improve the photograph before moving on.
Check:
- Highlights: Are important bright areas losing detail?
- Shadows: Is there enough separation and texture?
- Focus: Is the intended subject sharp?
- Depth of field: Is enough of the subject in focus?
- Background: Are there distracting edges or objects?
- Reflections: Are lights or unwanted surroundings visible?
Do not judge exposure from screen brightness alone. A bright display can make an underexposed photograph look acceptable. Use the histogram and highlight warnings alongside the image.
For a lighting exercise, change one thing at a time. Move the light, take a photograph, and compare. Then adjust its height, distance, or modifier. This makes it easier to understand which change produced the result.
Step 8: Use Develop Settings and Live View Carefully
The tether bar offers a Develop Settings menu for applying a preset to incoming photographs. If supported, select Live to open a live camera view. Live View availability and operation vary by camera.
For learning lighting, begin with a restrained rendering. A dramatic preset can make it harder to judge what the light itself is doing.
Also, do not confuse Live View with the finished photograph. With studio strobes, the live preview generally shows the continuous ambient and modeling light—not the brief flash exposure. Evaluate an actual capture before deciding whether your flash lighting is correct.
Step 9: Verify Your Files and Finish the Session
Do not assume the camera is also saving a second copy to its memory card. Check your model’s behavior and recording settings, then verify with test photographs.
When finished, choose:
File → Tethered Capture → Stop Tethered Capture.
Wait for transfers to finish before disconnecting.
Back up the original photographs as well as the Lightroom catalog. A catalog backup does not replace a backup of your image files.
Common Tethering Problems and How to Fix Them
Lightroom does not detect the camera
Check compatibility and software versions first. Then try another USB port and a known working data cable. Test with a shorter cable and remove extensions.
If necessary, turn off the camera, disconnect it, restart the computer, reopen Lightroom Classic, reconnect, and try again. Adobe also recommends trying an empty memory card, especially with Nikon cameras. Use a spare or previously backed-up card.
The connection drops during the session
Notice when it happens.
If the camera disconnects when you move, inspect cable seating and strain relief. If it happens after a pause, check the camera’s power-saving settings and whether the computer went to sleep.
If the battery level is low, replace or recharge it before further testing. Do not assume the USB connection is powering the camera simply because it is transferring photographs.
Photographs transfer slowly
Large RAW files, extra JPEG files, cable limitations, and competing computer activity can all contribute to delays.
Try a short diagnostic session:
- Capture single frames instead of bursts.
- Use RAW only if you do not need JPEG copies.
- Close unnecessary applications.
- Temporarily avoid demanding editing operations during capture.
- Compare your usual setup with a direct connection and a local SSD destination.
Change one variable at a time so you can identify what helps.
The newest photograph is not displayed
Check that Disable Auto Advance is unchecked in the session settings.
Also confirm whether the photograph actually transferred. A display-selection problem and a missing-file problem require different troubleshooting.
Sony transfers JPEGs when you expected RAW
Check both the camera’s recording format and its remote-transfer settings. Adobe specifies setting PC Save Image Size to Original when RAW images need to be imported. Menu locations vary by model.
Fujifilm settings cannot be changed from Lightroom
Check the physical dial positions described earlier. When testing native tethering, disable competing tethering plug-ins.
Adobe also documents a case where changing camera settings prevents capture from the tether bar; restarting the tether bar is the suggested workaround.
Canon tethering behaves differently after an update
Adobe introduced a different Canon tethering connection method in Lightroom Classic 15.4. If your version includes the option, Adobe recommends trying Use Canon SDK for Tethering Canon Cameras under Preferences → General → Tether Options, then restarting Lightroom Classic when the newer method causes problems.
Images stop saving or importing
Check free disk space. If basic troubleshooting fails, Adobe recommends checking firmware, testing the manufacturer’s capture application, and considering a Lightroom preferences reset. Record your preferences first, and test the other application separately from Lightroom’s native tethering.
The photographs look different from the camera screen
A RAW photograph’s appearance depends on its processing and profile. The camera preview may use a different rendering from Lightroom.
Display brightness and color also affect what you see. Use a calibrated monitor for dependable evaluation, and avoid correcting the photograph simply to match an uncalibrated camera screen.
What If Lightroom Classic Cannot Tether Your Camera?
If the manufacturer’s software supports tethering your camera, you may be able to combine it with Lightroom Classic’s Auto Import feature:
- Create an empty folder for incoming captures.
- Configure the camera software to save photographs there.
- In Lightroom Classic, open File → Auto Import → Auto Import Settings.
- Select that folder as the Watched Folder.
- Choose a separate destination for the imported photographs.
- Enable Auto Import and take a test photograph.
Lightroom moves incoming images from the watched folder into the destination and adds them to the catalog. It does not monitor subfolders.
In this arrangement, the manufacturer’s software controls the camera. Lightroom handles the incoming files; its native tethered capture session should be stopped.
Try This Simple Tethering Exercise
Place an object on a table and light it from one side. Take a photograph, then add a white reflector opposite the light and take another.
Compare the shadow detail, reflection placement, and overall contrast on your computer. Move the reflector farther away and repeat.
This is where tethering becomes especially useful: you can see a small change clearly, understand its effect, and make a more deliberate decision about the next photograph.