Mastering Object, Gradient, and Range Masking in Adobe Lightroom Classic
Understanding Object, Gradient, and Range Masking in Adobe Lightroom Classic
Masking in Adobe Lightroom Classic is a powerful tool for photo editing, and its masking tools—particularly Object, Gradient, and Range masks—offer unparalleled precision for targeted adjustments. Whether you’re refining a portrait, enhancing a landscape, or adding creative effects, these masks let you edit specific areas of an image without affecting the rest. Here’s an in-depth look at these masking in Adobe Lightroonm and how to use them effectively.
1. Object Masks
What are Object Masks?
Object masks automatically detect and isolate objects in your photo based on your input. By drawing over or brushing on an area, Lightroom uses AI to recognize the object and create a mask around it.
When to Use:
- Isolating a subject in a portrait.
- Enhancing details in objects like flowers, vehicles, or buildings.
- Applying effects like sharpness, clarity, or color adjustments to specific elements.
How to Use:
- Open the Masking Panel by clicking the dotted circle icon in the toolbar.
- Select Object Selection.
- Choose either the Brush Tool or Rectangle Tool:
- Brush Tool: Paint over the object you want to mask.
- Rectangle Tool: Draw a rectangle around the object to mask it.
- Lightroom will automatically detect and mask the object.
- Use sliders to adjust settings like exposure, contrast, and saturation within the mask.
Pro Tips:
- Use Add and Subtract options to refine the mask if Lightroom doesn’t perfectly detect the object.
- Combine Object Masks with other masks for complex edits.
2. Gradient Masks
What are Gradient Masks?
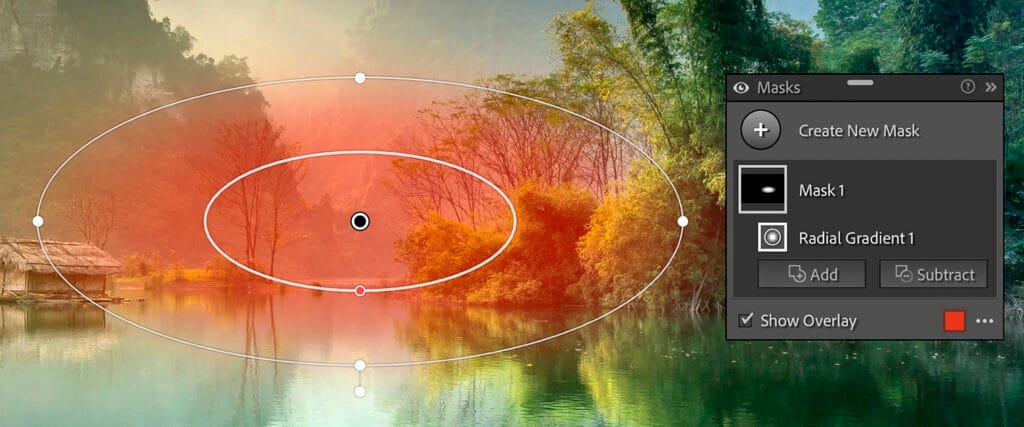
Gradient masks apply a smooth, gradual adjustment across an area of your image. They can be either linear (straight lines) or radial (circular/oval).
When to Use:
- Enhancing skies with a gradual exposure adjustment.
- Adding vignettes to focus attention on the subject.
- Balancing light in landscapes or architectural shots.
How to Use:
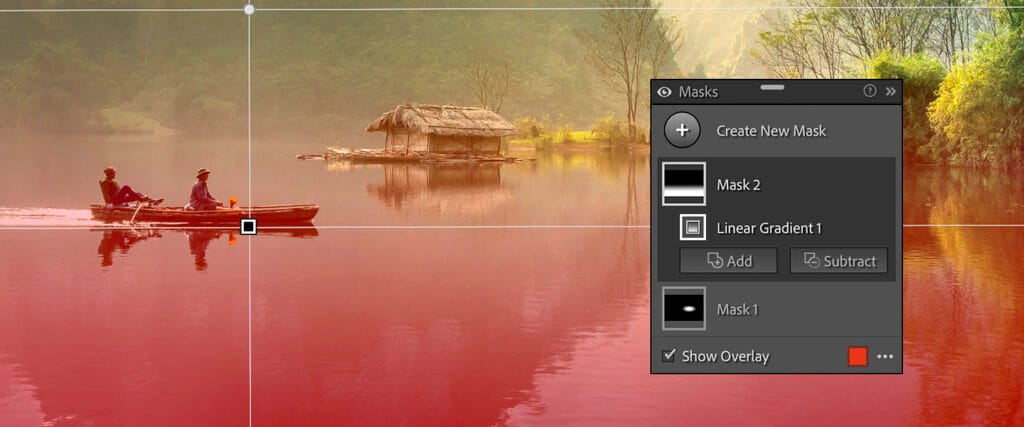
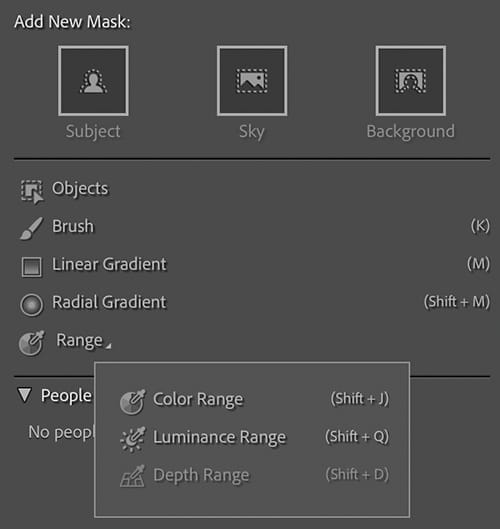
- In the Masking Panel, select Linear Gradient or Radial Gradient.
- Click and drag on your photo:
- For Linear Gradient, drag in the direction of the gradient.
- For Radial Gradient, drag outward to create an oval or circle.
- Adjust the gradient’s feathering (softness) and size to fit the area.
- Use sliders to tweak exposure, highlights, shadows, or other settings.
Pro Tips:
- Invert Radial Gradients to adjust areas inside the circle instead of outside.
- Combine multiple gradients for advanced light balancing.
3. Range Masks
What are Range Masks?
Range masks allow you to select and adjust parts of an image based on specific attributes like color or brightness. They are perfect for highly selective edits.
A. Color Range Masks
What They Do:
Target and adjust specific colors in your photo.
When to Use:
- Enhancing colors in flowers, clothing, or landscapes.
- Isolating and changing specific hues without affecting the rest of the image.
How to Use:
- In the Masking Panel, select Color Range.
- Use the eyedropper tool to click on the color you want to mask.
- Refine the range using the Amount slider to expand or narrow the selection.
- Adjust sliders for your desired effect.
B. Luminance Range Masks
What They Do:
Target areas based on brightness levels (shadows, midtones, highlights).
When to Use:
- Brightening highlights without affecting shadows.
- Recovering details in overexposed or underexposed areas.
How to Use:
- In the Masking Panel, select Luminance Range.
- Use the slider to set the brightness range you want to adjust.
- Fine-tune with the Smoothness slider for a softer or sharper transition.
Why These Tools Are Game-Changers
These masks elevate your editing precision by:
- Saving Time: Quickly isolate areas without manual brushing.
- Improving Quality: Create edits that blend seamlessly with your image.
- Enabling Creativity: Experiment with advanced adjustments and effects.
Pro Workflow Tips
- Use the “Show Overlay” option to visualize your mask area.
- Combine masks using the Add and Subtract tools for advanced customizations.
- Save commonly used masks as Presets for faster edits in future projects.
Mastering Object, Gradient, and Range masks in Adobe Lightroom Classic unlocks endless possibilities for your editing. These tools give you the control to create professional-grade images with ease. Start experimenting today to take your photography to the next level!


