Step-by-Step Guide: Creating Slideshows with Audio in Photoshop
Creating a Slideshows with audio in Adobe Photoshop using the “Load Files into Stack” method involves several steps. Here’s a detailed guide:
Steps to Create a Slideshows with Audio in Photoshop
1. Prepare Your Assets
- Images: Organize the images you want in your slideshow. Ensure they are the same resolution for consistency.
- Audio: Choose a music track or audio file to accompany your slideshow.
2. Load Images into a Stack
- Go to File > Scripts > Load Files into Stack.
- In the dialog box:
- Select Files or Folder, depending on where your images are located.
- Click Browse to choose your images.
- Check the Attempt to Automatically Align Source Images option if needed.
- Click OK to load the images into a single document, each on its own layer.
3. Convert Layers into a Timeline
- Go to Window > Timeline to open the timeline panel.
- Click on Create Video Timeline in the Timeline panel.
- Each layer will appear as a frame in the timeline.
4. Adjust Slide Duration
- Drag the edges of each layer in the timeline to set its duration.
- For consistency, aim for 2-5 seconds per slide, depending on your preference.
- Arrange the layers in the desired order by dragging them in the timeline.
5. Add Slideshow Transitions (Optional)
- Click the Transition icon (a small rectangle between clips in the timeline).
- Choose a transition type (e.g., Fade).
- Drag and drop the transition between layers for smooth visual changes.
6. Add Slideshow Audio
- Click on the Audio Track icon in the Timeline panel.
- Select Add Audio and browse for your audio file.
- Adjust the audio track to match the length of your slideshow:
- Drag the edges of the audio clip in the timeline to trim it.
- Use the Fade In and Fade Out options for smoother transitions.
7. Preview the Slideshow
- Use the play button in the Timeline panel to preview your slideshow and audio.
8. Export the Slideshow
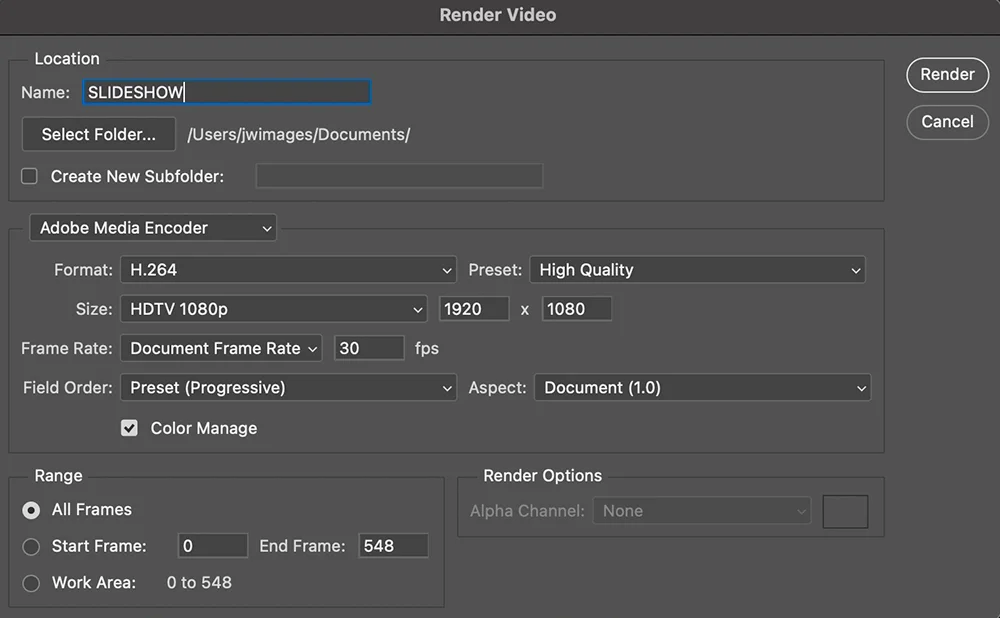
- Go to File > Export > Render Video.
- In the Render Video dialog box:
- Choose a name and location for your file.
- Adobe Media Encoder
- Set the format to H.264
- Use Preset High Quality
- Adjust resolution to 30fps
- Size HDTV 1080p 1920X1080
- Field Order to Progressive and Aspect to Document 1.0
- Click Render to export your slideshow.

This method allows you to create a visually appealing slideshow with audio in Photoshop, perfect for presentations or social media sharing. Let me know if you’d like any further clarification!


This design is incredible! You certainly know how to keep a reader
entertained. Between your wit and your videos, I was almost moved to start my own blog (well, almost…HaHa!) Wonderful
job. I really enjoyed what you had to say, and more than that,
how you presented it. Too cool!