Why Selective Adjustments Are the Secret to Lightroom Mastery
Mastering Masking in Adobe Lightroom Classic: A Beginner’s Guide
Adobe Lightroom Classic offers powerful tools to make selective adjustments to your photos, and the masking feature is a game-changer. Whether you want to isolate a subject, enhance the sky, adjust the background, or make precise edits with the brush tool, these tools give you ultimate control over your edits. Here’s a step-by-step guide to using Select Subject, Select Sky, Select Background, and the Brush in Lightroom Classic. Selective adjustments used 90% of the time over global adjustents.
1. Select Subject: Perfect for Isolating Your Main Subject
What It Does:
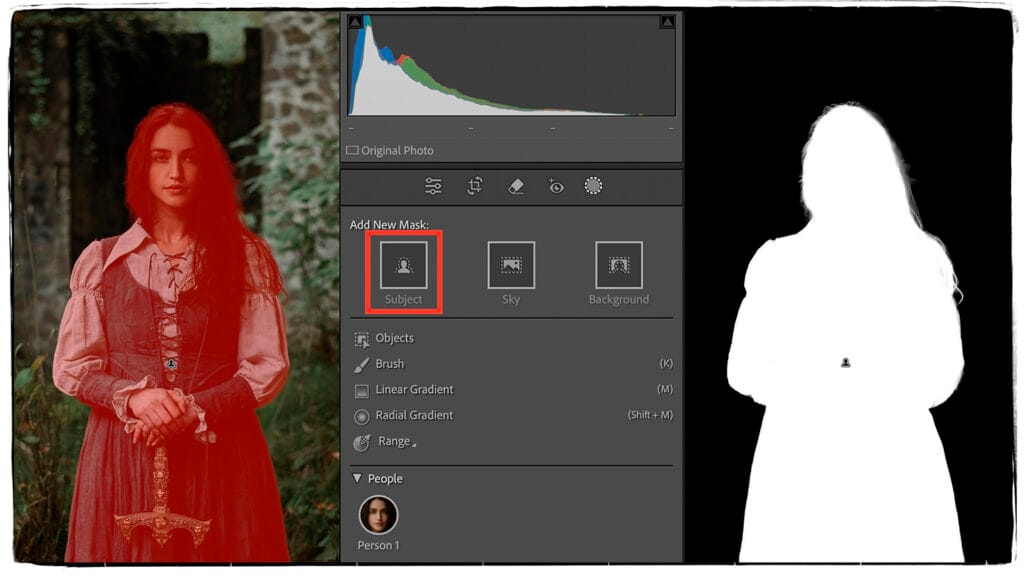
The Select Subject tool automatically identifies the main subject in your image, whether it’s a person, animal, or object. It’s great for enhancing portraits, making objects pop, or adding creative effects.
How to Use It:
- Open the image you want to edit and switch to the Develop Module.
- Click the Masking Tool (circular icon with a dashed outline in the toolbar).
- Select Select Subject from the dropdown menu.
- Lightroom will analyze your image and highlight the detected subject with a red overlay.
Tips for Refinement:
- Use the Add/Subtract options to fine-tune the mask by including or excluding parts of the image.
- Adjust the sliders (exposure, contrast, texture, etc.) to apply the desired effect to your subject.
2. Select Sky: Enhance Dramatic Skies
What It Does:
The Select Sky tool detects and isolates the sky in your photo. It’s perfect for enhancing sunsets, creating moody skies, or making clouds stand out.
How to Use It:
- In the Masking Tool, select Select Sky.
- Lightroom will identify the sky and show the red overlay.
- Apply adjustments like increasing Dehaze for depth, adjusting Exposure for brightness, or tweaking the Temperature for warmth or coolness.
Pro Tip:
Combine Select Sky with gradient filters or brushes for a seamless transition between the sky and the foreground.
3. Select Background: Shift Focus to Your Subject
What It Does:
The Select Background tool detects and isolates the background in your photo.
- In the Masking Tool, select Select Background.
- Lightroom will identify the background and show the red overlay.
- Apply adjustments like increasing Dehaze for depth, adjusting Exposure for brightness, or tweaking the Temperature for warmth or coolness.
4. Brush Tool: Precision at Your Fingertips
What It Does:
The Brush Tool allows you to manually paint adjustments onto specific parts of your image. It’s ideal for fine-tuning or working on areas that automated tools might miss.
How to Use It:
- Choose Brush from the Masking Tool options.
- Adjust the brush size, feathering, and flow to control how the adjustments are applied.
- Paint over the areas you want to edit.
- Use the Add of Subtract option if you make a mistake or need to refine your mask.
Creative Ideas Using Masking Tools
- Portraits: Use Select Subject to soften the background while keeping the subject sharp and vibrant.
- Landscapes: Combine Select Sky with gradient tools to balance exposure across your image.
- Food Photography: Highlight your dish with Select Subject and darken the surrounding table using Select Background.
- Artistic Effects: Use the Brush Tool to paint on effects like a vignette or selective color adjustments.
Final Thoughts
Masking in Lightroom Classic unlocks endless possibilities for editing your photos. Whether you’re a beginner or a seasoned photographer, mastering selective asjustments or masking can take your images to the next level. Experiment, refine, and let your creativity shine!
What’s your favorite Lightroom masking trick? Share it in the comments below!
Step-by-Step Tutorial: Detailed Guide to Using Masking in Adobe Lightroom Classic
Step 1: Open Your Photo in Lightroom Classic

- Launch Adobe Lightroom Classic.
- In the Library module, select the photo you want to edit.
- Switch to the Develop module by clicking the “Develop” button at the top of the screen or pressing
Don your keyboard.
Step 2: Access the Masking Tool
- In the Develop module, locate the Masking Tool icon in the toolbar under the histogram.
Icon Tip: It looks like a dotted circle or a circle split by a line. - Click on it to open the Masking panel on the right side.
Step 3: Select a Masking Type
From the dropdown menu, choose one of the following types based on your needs:
- Brush: For precise manual adjustments. Use this for areas like touching up fine details.
- Linear Gradient: Perfect for gradually applying adjustments, like darkening a sky.
- Radial Gradient: Great for focusing or highlighting circular areas, like a face or a spotlight effect.
- Select Subject: Uses AI to identify the main subject of the photo and creates a mask around it.
- Select Sky: Automatically detects the sky in landscape photos for quick adjustments.
Example: For a landscape photo, select Select Sky to adjust only the sky.
Step 4: Adjust the Mask
- Visualize the Mask: After selection, a red overlay will indicate the masked area. If the overlay isn’t visible:
- Toggle it on/off by pressing the
Okey. - Adjust the overlay opacity in the Masking panel.
- Toggle it on/off by pressing the
- Customize Edges:
- Brush Tool: Adjust the Feather slider to soften edges.
- Linear or Radial Gradient: Move or resize the gradient by dragging its handles.
Step 5: Fine-Tune Adjustments
- With the mask active, start modifying the settings in the Basic Panel on the right. You can adjust:
- Exposure: To brighten or darken the area.
- Contrast: To add depth or flatten the tones.
- Highlights: To recover bright details.
- Shadows: To bring out details in darker areas.
- Temperature/Tint: To adjust the color tones for warmth or coolness.
- Texture/Clarity/Dehaze: For sharper or more atmospheric effects.
- Make subtle changes for a natural look. Over-adjusting can make edits look unrealistic.
Step 6: Refine the Mask
- Add or Subtract Areas:
- In the Masking panel, click Add or Subtract to include or exclude areas from the mask.
- Use tools like Brush, Linear Gradient, or AI-powered Select Subject/Sky to refine.
- Invert the Mask:
- For opposite adjustments (e.g., darken the background but not the subject), click Invert Mask in the Masking panel.
Step 7: Combine Multiple Masks
- Lightroom allows you to stack multiple masks for complex edits.
- Example: Use Select Subject to highlight the subject, then Linear Gradient to darken the background.
- Each mask can be adjusted independently.
Step 8: Save or Export Your Work
- Preview Changes: Compare your edit with the original by pressing the
\key. - Export the Image:
- Go to File > Export.
- Choose your file format (JPEG, PNG, etc.) and resolution.
- Save the edited photo to your desired location.
Pro Tips:
- Keyboard Shortcuts: Press
Shift + Oto cycle through different overlay colors if the red is hard to see. - Copy Masks: To apply similar edits to multiple photos, use Settings > Copy Settings, then paste them onto another photo.
- Experiment: Don’t hesitate to try different mask types in combination.
Let me know if you’d like further assistance or specific examples for any step!


