SHUTTER BUG ACADEMY / LEARN PHOTOGRAPHY
By John Whitehead | Shutter Bug Academy
HDR photography helps you hold detail in a scene that contains both very bright highlights and deep shadows. Think of a room with a sunlit window, a shaded canyon beneath a bright sky, or a building photographed at dusk. A single exposure may not record all the detail you want in both ends of that range.
The solution is to photograph a series of different exposures and merge their usable information. A shorter exposure protects the highlights. A longer exposure records more light in the shadows. Together, they can give you a more flexible starting point for your finished photograph.
The goal is to control the tones, not to make everything equally bright. A good HDR photograph can still have deep blacks, luminous highlights, and a clear sense of the direction of the light. HDR does not require glowing edges, gray shadows, or exaggerated color.
1. What HDR does—and what it cannot do
HDR stands for high dynamic range. In capture, dynamic range describes the span between the brightest detail and the darkest usable detail you can record. Bracketing extends the scene information available for a merge beyond what a single exposure may capture cleanly.
Imagine photographing an old stone room with an open doorway. Expose for the countryside outside, and the room may become extremely dark. Expose for the room, and the clouds outside may turn white. HDR lets you combine information from both exposures, provided that the important detail actually exists somewhere in your bracket.
It does not repair missed focus, eliminate camera shake within an exposure, or recover a cloud that is clipped in every frame. It also cannot turn three differently edited copies of one RAW file into three genuinely different captures. Those copies contain the same original sensor information.
Before bracketing, ask whether you need it. If one well-exposed RAW file already holds the highlights and sufficiently clean shadows, an HDR merge may add work without a meaningful benefit. It is particularly useful for relatively still architecture, interiors, landscapes, and evening city scenes. Fast action, windblown foliage, and breaking waves are more difficult because the subject changes between exposures.
2. Why in-camera HDR is quick—but often not your best master file
In-camera HDR can capture and combine a sequence with little intervention. That is useful for a quick travel image, a preview, or a photograph you need to share immediately. You can evaluate a balanced result without first going to your computer.
The trade-off is control. Depending on the camera, the mode may limit the exposure spread, number of frames, rendering style, output format, or access to the originals. A finished JPEG already has many tonal and color decisions baked into it. Strong corrections later can reveal banding, color problems, or compression artifacts more readily than a carefully preserved editing master.
Avoid the blanket claim that every camera discards the RAW files. For example, Nikon’s Z6III HDR Overlay creates a JPEG but offers an option to retain the individual RAW exposures. Camera features differ, so check your own model’s HDR and image-quality settings. Also, a camera’s HDR display/HEIF setting is not necessarily the same thing as a multiple-exposure HDR merge. [6]
In-camera HDR: step by step
- Choose a still, high-contrast scene and support the camera securely.
- Find the multiple-exposure HDR function in the shooting menu. Its name varies by manufacturer.
- Choose a natural rendering or moderate strength. Use a single HDR sequence while learning.
- Enable saving the original exposures when the camera offers it. Confirm whether the finished image is JPEG, HEIF, or another format.
- Compose, focus, and hold the camera steady through the complete sequence.
- Review bright edges, foliage, and moving objects at high magnification. Check that the result still has believable contrast.
- Turn HDR mode off when finished. If important detail is missing or the rendering is heavy-handed, capture a RAW bracket for desktop merging.
3. Why merge in Lightroom or Photoshop?
For deliberate work, separate RAW captures give you control over how much of the scene’s brightness range you record. Desktop merging gives you a larger preview, alignment choices, motion correction, and more opportunity to judge the result before committing to an output.
Lightroom Classic is an excellent starting point for a natural photographic workflow: merge the brackets, then shape the result with familiar Develop controls. Photoshop is useful when you want an explicit 32-bit HDR master, a choice of tone-mapping approaches, or a route into detailed retouching and layer-based finishing.
Neither program guarantees a better-looking image. The advantage is the quality of the source information and the control you retain. A badly captured bracket can still produce a worse photograph than a strong single exposure.
4. How to bracket for HDR
Exposure bracketing means photographing the same composition at different exposure levels. For HDR, keep the aperture and ISO fixed and change the shutter speed. This keeps depth of field consistent and avoids changing the camera’s ISO behavior between frames.
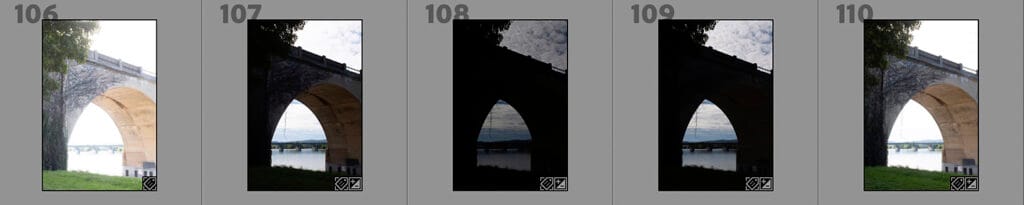
One stop is a doubling or halving of exposure. A practical starting point is three frames at −2, 0, and +2 EV relative to your chosen middle exposure. That is two stops between adjacent frames and four stops from the darkest to the brightest capture. It does not mean the final file has only four stops of dynamic range; each capture already records a range of tones.
| Frame | Shutter speed | Aperture | ISO | Main contribution |
|---|---|---|---|---|
| −2 EV | 1/500 sec | f/8 | 100 | Protects bright clouds and windows |
| 0 EV | 1/125 sec | f/8 | 100 | Records the middle of the scene |
| +2 EV | 1/30 sec | f/8 | 100 | Records more light in dark areas |
These are conventional rounded shutter speeds. The middle exposure is a starting reference, not a promise that the camera meter has found the ideal exposure.
Camera setup: step by step
- Compose first. Decide which highlight and shadow details matter. A bare bulb or reflection may reasonably remain clipped; an important white wall should not.
- Record RAW. Use the camera’s normal full-quality RAW setting. Keep the original files after merging.
- Support the camera. A tripod makes framing consistent and permits a longer shadow exposure. Follow the lens or camera instructions for stabilization on a tripod.
- Choose the aperture for the picture. Use the depth of field you need; f/8 is only an example. Do not change the aperture within the set.
- Set a fixed ISO. Use a low native ISO when practical and turn Auto ISO off. If motion forces higher ISO, prioritize a usable shutter speed.
- Lock focus and white balance. Focus carefully, then prevent refocusing between shots. A fixed white balance keeps previews consistent; RAW white balance remains adjustable.
- Set exposure bracketing. Choose three frames and two-stop spacing if your camera supports it. Confirm that the bracket changes shutter speed. Use aperture priority or manual exposure as appropriate for your camera’s AEB implementation.
- Shoot the whole set promptly. A supported continuous drive or bracket/self-timer mode can reduce time between frames. Some cameras need the shutter held; others take the sequence automatically. Verify that all frames were recorded.
- Inspect the endpoints. The darkest exposure must preserve the important highlights. The brightest must record usable shadow texture without unacceptable motion blur. Use highlight warnings and, if available, separate RGB histograms. Camera histograms normally reflect a processed preview, so they are guides rather than exact RAW clipping meters.
- Extend the bracket if needed. Add a darker exposure if the highlights still clip; add a brighter one if the shadows remain too weak. Five frames at −4, −2, 0, +2, +4 EV are an option for an unusually wide range, not a requirement for every scene.
CHANGE SHUTTER SPEED. KEEP APERTURE + ISO FIXED.-2 EV1/500 secf/8 | ISO 100Highlights0 EV1/125 secf/8 | ISO 100Middle exposure+2 EV1/30 secf/8 | ISO 100Shadows2 stops = 4x the exposure time between adjacent framesConventional rounded shutter speeds. Extend the bracket only when needed.Worked camera-settings example; the illustrated photographs do not verify these EV values.
Manual bracketing without AEB
Set manual exposure, fixed aperture, and fixed ISO. Take the middle frame, then shorten the shutter time by two stops and lengthen it by two stops from the middle setting. For the example above, use 1/125, 1/500, and 1/30 second. Use a remote or a gentle touch so that adjusting the camera does not change the framing. The capture order matters less than covering the range and keeping the scene stable.
Do not automatically shoot more frames because “more must be better.” Redundant exposures take time, use storage, and give moving subjects more opportunities to change position. Use enough frames to cover the tones you need.
5. 8-bit, 16-bit, and 32-bit HDR explained
Bit depth and dynamic range are related, but they are not interchangeable. Bit depth describes how values are encoded. Dynamic range describes the span of brightness information. The distinction between ordinary integer encoding and floating-point encoding is essential here.
The bit depths below are per color channel. An ordinary RGB image has red, green, and blue channels. An 8-bit RGB file therefore has 24 bits across its three color channels; it is still described as 8 bits per channel. [3]
| Format | What it means | Best role in this workflow |
|---|---|---|
| 8-bit/channel, ordinary rendered image | 256 values per channel; less room for repeated strong tonal changes | Finished conventional JPEG for web delivery |
| 16-bit/channel, ordinary rendered image | A nominal 65,536 integer codes per channel; much finer tonal precision | Retouching and a high-quality SDR editing master |
| 32-bit/channel floating point in Photoshop | Stores scene-referred values across an extended brightness range | HDR master before reducing the range for ordinary output |
| Lightroom HDR DNG, 16-bit floating point | Uses floating-point encoding rather than ordinary 16-bit integer encoding | Flexible merged file for RAW-style Lightroom editing |
The 65,536 figure describes generic 16-bit integer encoding, not a promise about every Photoshop tool’s internal implementation. More bits also do not mean more megapixels or automatically sharper detail.
An ordinary 16-bit TIFF and a 16-bit floating-point HDR DNG are not equivalent containers. Lightroom’s HDR technology uses floating-point DNG storage; it does not need a Photoshop-style 32-bit document to retain extended brightness information. Adobe describes this encoding in its explanation of the shared Lightroom HDR technology. [4]
In Photoshop’s Merge to HDR Pro workflow, choosing 8-bit or ordinary 16-bit output renders the extended-range result into a conventional tonal range. Choosing 32-bit retains the HDR data for later decisions. Simply changing an existing 8-bit JPEG to 32-bit cannot restore detail that was never captured. [2, 5]PRECISION AND BRIGHTNESS RANGE ARE DIFFERENT IDEAS8-bit integer256 values / channel16-bit integer65,536 nominal codes / channelFloating pointExtended brightness rangeNormal display rangeHDR headroomLightroom HDR DNG: 16-bit float | Photoshop HDR master: 32-bit floatConceptual bands, exaggerated for visibility; not an actual bit-depth comparison.Conceptual bands are exaggerated for visibility, not a pixel-accurate comparison.
6. What is ghosting—and what does deghosting do?
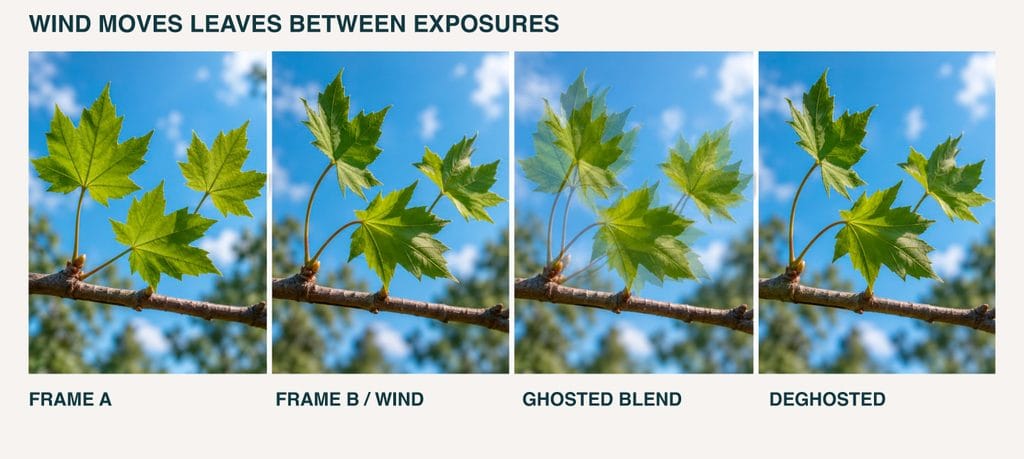
Ghosting happens when an object occupies different positions in the source frames. When those frames are combined, leaves may appear doubled, a person may look transparent, or a flag may have overlapping edges. Water and moving clouds can create less obvious smears or patches.
Alignment corrects changes in camera position. Deghosting addresses changes within the scene. They solve different problems. Neither can reliably turn a subject that is blurred in every source frame into a sharp one.
Deghosting generally favors information from one exposure in affected areas instead of blending conflicting positions. That can reduce the multi-exposure benefit locally: a region taken from a dark frame may be noisier when brightened, while one taken from a bright frame may have less highlight information.
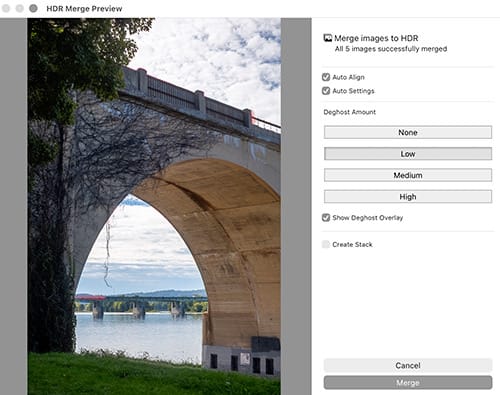
In Lightroom Classic, begin with None. If motion artifacts appear, try Low, then Medium or High only as needed. The deghost overlay indicates the areas being treated; it is not a permanent colored mark on the photograph. Lightroom’s normal HDR Merge dialog does not provide Photoshop’s clickable base-frame selection. [1]
Photoshop’s Remove Ghosts uses a base image, indicated by a green border around its thumbnail. Click another thumbnail if it gives the moving subject a better position or exposure. Always inspect the result closely. [2]CAMERA ALIGNMENT ≠ SUBJECT MOTIONFrame AFrame BNaive blendDeghostedThe scene changes between exposures. A blend can show both positions.Deghosting favors one moment in affected areas; inspect for noise and broken edges.Alignment addresses camera movement; deghosting addresses subject movement.
7. Merge HDR in Lightroom Classic: step by step
These instructions use Lightroom Classic on desktop. Other Lightroom versions can arrange controls differently.
- Import the original bracket and select only the frames from that composition.
- Choose Photo > Photo Merge > HDR.
- Enable Auto Align if framing shifted, especially for handheld captures.
- Treat Auto Settings/Auto Tone as an optional starting rendition; it does not replace your editing judgment.
- Start with Deghost Amount: None. Increase only if necessary and inspect the overlay.
- Enable Create Stack if you want the result grouped with its sources.
- Click Merge. Lightroom creates a new HDR DNG in the catalog. [1]
Finish the merged image
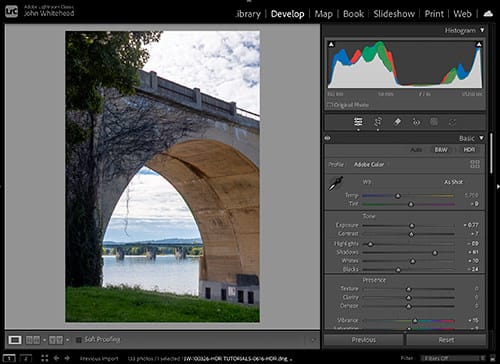
Open the DNG in Develop. Begin with a suitable profile and white balance, then establish the main subject’s brightness. Bring down distracting highlights and open shadows only as far as the photograph needs. Set white and black points so the image retains structure.
Avoid the reflex of pushing Highlights to −100 and Shadows to +100 on every photograph. A dark room should usually remain darker than the sunlit view outside it. Use masks when the interior needs a different adjustment from the sky. Keep Texture, Clarity, and Dehaze restrained around branches and architectural edges.
Compare the result with your best single exposure at matched overall brightness. Look for an actual improvement in usable detail, noise, and tone—not merely a brighter preview. Examine motion areas and corners at 100% before exporting.
8. Merge HDR in Photoshop: step by step
Use the original bracket, retaining exposure metadata. Avoid differently cropped or independently stylized versions of the source files.
- Choose File > Automate > Merge to HDR Pro.
- Click Browse, add the bracket, enable automatic alignment if needed, then click OK.
- Review the preview and source thumbnails.
- Enable Remove Ghosts only when required; select a better base thumbnail if necessary.
- Choose 32 Bit to preserve an HDR master. The white-point preview slider changes the preview, not the stored range.
- Complete the merge and save a 32-bit PSD, PSB, or TIFF master before conversion. If your version offers an automatic Camera Raw toning/conversion path, leave that off for this master-first route.
- Duplicate the master. Choose Image > Mode > 16 Bits/Channel on the copy and adjust the conversion’s tone mapping.
- Finish the 16-bit copy with supported adjustment layers and masks. Preserve the 32-bit master separately. [2]
Choosing a tone-mapping approach
Tone mapping places a wide brightness range into a smaller output range. For a controlled starting point, compare the available conversion methods. Local Adaptation offers local tonal controls; Exposure and Gamma offers a simpler overall adjustment. Let the image determine the approach rather than choosing the most dramatic preset.
When using local adjustments, watch for bright outlines around rooflines and dark rims around clouds. Reduce aggressive detail and local contrast if those artifacts appear. Keep color believable, especially in already saturated skies and foliage. A lower-contrast preview can be refined later; severe artifacts are harder to hide.
For a faster conventional result, you may select 16-bit directly in Merge to HDR Pro and tone-map there. That is a reasonable workflow, but it does not leave you with the same extended-range master as a saved 32-bit merge. Keep the original bracket so you can merge it again. Reserve 8-bit conversion for the final delivery copy whenever substantial editing remains.
9. HDR merging is not the same as HDR display
An HDR merge can become a completely ordinary SDR photograph for print or the web. No HDR monitor is required to benefit from bracketing and a careful SDR rendition.
Lightroom Classic’s HDR button in Develop concerns HDR editing and output for compatible displays. It is separate from the Photo Merge command. For a conventional blog image, check the Develop HDR state and make an SDR rendition deliberately. Do not assume the merge automatically selects the output behavior you want. [7]
Export for a conventional website
Keep the HDR DNG or 32-bit master, plus your editing work. Export an SDR JPEG, convert to sRGB, resize for the intended display dimensions, and choose compression that looks clean at that size. In Lightroom, leave HDR output disabled for this conventional delivery. In Photoshop, export a separate 8-bit SDR copy after your 16-bit finishing work.
Open the exported file and inspect it. Confirm the crop, color, sharpening, and shadow balance at its actual web size. For printing, soft-proof using the appropriate paper/printer profile and make a print-specific rendition; paper cannot reproduce an HDR screen’s luminous highlights.
If you deliberately publish HDR-display images, use a supported HDR export route, review the SDR fallback, and test the actual website and target devices. File format alone does not guarantee consistent HDR presentation. [7]
10. Troubleshooting your HDR photographs
| Problem | Likely cause | What to change |
|---|---|---|
| Important highlights remain blank | They were clipped in every source | Add a shorter exposure when reshooting |
| Shadows look noisy | Too little exposure, or a deghosted area uses a dark source | Capture a brighter usable shadow frame; review deghosting |
| Leaves or people look doubled | Subject moved between frames | Reduce capture time; test deghosting or use a single frame |
| Architecture has double edges | Alignment failed or the camera moved too much | Compare aligned sources; reshoot with stable support |
| Bright halos surround objects | Excessive local contrast or problematic blending | Reduce aggressive tonal controls; inspect the merge itself |
| The image looks flat | Every shadow has been lifted and every highlight compressed | Restore a black point and a believable light hierarchy |
| The moving subject is soft | It blurred during the source exposures | Use a faster shutter speed; deghosting is not motion freezing |
| One side changes color between frames | Lighting changed or a lamp flickered | Keep lighting steady; reconsider timing or use one capture |
A practical exercise
Photograph a still scene containing a bright window or sky and a shaded foreground. Make a three-frame RAW bracket with fixed aperture and ISO. Merge it once in Lightroom Classic and once in Photoshop. Produce a restrained SDR rendition from each.
Compare both merges with your best single RAW frame at similar brightness. Inspect the brightest textured area, the deepest important shadow, and one fine edge. Which version actually gives you more usable detail? Where does deghosting help, and where does it introduce a compromise?
The successful photograph is the one whose tones support the subject. HDR is a way to preserve choices while photographing a difficult range of light. Composition, timing, color, and the quality of the light still determine whether those choices lead to a strong image.