SHUTTER BUG ACADEMY / LEARN PHOTOGRAPHY
Circular Polarizer: Better Color, Less Glare, and Why Quality Matters
By John Whitehead | Shutter Bug Academy
A stream can look clear to your eyes and turn into a sheet of reflected sky in your photograph. Wet leaves can appear rich and green in the woods, yet look pale and shiny in your image. Sometimes the problem is the reflected light covering the subject.
A circular polarizer, often abbreviated CPL, gives you control over that light before you take the photograph. Turn its front ring and watch reflections change. Water can reveal submerged stones. Leaves can regain their color. A blue sky can become more pronounced against white clouds.
My advice is to buy an excellent circular polarizer rather than choosing the cheapest filter available. You are placing another optical component in front of your lens, so its quality matters. To make that investment more practical, buy one that fits your largest commonly used filter thread and adapt it to smaller lenses with step-up rings.
What does a circular polarizer actually do?
Light reflected from nonmetallic surfaces can become partially polarized: more of its vibration is aligned in a particular direction. A polarizer selectively transmits light according to that alignment. Rotating the filter changes which reflected light it suppresses.
This is why the effect varies as you turn the ring or change your camera position. It is also why attaching the filter without adjusting it may accomplish very little.
The word “circular” describes the filter’s optical construction, not simply its round shape. A CPL combines a linear polarizing layer with a quarter-wave plate, making it compatible with camera systems whose metering or autofocus can be affected by linearly polarized light. For general photographic use, choose a CPL unless you have a specific reason to use a linear polarizer.
1. Control reflections on water
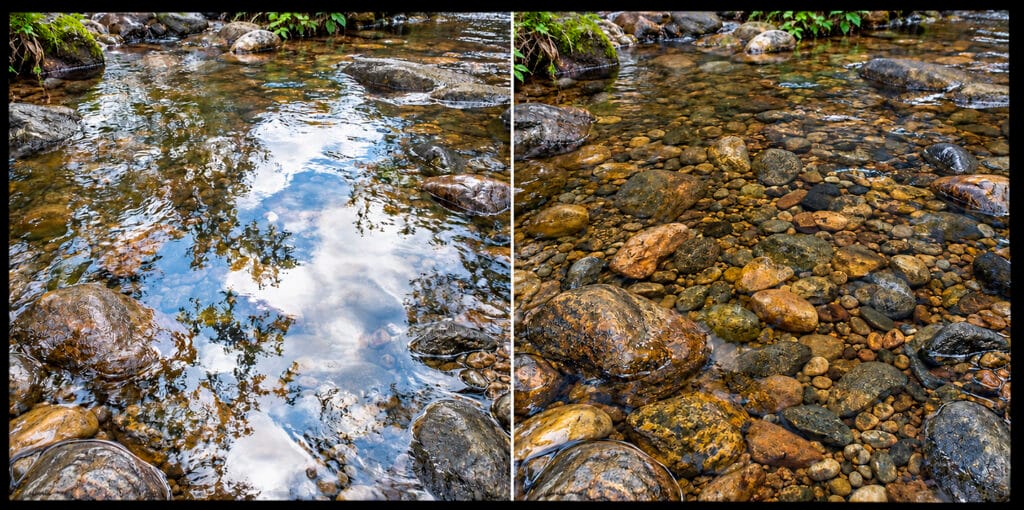
Look at a shallow stream from an angle. Part of what you see is the streambed; another part is the sky or surrounding landscape reflected on the surface.
A polarizer can reduce that reflected layer. This lets the stones, plants, and textures beneath the surface become more visible. The result depends on your viewing angle, the light, and how much the water itself scatters light. It cannot make muddy water transparent.
Do not automatically remove every reflection. A little reflected light helps water look like water. And if a mountain’s reflection is the subject, suppressing it may weaken the photograph.
Photorealistic example — stream: Compare the pale reflections on the left with the visible submerged stones on the right. The intended change is reflection control, with exposure compensated to maintain comparable brightness.
2. Reveal richer color in leaves and wet landscapes
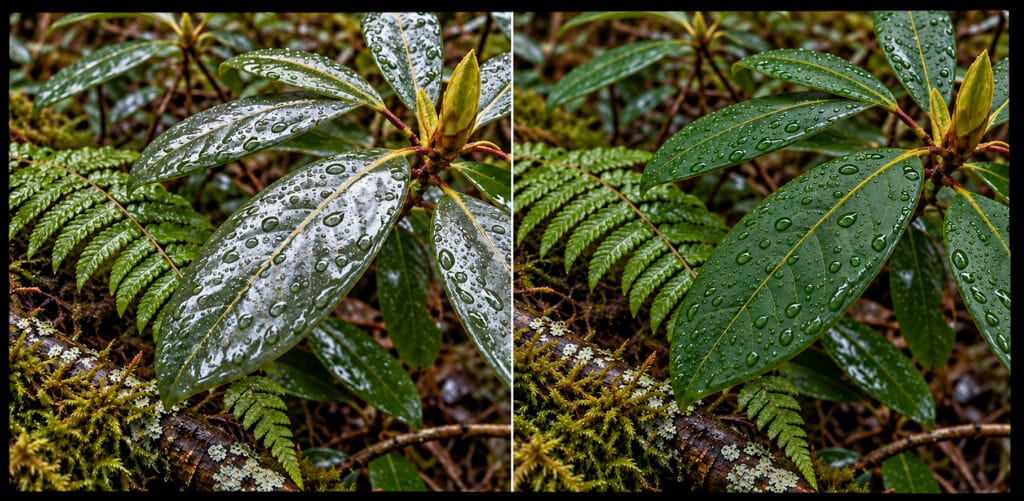
Leaves reflect light, especially after rain. That sheen can mask their green color and soften the appearance of their surface texture. A polarizer can reduce the sheen, revealing more of the underlying color.
This makes a CPL worth trying in an overcast forest, even when there is no blue sky in the frame. Look closely at broad leaves, mossy rocks, and damp vegetation as you rotate the filter.
Watch individual surfaces rather than judging the entire photograph at once. A leaf angled toward you may change substantially while another barely changes. That is normal: their orientations differ.
Photorealistic example — foliage: Notice the silvery coating of reflected light on the unfiltered leaves. In the polarized version, the green surfaces become more visible. The goal is believable color, not fluorescent greens.
3. Give blue skies more separation from clouds
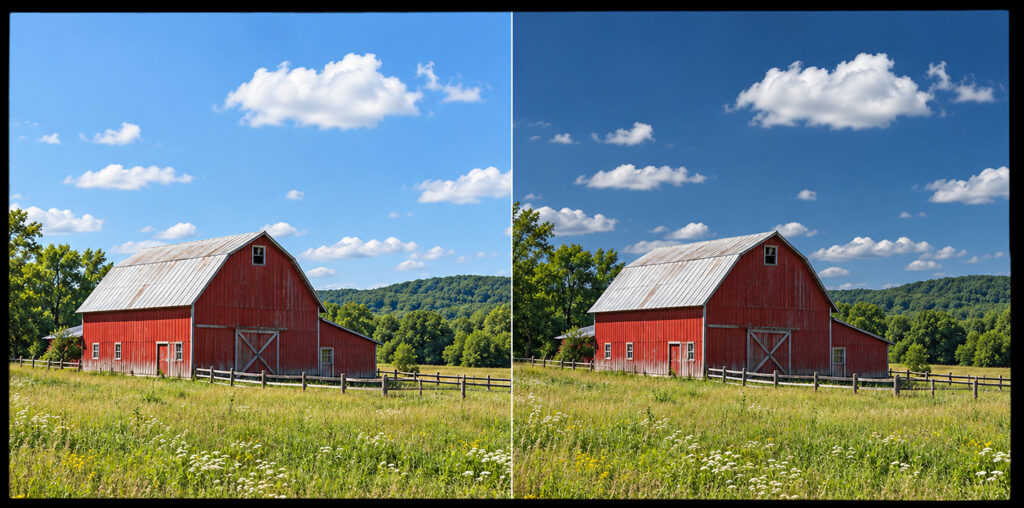
A CPL can deepen blue sky and help white clouds stand out. For sky darkening, the strongest effect is generally about 90 degrees from the sun. Pointing toward or directly away from the sun usually produces much less change.
Be careful with wide-angle lenses. They include a broad range of angles to the sun, so polarization may darken one part of the sky much more than another. That can create an unattractive dark patch or band.
Rotate the filter back from maximum strength if the result looks uneven. Check the whole frame, including its corners. A natural-looking sky is usually more useful than the darkest possible sky.
Photorealistic example — sky: The barn and meadow stay similar in brightness while the blue sky deepens. The clouds retain their shape and placement.
4. Reduce distracting reflections in glass
A polarizer can help when photographing through a shop window or another glass surface. Turn the filter while watching a specific reflection: it may become much weaker, revealing more of the subject behind the glass.
Your position matters. If rotating the filter produces little change, try moving to a different angle. Do not expect every reflection to disappear at once. Multiple panes, different reflection angles, and some treated glass can complicate the result.
Why Photoshop cannot fully replace a polarizer
Editing can darken a blue sky or increase saturation. However, it cannot reliably recover the true detail behind a strong reflection if that detail was never recorded clearly.
Imagine photographing a fish beneath a reflective pond surface. Increasing contrast afterward does not separate the fish from the reflected sky. Reducing the reflection before exposure gives the camera a better opportunity to record the fish itself.
Some editing tools can reduce reflections, but their reconstructed result is not a guarantee of the original scene’s detail. For accurate capture, controlling the light at the lens remains valuable.
Why buy an excellent polarizer instead of a cheap one?
Every photograph made with the filter attached passes through it. Optical flatness, color neutrality, coatings, and mechanical construction all deserve attention.
Look for these qualities:
- Consistent optical quality: A filter should preserve fine detail rather than introduce softness or distortion.
- Neutral color: A strong unwanted color cast creates extra correction work.
- Effective antireflection coatings: These help limit reflections introduced by the filter’s own glass surfaces.
- A smooth rotating ring: Adjustment should be controlled and easy without loosening the whole filter.
- Accurate threads and a suitable frame: A well-made mount improves handling; a slim profile can help on wide-angle lenses.
- Easy-clean surfaces: Water- and oil-repellent coatings are useful around spray, rain, and fingerprints.
B+W is a premium option to consider. Its documented range includes multicoated CPLs, with MRC nano coatings on its higher-tier models and brass mounts. These are concrete features to compare, rather than relying only on a “professional” label.
A low price does not automatically mean a filter is unusable, and a high price does not guarantee the best result on every lens. Test a new filter: photograph fine detail with and without it, compensate exposure, and compare sharpness, color, and flare. Keep the camera position, focus, aperture, and white balance consistent.
I would rather invest in one excellent polarizer that serves several lenses than buy a separate low-quality filter for every lens.
Buy one larger polarizer and use step-up rings
Start by checking the filter-thread diameter on each lens. Look for the Ø symbol, such as Ø67, Ø77, or Ø82. This is the filter size in millimeters. It is separate from focal length: a 50mm lens does not necessarily take a 50mm filter.
Suppose your lenses use 58mm, 67mm, 72mm, 77mm, and 82mm filter threads. You can buy one 82mm CPL and use the following adapters:
| Lens filter thread | Adapter | Shared polarizer |
|---|---|---|
| 58mm | 58–82mm step-up ring | 82mm CPL |
| 67mm | 67–82mm step-up ring | 82mm CPL |
| 72mm | 72–82mm step-up ring | 82mm CPL |
| 77mm | 77–82mm step-up ring | 82mm CPL |
| 82mm | No adapter | 82mm CPL |
The smaller side of the adapter screws into the lens. The larger filter screws into the front of the adapter. There is no glass in the ring.
Choose the size that fits your own kit. If your largest relevant thread is 77mm, an excellent 77mm filter may be sufficient. An 82mm filter is a practical example, not a universal requirement.
Step-up and step-down rings are different
A step-up ring mounts a larger filter on a smaller lens thread. For example, a 67–82mm ring connects a 67mm lens thread to an 82mm filter.
A step-down ring mounts a smaller filter on a larger lens thread. For example, an 82–67mm ring puts a 67mm filter in front of an 82mm lens thread. Its smaller opening can block the image corners, producing mechanical vignetting. The risk is particularly relevant at wide angles.
For this one-filter strategy, buy step-up rings. Step-down rings have specialized uses, but they are a poor default for sharing a CPL.
Practical limitations to consider
Use a direct adapter when possible instead of stacking a chain of rings. Keep the assembly short, and check the corners at the widest focal length you intend to use.
A larger filter may interfere with the original lens hood, and your smaller lens cap will not cover it. Plan for a cap that fits the filter. Some very slim filters have different cap arrangements, so check before buying.
Fit threads gently and stop when snug. Also remember that sharing one filter means moving it between lenses. Separate filters may be more convenient if you frequently alternate between two cameras.
This approach applies to lenses with compatible front filter threads. Bulbous-front lenses and lenses using rear or drop-in filters need their own solutions.
How to use a circular polarizer, step by step
- Decide what you want to change. Choose a reflection, a patch of shiny leaves, or part of the sky to watch.
- Attach the filter. Use the correct step-up ring if needed. Avoid unnecessary filter stacking.
- Compose and focus. If your lens’s front section rotates during focusing, adjust polarization after focusing.
- Rotate the CPL slowly. Watch the image through the viewfinder or on the screen.
- Choose the amount of effect. Maximum suppression is not automatically the best photograph.
- Check exposure and shutter speed. The filter absorbs light; compensate as needed.
- Inspect the entire frame. Look for uneven sky darkening, blocked corners, and reflections you wanted to preserve.
- Readjust after reframing. Turning the camera or changing your viewpoint changes the relationship between the filter and the scene.
Account for the light you lose
CPLs commonly cost approximately one to two stops of light, depending on the filter. Through-the-lens metering sees this loss, but the resulting settings still need your attention. In manual exposure with fixed ISO, you must make the necessary adjustment yourself.
For example, if the unfiltered exposure is 1/250 second at f/8, ISO 100, a two-stop loss requires approximately 1/60 second at f/8, ISO 100 to maintain comparable overall brightness.
That slower shutter may blur windblown leaves. You could instead increase ISO from 100 to 400 and retain 1/250 second at f/8. A tripod reduces camera movement, but it cannot stop the subject from moving.
On film, an external handheld meter does not automatically measure the filter’s loss. Apply the appropriate filter compensation if you are not metering through the filter.
When to take the polarizer off
Remove it when it offers no useful visual change and you need the light. This often includes low-light handheld work, action, and night photography. Also remove or readjust it when reflections are an essential part of the composition.
Do not expect a CPL to eliminate reflections from bare metal. It is most useful for nonmetallic surfaces; painted or coated metal can behave differently because of its surface finish.
For a practice session, photograph one scene three ways: without the filter, with a moderate effect, and with maximum suppression. Compensate exposure so the comparison is fair. Then ask which version communicates the scene most effectively.
A circular polarizer rewards observation. Buy a well-made one, adapt it thoughtfully, and learn to watch the light change as you rotate it. The value is the control it gives you at the moment you make the photograph.