Easy Adobe Photoshop Preferences, Custom Toolbar, Color Settings, & Workspace
This is the first video in this series. While the subject matter might not be the most exciting, it will significantly speed up your workflow.
In this video, we’ll cover how to set up Adobe Photoshop preferences, customize your toolbar, adjust color settings, and organize your workspace. If you haven’t considered doing any of this yet, you should. Optimizing your preferences in Adobe Photoshop can greatly enhance the program’s performance and usability.
I don’t make many changes, but the ones I do make a huge difference. If you’ve watched any of my previous videos, you’ll know that I use a custom toolbar. Adobe stacks tools by default, which can be time-consuming to navigate. I prefer to remove tools I don’t use and unstack the ones I use most frequently. Feel free to try my setup and adjust it as you become more familiar with the program.
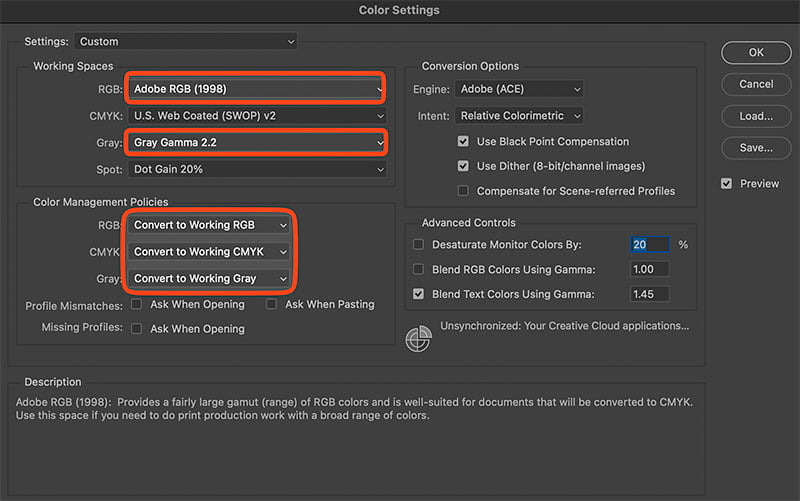
Color settings are crucial for achieving accurate colors and tonal values in photography. You’ll need to specify your preferred color space as your working profile in both Adobe Camera Raw and Adobe Photoshop. I use Adobe RGB, also known as Adobe 1998 or Adobe RGB 1998, which offers a larger color gamut than sRGB without being as excessive as ProPhoto. See color setting in image below. The path is Edit/Color Settings.
Lastly, I adjust the layout of the windows on the right side of Adobe Photoshop. These windows, accessible through “Window” on the top menu, contain many of the program’s key features. Since screen space is always limited, I’ll show you how I optimize this area.
This process is called, “color management.” I will post more on the subject and link those articles to this page. Check ou these links!


