Selectol and Dektol Developing: How to Improve Highlight Detail in Black and white Printing
Start with the right developer
Selectol and Dektol Developing
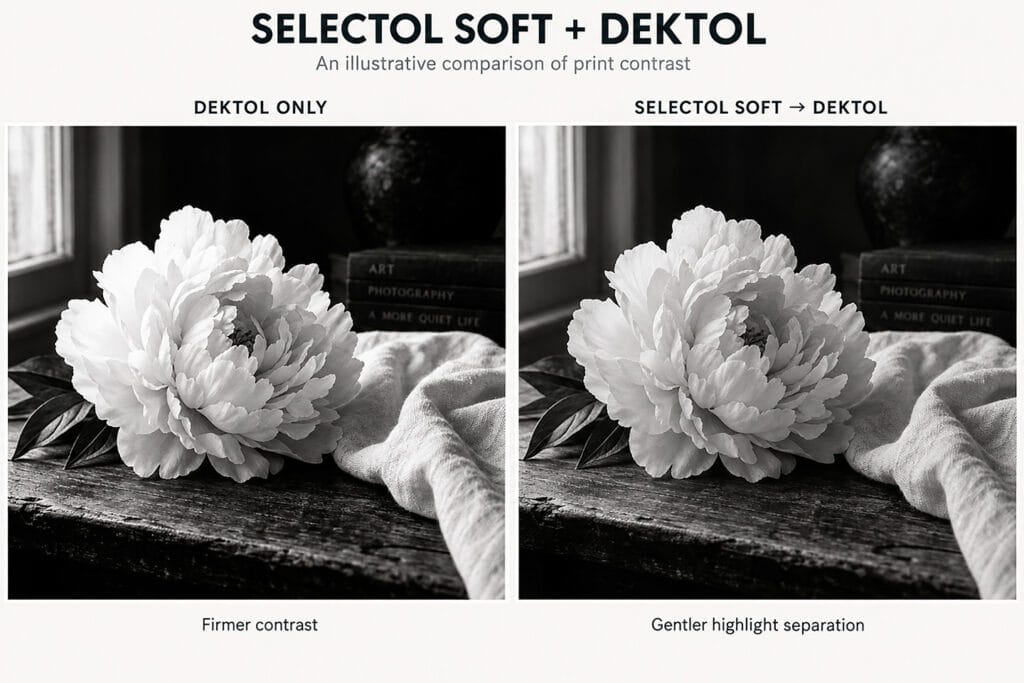
Selectol and Dektol Developing. The classic pairing is Selectol-Soft followed by Dektol. Regular Selectol is a different developer; do not assume it will give the same low-contrast result. Check the full name on the package. Photographers’ Formulary lists TD-31 as a Selectol-Soft substitute and describes its D-52 Selectol as a moderate-contrast, warm-tone developer. [1, 2]
What this method can do
A soft-working developer can help fit a contrasty negative onto paper with a gentler tonal scale. A second bath in Dektol can strengthen the dark values. The aim is a print with visible texture in bright areas, useful mid-tones, and convincing blacks. Both developers act on the whole image; neither works exclusively on highlights or shadows. [1]
Highlight detail also requires enough enlarger exposure. Dense areas of the negative transmit little light and produce the bright areas of the print. If those areas receive too little exposure, changing developers alone will not solve the problem. The method cannot invent texture that the negative never recorded.
Tray sequence
| Order | Bath | Purpose |
| 1 | Selectol-Soft | Begin with softer development |
| 2 | Dektol | Finish to the tested density and contrast |
| 3 | Stop bath | Stop development after both developers |
| 4 | Fixer | Fix according to the paper/fixer instructions |
| 5 | Wash | Remove processing chemicals |
Transfer directly between the developers. Do not use a stop bath or fixer between them. Keep separate, labeled tongs for each bath and prevent Dektol from carrying back into the soft developer.
01 / Prepare and establish a reference
1. Choose a suitable negative and paper
Choose a negative with bright textured areas, such as clouds or white fabric, and some deep shadows. Use one paper type and batch for all tests. Fiber-base paper is useful for fine-print comparisons; RC can also be tested, but its response and permitted wet time differ. Start with a familiar paper and normal processing routine. Fiber based paper using either variable contrast or graded paper will achieve superior results.
2. Set up the darkroom
Use a paper-compatible, tested safelight, five labeled trays, separate tongs, a timer, thermometer, measuring cylinders, and a print-record sheet. Keep the dry enlarger area separate from the wet bench. Use ventilation, avoid skin contact, and follow chemical labels and safety data sheets. Keep all unused paper light-safe.
3. Mix stock first, then dilute for the trays
Mix each stock solution exactly as its package directs, then bring the working solutions to 68°F / 20°C. Keep both developer baths at the same temperature. “1+2” means one part stock plus two parts water—not one part powder plus water.
| Developer | Working-solution starting point |
| Original Selectol-Soft | Use its package dilution. A traditional two-tray test uses 1+1: 500 mL stock + 500 mL water per liter. [3] |
| TD-31 substitute | Manufacturer starting dilution: 1+2, with about 2 minutes for standalone development. Follow its own instructions; it is not identical to the original. [1] |
| Dektol | Use the package’s normal paper dilution, commonly 1+2: 300 mL stock + 600 mL water = 900 mL. Keep dilution fixed while testing times. |
4. Make a fully processed Dektol reference print
Focus, stop down the enlarging lens, and choose a sensible starting filter or paper grade. Make an exposure test strip in Dektol alone, using the normal development time specified for your paper/developer combination. Stop, fix, wash, and dry it. Select an exposure, then make a reference print. Do not pull it early to compensate for overexposure.
5. Check whether a simpler adjustment works
On variable-contrast paper, try a lower filter grade and retest exposure first. If only one bright area lacks tone, try a controlled burn. Use two developers when these approaches do not provide the tonal balance you want, or when exploring finer control on graded paper. [4]
02 / Develop and refine the print
6. Make a fresh exposure test for the two-bath sequence
Use strips that include an important highlight and a dark value. Keep paper, filter, aperture, temperature, and agitation constant. A practical first trial is 2 minutes in the soft developer, followed by 30 seconds in Dektol. This is an experimental starting point, not a universal manufacturer processing time. Retest exposure for this sequence rather than assuming the Dektol-only exposure will match.
7. Develop first in Selectol-Soft
Slide the exposed sheet into the soft bath, immerse it promptly, and start timing. Rock the tray gently and continuously so fresh solution moves across the paper. Keep the whole sheet submerged. Use the same agitation on every test; do not judge final highlight density under the safelight.
8. Transfer directly into Dektol
Lift by a corner, drain briefly over the first tray, and transfer without an intermediate rinse or stop bath. Keep transfer time consistent. Agitate gently in Dektol for the chosen trial time. Start with 30 seconds; compare fresh prints at 45 and 60 seconds if the blacks remain weak. Extra time can change highlights and midtones too. The finishing bath is not a shadow-only control.
9. Stop, fix, wash, and dry
After Dektol, use the normal stop bath, then complete fixing and washing for your exact paper and chemistry. Keep the paper under safelight conditions until adequately fixed. For example, ILFORD MULTIGRADE RC instructions specify ILFOSTOP 1+19 for 10 seconds, RAPID FIXER 1+4 for 30 seconds, and a 2-minute running-water wash. These are RC-specific instructions; do not copy them to fiber paper. [4]
For fiber paper, follow its specified fixing, wash-aid, and final-wash sequence. Judge fully dry prints under the same white light, because drying can change the appearance of delicate highlights.
10. Change one variable and record the result
| Test | Soft bath | Dektol finish | Question |
| A | 2:00 | 0:30 | Is there texture and adequate black? |
| B | 2:00 | 0:45 | Do darker values improve? |
| C | 2:00 | 1:00 | Does extra development hurt the balance? |
Times are minutes:seconds and are trial settings, not guaranteed endpoints. Keep exposure fixed for this comparison, then refine exposure after selecting the best sequence. If all results disappoint, revisit filtration and exposure before extending development further.
03 / When to use it—and when to skip it
| Use it when… | Skip it or solve something else when… |
| A contrasty negative has highlight texture that is difficult to print with a satisfying tonal balance. | The negative contains no usable texture in the bright area. Chemistry cannot create missing information. |
| You want fine contrast adjustments on graded paper. | A lower variable-contrast filter already produces the result you want. |
| You want to explore a softer tonal scale with a controlled Dektol finish. | The print already lacks contrast or blacks; more soft development may make it less convincing. |
| You can run careful tests and reproduce the timing. | You need fast throughput, have limited tray space, or cannot keep solutions and transfers consistent. |
Trade-offs
Expect extra chemistry, testing, tray space, and cleaning. Carryover and developer exhaustion can cause drift. Paper type and image tone affect whether the change is useful. A long Dektol finish can reduce the soft bath’s advantage. Compare complete, dry prints rather than assuming that a more complicated process is better.
Troubleshooting
| What you see | What to test next |
| Blank highlights; good blacks | Increase exposure or burn the highlight; if shadows then close up, lower contrast. |
| Weak blacks and dull midtones | Check fresh chemistry and exposure; test a longer Dektol finish or a higher filter grade. |
| Gray whites or dirty borders | Check paper/safelight fog, contamination, and exposure; do not call fog “extra detail.” |
| Uneven development | Immerse promptly; maintain even agitation and adequate solution depth. |
Record: negative ID, paper and batch, filter, aperture, exposure and burns, both dilutions and temperatures, bath and transfer times, chemistry age, and observations after drying.