01 / The equipment
What makes a studio strobe different?
Raise a continuous light until the exposure looks right and you can watch the whole change happen. Walk up to a strobe and the lamp may look exactly as bright as before, even after you double the flash setting. That catches people on their first day in the studio. The light you can see is the modeling lamp. The one that makes the photograph lasts a fraction of a second.
A strobe stores electrical energy in a capacitor, then releases it through a xenon flash tube when it receives a firing signal. It needs time to charge again. Listen for the ready beep or watch the ready indicator before judging a test frame. An occasional dark frame during a fast series can be a recycling problem even when your camera settings are perfect.
Monolight or head and pack?
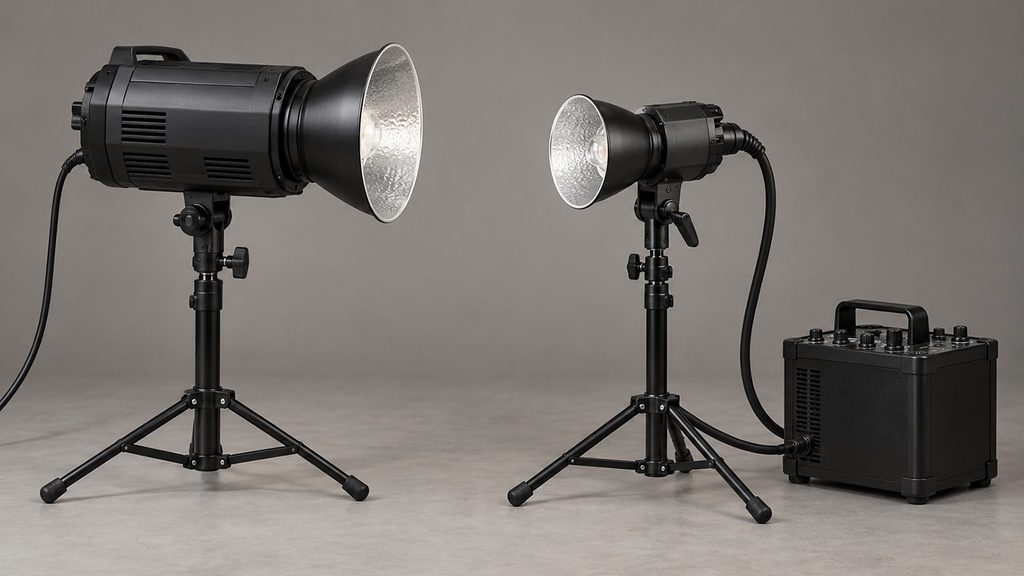
On a monolight, the controls travel with the light. That is handy for a one-light portrait and less convenient once the head is eight feet up on a boom. Radio power control can save a trip up the ladder. AC monolights need an outlet at each position. Battery monolights carry their own supply.
A pack system puts the capacitors and controls in a separate generator. A lighter head is easier to position overhead, but its cable limits placement. A 1,200 Ws pack with two heads attached does not automatically supply 1,200 Ws to each. Some packs split energy equally, others in fixed ratios, and some allow independent adjustment. Check the outlet markings before changing a second head. Follow the manufacturer’s shutdown procedure before connecting or disconnecting a head cable.
Read shadows with the modeling light
Bring the softbox up until the shadow under the nose starts to touch the lip. Lower it just enough to separate the two. You can do that entire exercise with the modeling lamp before anyone has to fire a flash. In full or fixed mode the lamp stays bright enough for focusing. In proportional mode its brightness follows the selected flash setting, which helps you judge the balance between matched heads.
Older heads often use hot tungsten-halogen modeling bulbs. Newer ones may use LEDs. Their color and brightness can differ from the flash. A slow exposure or a high ISO can record the modeling lamp or the room lights, especially on the shadow side. Make a frame with flash disabled to see how much continuous light is actually registering.
Why the flash tube may look tinted
“Color-coated” usually refers to a factory treatment on the glass that changes the spectrum reaching the subject. Depending on the system, it can reduce ultraviolet output or warm the visible flash toward the manufacturer’s daylight target. Check where the correction lives. Broncolor’s Pulso G is a useful example because its listed 5900 K tube and 5500 K protecting glass carry different ratings.
If one side of a white product looks warmer than the other, fire each head separately onto a neutral target using the same camera white balance and modifier. Compare the frames. A mismatched dome or yellowed diffusion panel can show up immediately. RAW gives you room to adjust white balance, but one global correction cannot remove two different casts falling on opposite sides of a face. Use approved replacement parts and let hot glass cool before handling. Leave internal capacitor service to a technician.
02 / Flash exposure
How much light is 400 watt-seconds?
A 400 W continuous fixture and a 400 Ws flash do not have comparable brightness ratings. The first number describes a rate of energy use. The second describes the electrical energy available for one flash at full output. Actual light at the subject depends on the head’s efficiency, reflector, diffusion and distance. A flash meter answers the question a catalog rating cannot: what aperture will this setup give me here?
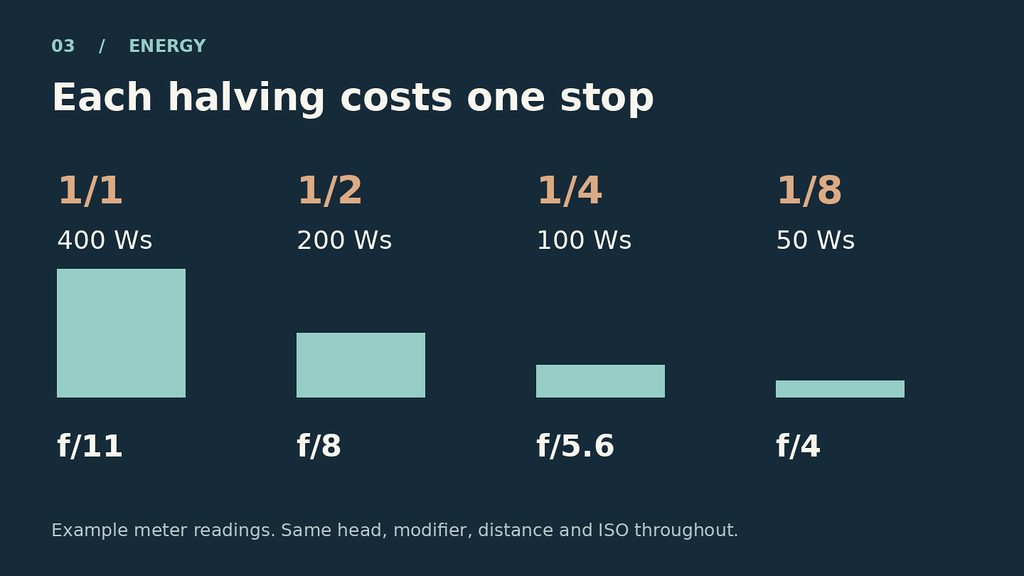
On a 400 Ws head, full, half and quarter power correspond to 400, 200 and 100 Ws. Each halving costs one stop. If the first meter reading is f/11, expect about f/8 and f/5.6 on the next two pops. If the camera stays at f/11, the photograph gets progressively darker. On a stop-based digital control, a change from 8.0 to 7.0 may mean one stop down. Those display numbers are settings, not f-stops to copy into the camera.
03 / Flash exposure
Separate the room from the flash
Start at ISO 100, 1/125 second and f/8 if your camera supports that sync speed. Turn off Auto ISO. With the trigger off, make the room-only exposure. A nearly black frame is useful for a fully flash-lit portrait. If a window is part of the picture, decide how bright you want it before adding flash.
At ordinary sync, with the entire brief pulse captured, slowing from 1/125 to 1/60 admits roughly one stop more room light while the flash contribution stays essentially the same. Aperture and ISO affect both sources. To brighten just the flashed face, increase flash energy. Moving the light closer also brightens the face, but changes shadow softness and how rapidly the light falls off behind it.
04/ Shutter timing
Why a dark band appears
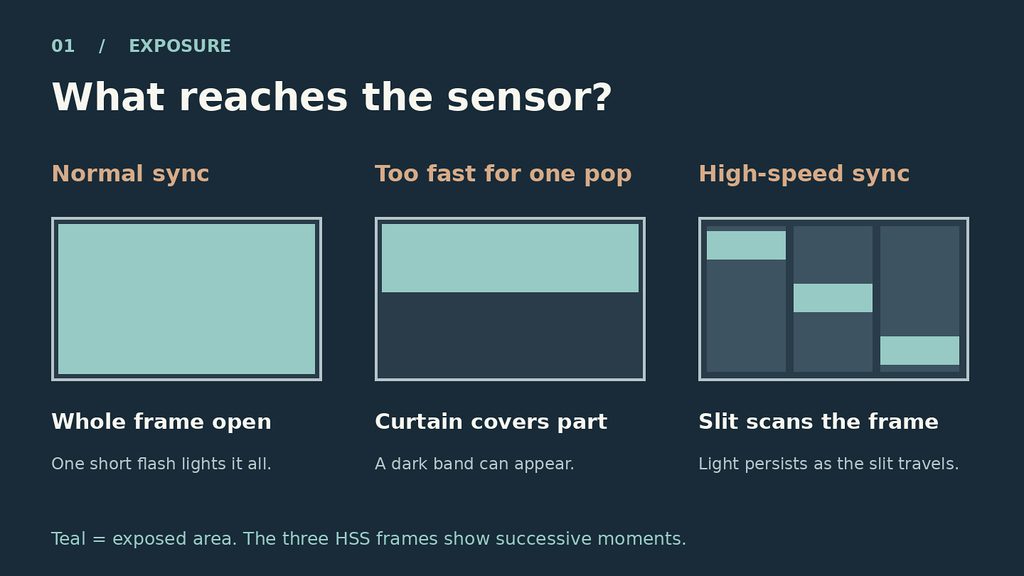
A mechanical focal-plane shutter has two curtains. At or below normal sync speed, the first clears the frame before the second starts closing. Above sync, the second follows the first across the sensor, creating a moving slit. Fire a single short flash then and only the open strip gets all its light. The result can be a dark edge or band. Its position depends on the camera.
Many cameras sync around 1/160 to 1/250 second, but look up your model and shutter mode. Some electronic-shutter modes disable flash or change the limit. If a band appears on a plain wall at your nominal maximum, slow down one step and test again with the actual radio and head. A leaf shutter or global shutter can behave differently.
When high-speed sync earns its keep
Suppose a doorway portrait calls for f/2.8, but daylight gives a correct background exposure at 1/1000 second. With a compatible camera, transmitter and strobe, high-speed sync can deliver that frame. Typical HSS systems pulse rapidly so each part of the sensor receives light as the slit passes. Your camera now controls the time each strip receives both ambient and HSS illumination.
The cost is useful output. A softbox across the room may give too little fill once you enter HSS. Bring it closer, choose a more efficient modifier or work in open shade. Another option is a lens-mounted neutral-density filter and a slower shutter at normal sync. The filter cuts flash as well as daylight, so meter again. For a moving subject in a dim studio, look at flash duration before reaching for HSS.
05 / Motion
Read the t.1 duration for action
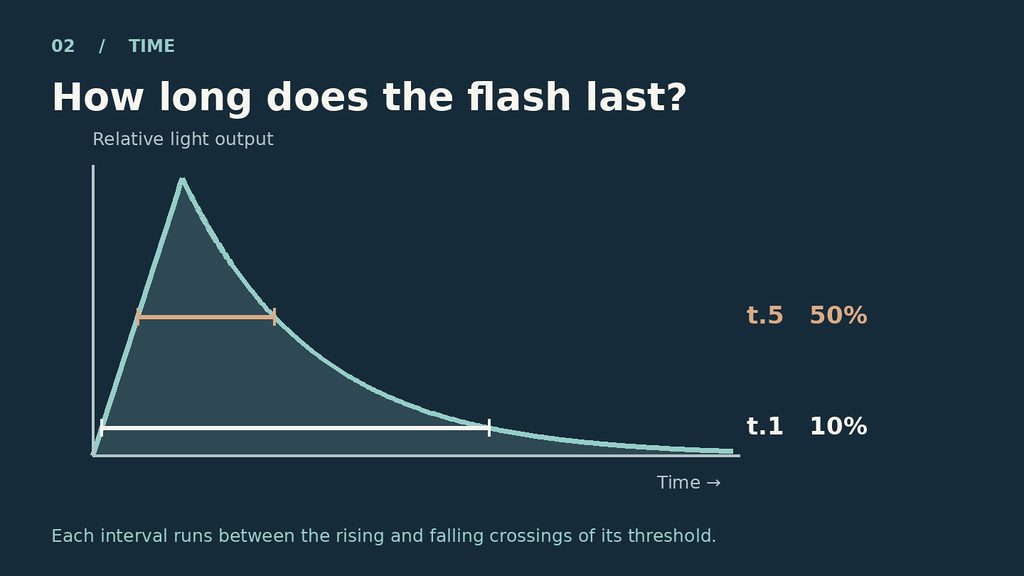
Imagine photographing a potter flicking clay from a tool. The shutter might be open for 1/125 second, yet the flying specks can be sharp if nearly all the recorded light arrives in a much shorter burst. A long, dim tail on that burst can still draw a streak. The t.1 specification counts more of that tail than t.5, so it is the more useful starting point for motion.
A t.1 of 1/4000 second is shorter than a t.1 of 1/800. Neither guarantees sharpness for every subject. Speed, direction, magnification and final print size matter. Many electronically cut-off heads shorten duration as you lower energy. Other circuits behave differently. Read the duration table or the head’s display at the selected setting. To test, photograph a swinging key ring against black. Compare two durations, meter back to equivalent brightness, and check a flash-off frame for ambient trails.
06 / Firing the lights
Cord, optical slave or radio?
The simplest manual trigger closes a contact at the right moment. A sync cord does this directly. A basic hot-shoe radio does it wirelessly, often through a receiver plugged into the head’s sync socket. Either can fire a sophisticated strobe while leaving power control at the head. The TEST button on the head checks the flash itself. TEST on the transmitter checks the radio link as well.
In the HACC studio, a PocketWizard transmitter and a compatible receiver can fire a Broncolor head through its sync input. Start with one light. Match radio channels, check the receiver’s cable, wait for ready and press the transmitter’s test button. Then fire the camera. A channel separates nearby setups. A group, on systems that support groups, lets you select the key, fill or rim within a setup.
An optical slave, sometimes called a photocell, fires when it sees another flash. It works well where light can bounce around a studio. A basic slave may fire on a TTL metering preflash and miss the exposure. Use a supported preflash-ignore mode or put the triggering flash in manual. Proprietary radios can add remote power, modeling-lamp control, TTL or HSS. Matching channel numbers across unrelated systems do not make them compatible.
07 / Firing the lights
Manual power or TTL?
For a series of staff portraits, put a tape mark under the stool and set flash power manually. Once the incident meter reads your chosen aperture, each person receives the same amount of light at that mark. Manual camera exposure and manual flash power are separate choices. You can set ISO, shutter and aperture yourself while letting a compatible TTL system set flash output.
TTL measures a preflash through the lens and computes the main burst. It can help when a subject steps toward or away from the light. A bright shirt, dark background or change of framing can influence its decision. If the flash-lit face is too bright, try minus flash exposure compensation. If it is too dark, try plus. Some systems let you capture a TTL starting value and switch to manual to hold it for the rest of the series.
08 / Shaping light
Will the LED softbox fit the strobe?
A 90 cm softbox placed one meter from a face serves the same purpose on an LED or a strobe. Umbrellas, octaboxes, beauty dishes, snoots, grids and barn doors still do their familiar jobs. The mechanical connection is where photographers get caught. A Bowens S-type accessory does not lock directly onto a Broncolor bayonet. Profoto uses its own attachment system. An umbrella generally uses a shaft receiver, so check its diameter and the available clearance.
For a rod-style softbox, an interchangeable insert may let you keep the fabric and rods while replacing only the part of the speedring that fits the head. Some quick-opening boxes have a fixed mount. Check load and heat ratings, especially around a halogen modeling lamp. Then look at the lit diffusion panel from the subject’s position. A recessed flash face or different tube geometry can change how evenly the same box fills. Re-meter after a swap.
09 / Studio exercise
Build the portrait one light at a time
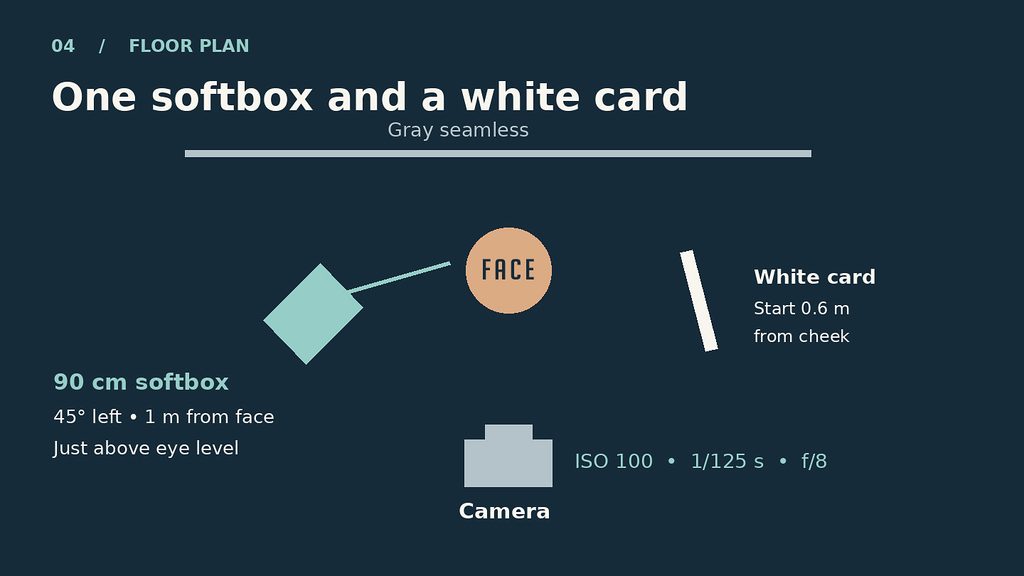
Place the subject roughly 1.5 m in front of a gray seamless. Put a 90 cm softbox about one meter from the face, 45 degrees to camera left, slightly above eye level and tilted down. Weight the stand. Set ISO 100, 1/125 second and f/8, then make the flash-off frame. With the head in manual, 1/8 power on a 400 Ws unit is a trial setting. The meter decides the final power.
Take the first portrait with the softbox alone. Bring a white card toward the shadow cheek and take a second. Compare the cheek opposite the key and the dark side of the cup. The white card has no power dial. Its contribution changes with its size, angle and distance. Record the final distances and reading so another photographer can rebuild the setup.
10 / Studio exercise
Read the portrait before moving the light

In the portrait, trace the nose shadow and the light across the cup before looking at the overall brightness. If the shadow edge is too hard, bring the box closer and reduce flash power to restore the same meter reading. If the edge looks right but the shadow is too deep, move the white card closer instead. Those adjustments solve different problems.
11 / On location
Portable battery-powered strobes

A battery monolight lets you move the same portrait setup into a workshop or a field without finding an outlet. Some portable systems split the battery generator and the head, which takes weight off the stand but introduces a cable. Compare usable output through your intended modifier, the lowest available setting, the weight aloft and the time between full-power shots. A low minimum matters just as much indoors when you want a close softbox and a wide aperture.
For a potter in a bright doorway, expose the workshop background first. Start the battery head just outside the composition, 45 degrees to the subject, and add enough flash to read the face. If daylight forces you above sync, decide whether you can move into shade, stop down or enable compatible HSS. A nearer softbox both softens the shadow edge and helps recover working exposure.
A manufacturer’s flash-count rating is usually tied to a defined test, often full-power pops on a fresh battery. Long modeling-light use, repeated high-output shots, HSS and temperature change what you get on location. Turn down the preview lamp between setups, carry a charged spare, watch for thermal warnings and secure the stand. Outdoors, give someone the job of holding a large modifier when wind can catch it.
Equipment references
Nikon • focal-plane shutters and high-speed sync
Broncolor • Pulso G tube, modeling lamp and protecting glass