Mastering the Art of Saving Images in Adobe Photoshop: A Complete Guide

Mastering the Art of Saving Images in Adobe Photoshop: A Complete Guide
Saving images in Adobe Photoshop isn’t as simple as just pressing “Save As” or “Save a Copy.” Depending on the intended use of the image—whether for print or the web—the process of saving can involve several steps and considerations. Understanding elements like resolution, pixels, color profiles, flattening images, profile conversion, sharpening, and file formats will ensure your image looks its best in any medium. In this post, I’ll break down each of these critical aspects of saving an image in Photoshop.
1. Resolution: The Foundation of Image Quality
Saving for Print
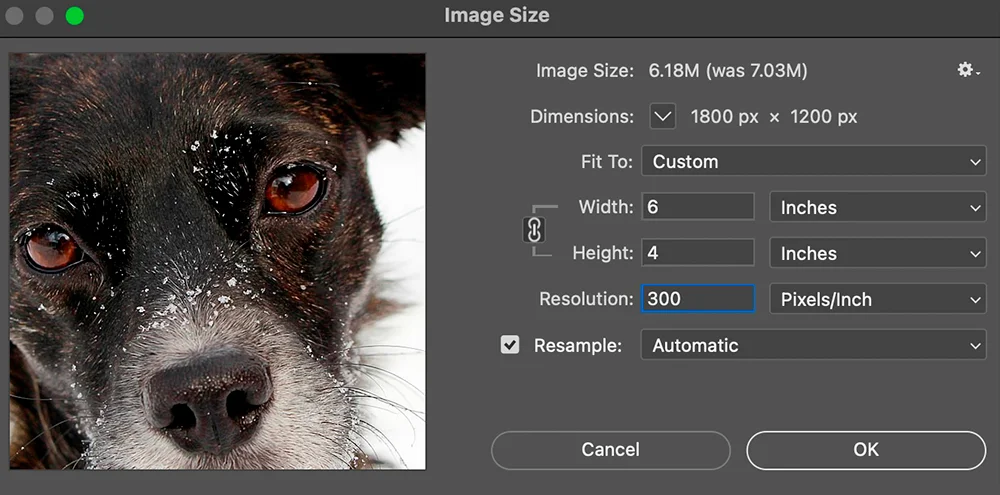
When saving for print use the width and height for your final output size. In this case 4 X 6. Resolution refers to print quality. 300 pixels per inch is a good standard to start with.
Resolution refers to the number of pixels per inch (PPI) in an image and plays a key role in determining its quality. Higher resolution means more pixels and finer detail, but it also means larger file sizes.
- For print: You’ll want a resolution of at least 300 PPI for high-quality prints. This ensures that your image retains sharpness and clarity when printed.
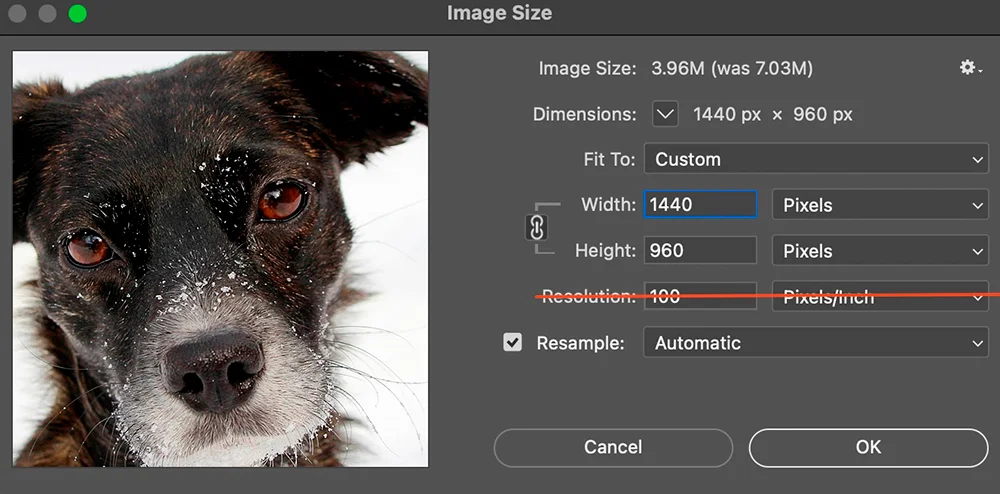
- For web: We size using pixel dimension. Resolution is not a factor when sizing to pixel dimension so the number in the field does not matter.
Saving for the Web
When saving for the web, you need to size in pixel dimensions. Resolution does not matter when sizing for pixel dimension for the web.
When saving, always set your resolution according to the final use of the image.
2. Pixels: Understanding Image Size and Detail
Pixels are the individual points of color that make up an image. When you adjust image dimensions in Photoshop, you’re essentially adjusting the pixel count. The more pixels, the more detail an image can display.
- For print: Image size is generally specified in inches or centimeters, but you’ll also need to keep an eye on pixel dimensions. A large print will need more pixels to ensure that it doesn’t look blurry.
- For web: You’ll want to keep your pixel count optimized for faster loading times. For example, images intended for a blog post might have dimensions like 1200×800 pixels, balancing quality with speed. Google uses page load speed are part of its ranking system. Sizing an image to the correct size is very important.
3. Color Profiles: Ensuring Color Accuracy
Color profiles determine how colors are interpreted in your image. The two most common color profiles you’ll encounter are sRGB and Adobe RGB.
- For print: Use Adobe RGB. This profile has a wider color gamut, meaning it can display more colors, which is essential for high-quality print work.
- For web: sRGB is the go-to profile. It’s the default for most monitors, and the web ensuring that your image will display colors accurately, across devices.
Before saving, always ensure you’ve set the correct color profile for your intended output. You can check this under the “Edit” menu by selecting “Convert to Profile.”
4. Flattening Images: Streamlining Your Layers
In Photoshop, you often work with multiple layers to create complex compositions. However, layers increase file size, and they may not be necessary for your final saved image.
- Flattening: Merging all layers into a single layer (Image > Flatten Image) reduces file size and simplifies the image, making it easier to export.
- When to flatten: For print, you can flatten images if you’re done editing and don’t need the layers anymore. For the web, flattening is almost always recommended to keep file sizes small and loading times fast.
That said, don’t forget to save a separate version of your file with layers intact in case you need to edit later.
5. Convert to Profile: Matching Your Output Device
The “Convert to Profile” option in Photoshop is essential when preparing images for different output devices, such as printers or web displays.
- For print: Converting to a printer’s specific color profile (usually provided by the print shop) ensures your colors will look accurate in the final product. This is especially important when using high-quality printers that interpret color differently from your screen.
- For web: Ensure that your image is in the sRGB profile to maintain consistent color display across different devices.
You can find the “Convert to Profile” option under the Edit menu.
6. Sharpening: Enhancing Image Clarity
Sharpening an image increases the contrast between neighboring pixels, making edges and details appear more defined.
- For print: Always apply sharpening as a final step before saving, but be cautious not to over-sharpen. Over-sharpening can create unwanted halos around objects.
- For web: A slight sharpening can enhance the image’s appearance, especially if you’ve resized it. However, avoid overdoing it as excessive sharpening can degrade image quality.
Photoshop offers various sharpening tools, such as Unsharp Mask and Smart Sharpen. Experiment with these to find the best option for your image.
7. File Formats: Choosing the Right One
Finally, the file format you choose when saving will impact both quality and compatibility. Photoshop offers several file formats, but here are the most common:
- JPEG: Ideal for web images. JPEGs compress image data to reduce file size, which is perfect for online use but can lead to quality loss.
- PNG: Best for images with transparency or sharp edges. PNGs are lossless, meaning they retain quality, but the file size can be larger than a JPEG.
- TIFF: A lossless format often used for print because it maintains maximum image quality, though it results in large file sizes.
- PSD: Photoshop’s native format, which preserves all layers, adjustments, and other editing features. Always save a copy of your work as a PSD to keep all your editing options intact.
- PDF: Useful for print when you need to maintain high quality and preserve text layers.
- WebP: Is a new format developed by google. WebP is similar to JPG but will usually reduce your file size smaller than JPG. It also supports transparency like PNG.
Final Thoughts on Saving Images
Saving images in Adobe Photoshop goes beyond simply selecting “Save As.” By mastering key elements like resolution, pixels, color profiles, flattening images, profile conversion, sharpening, and file formats, you can ensure your images look stunning whether they’re displayed on a website or printed on a billboard. Take the time to understand these settings, and your images will always shine in any medium.
Happy saving!