Photoshop Select and Mask-Precise Selections in 1 Location

Select and Mask
Mastering the Select and Mask Tool in Adobe Photoshop
The Select and Mask tool in Adobe Photoshop is a powerful feature that allows you to make precise selections and refine the edges of objects in your images. Whether you’re removing backgrounds, cutting out complex subjects, or blending layers seamlessly, Select and Mask gives you the control to fine-tune your selections for professional results. In this guide, I’ll explain what the Select and Mask tool is, and how to use it step-by-step.
What is Select and Mask?
Photoshop’s Select and Mask is essentially a workspace that enables you to refine selections. It’s especially useful for tricky areas like hair, fur, or soft edges where you want smooth blending. Instead of manually tracing every tiny detail, Select and Mask offers tools to automatically detect edges and refine the selection based on the subject’s contrast with the background.
When to Use Select and Mask
This tool is perfect for:
- Removing backgrounds from complex images.
- Selecting fine details like hair, fur, or foliage.
- Refining edges on objects that need smooth transitions.
How to Use the Select and Mask Tool
Step 1: Make an Initial Selection
Before opening the Select and Mask workspace, you can start with a basic selection. You can use any of Photoshop’s selection tools, like the Quick Selection Tool, Magic Wand, or Lasso Tool, depending on the complexity of your image. Here’s how:
- Quick Selection Tool: Useful for selecting areas of similar color or tone. It works like a brush, and you can adjust its size for larger or smaller selections.
- Object Selection Tool: Good for selecting large areas with similar color, such as the background.
- Lasso Tool: Offers freehand selection, great for manual tracing around an object.
Step 2: Enter the Select and Mask Workspace

With your initial selection active, go to the Options Bar and click on the Select and Mask button. Alternatively, you can find it under Select > Select and Mask.
Step 3: Understand the Workspace

The Select and Mask workspace provides several tools and options to help refine your selection. Here are the key components:
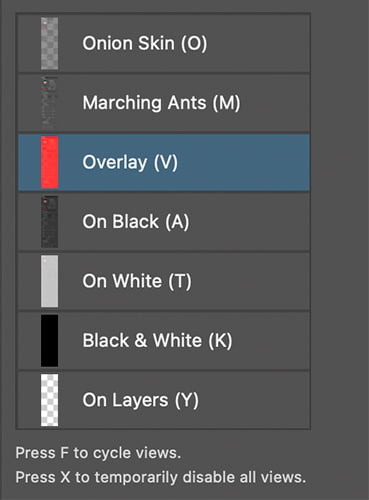
View Mode: This lets you choose how you see your selection. You can view it on Onion Skin, Overlay, On Black, On White, or other options to see how well the selection fits. See #4 Above.
- Edge Detection: See #6 Above.
- Radius: Determines how far Photoshop looks to detect edges. A higher radius is useful for subjects with complex edges, like hair or fur.
- Smart Radius: Automatically adjusts the radius for different parts of your selection. This is ideal for subjects that have both soft and hard edges.
- Global Refinements: See #7 Above.
- Smooth: Smoothens the edges of the selection, useful for reducing jagged edges.
- Feather: Softens the edges by adding a slight blur, ideal for blending selections smoothly into the background.
- Contrast: Sharpens the edges of the selection, giving you more defined borders.
- Shift Edge: Moves the selection border inwards or outwards, which helps if the selection has included too much or too little of the subject.
Step 4: Refining the Selection
Now that you’ve got a basic selection, you can use the tools on the left of the workspace to refine it: See #1 Above
- Quick Selection Tool: This works like the regular Quick Selection Tool, but allows more refined control within the Select and Mask workspace.
- Refine Edge Brush Tool: This is where the magic happens. Paint over tricky areas like hair or fur, and Photoshop will refine the edges for you. It automatically detects where the edges should be, making it easy to select fine details.
- Brush Tool: Paint directly on the areas where you need to add or subtract from the selection. This is good for precise touch-ups.
- Lasso Tool: Another way to make freehand adjustments to your selection.
Step 5: Outputting Your Selection
Once you’re satisfied with your selection, it’s time to output it. In the Output Settings at the bottom of the workspace, you can choose how to apply your selection. Here are some options: See #8 Above.
- Selection: This will simply refine your selection further.
- Layer Mask: This will apply your selection as a mask, allowing for non-destructive editing (meaning you can always tweak it later).
- New Layer with Layer Mask: Creates a new layer and automatically adds the selection as a mask.
Once you’ve chosen your output option, click OK, and you’re done!
Tips for Better Selections
- Use High-Resolution Images: The higher the resolution, the better Photoshop can detect edges and details.
- Zoom In: Always zoom in to inspect the fine details of your selection.
- Play with Edge Detection: Adjust the radius and Smart Radius settings for different types of selections, such as hair versus sharp edges.
- Combine Selections: Sometimes using more than one selection tool, like combining the Lasso Tool with Refine Edge, gives the best results.
- Cut Outs: Make your life easy, and your selections better by photographing images on a white background.
Conclusion
The Select and Mask tool in Photoshop makes advanced selections simple. With practice, you can tackle even the most intricate subjects, making your photo editing workflow faster and more accurate. Whether you’re working on professional composites or just enhancing your photos, this tool is an essential part of your Photoshop toolkit.