Selenium Toning: Why It Belongs in Your Fiber Print Workflow
John Whitehead | Shutter Bug Academy | Learn Film Photography
Why selenium tone a darkroom print?
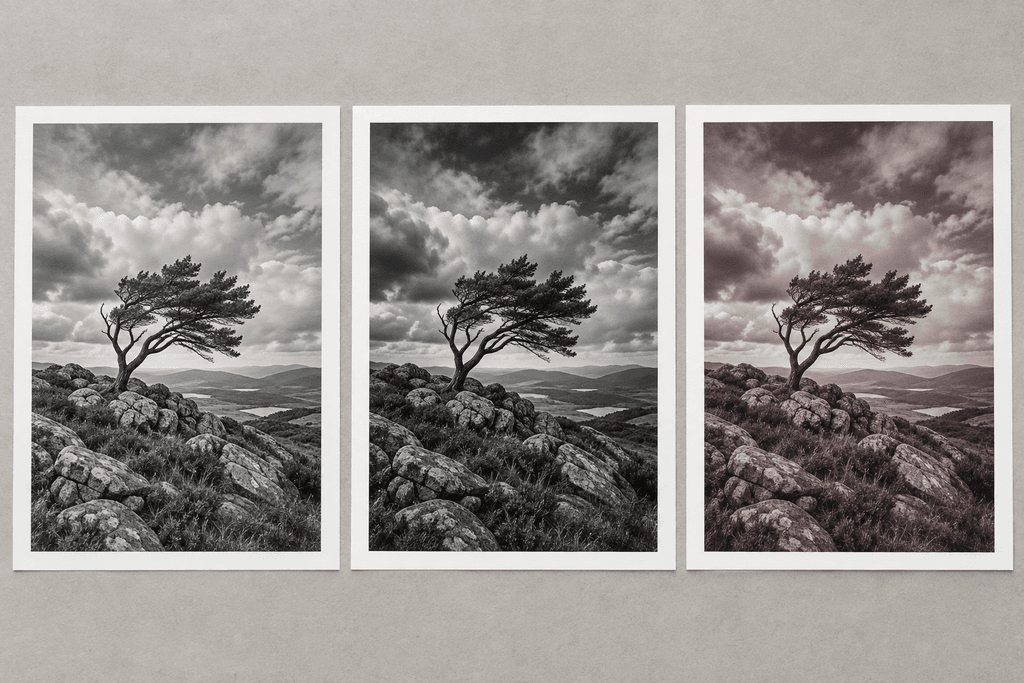
Toning is one of the most subjective decisions in darkroom printing. A neutral black, a cool shadow, or a warm purple-brown image can each be right for a particular photograph. The goal is to support the image, not to make every print look obviously toned.
Selenium toning can also become part of your normal finishing workflow, especially when making fiber-based prints for a portfolio, exhibition, or sale. Used thoughtfully, it can deepen the darkest values, refine image color, and improve the stability of the silver that is successfully toned. It deserves a place in your printing practice, but it is not a shortcut around careful processing.
What selenium actually changes
A silver gelatin print contains an image made of metallic silver. Selenium toner converts some of that silver to silver selenide. Depending on the paper and treatment, the result can include stronger maximum black density, a change in shadow contrast, and a subtle or pronounced change in image color. [1]
Think about a photograph of a weathered barn: deeper blacks may give the doorway more weight and make the pale siding feel brighter by comparison. The toner has not recovered missing highlight texture or created detail that was absent from the print. It has changed the relationship between existing tones.
This is why a technically stronger black is not automatically a better print. If the shadows already feel heavy, further intensification may work against the photograph. Make your exposure and contrast decisions with the final toned, dry print in mind.
Why fiber prints deserve the attention
Fiber-based paper rewards careful finishing with a beautiful physical surface and a print that feels like a handmade object. Its absorbent support also makes chemical removal more demanding than with resin-coated paper. Proper fixing, a suitable washing aid, and effective washing matter.
Selenium is not exclusive to fiber paper; compatible RC papers can be toned too. Nor does the fiber base alone determine the color. Emulsion, developer, dilution, temperature, and treatment all influence the result. Some papers show a strong change; others remain close to neutral.
For a finished fiber print, consider toning while you plan the printing session. Reserve an extra print as a comparison, allow time for the final wash, and leave the final judgment until the prints are dry.
Appearance and permanence are different goals
Selenium treatment can improve resistance to deterioration, but a brief dip in dilute toner is not a universal guarantee of long-term protection. Conservation research has questioned the protection of lightly toned low-density areas. Darker shadows or a visible hue are not a test of protection throughout the print.
Use the manufacturer’s process as a starting point, and describe your work accurately: “selenium-toned silver gelatin print” is more defensible than a promise that it will never fade. Correct fixing and washing, suitable mounting materials, and a stable storage and display environment remain essential.
For most personal printing, begin with the appearance you want and a sound processing method. If maximum permanence is a specific collection requirement, use a conservation-informed procedure rather than treating an aesthetic endpoint as proof of complete conversion. I prefer about minute.
Use a non-hardening fixer
Fixer removes undeveloped silver halides. A hardener has a separate job: it toughens the gelatin emulsion. That added hardening can make the emulsion less receptive to toner. It also makes efficient washing more difficult, which is especially unwelcome with fiber paper. Here Kodak Rapid Fixer is sold without the hardener.
Choose a fixer explicitly labeled non-hardening, such as ILFORD Rapid Fixer. “Rapid” describes fixing action; it does not by itself tell you whether another brand contains a hardener. If a product has a separate hardener, omit it only when its instructions permit that use. Do not try to remove hardener from an already mixed bath.
Non-hardening does not mean incomplete fixing. Use the specified paper dilution, time, agitation, and capacity. A tired fixing bath can leave compounds that later stain during toning. Extra washing cannot compensate for inadequate fixing.
If a print has already been hardening-fixed, do not assume it is ruined. Test a duplicate and follow the paper and toner guidance. For future prints, changing the fixing stage makes the workflow easier to control.
Where toning fits.
The point in the process
Selenium toner is used after development, stop bath, and complete fixing. It does not replace fixer. After toning, wash the print again before drying. Properly fixed prints can be toned under normal white light.
From dry paper to a dry finished print
Expose the dry paper under the enlarger; develop fully; stop; fix in non-hardening fixer; wash; selenium tone; rinse and complete the final wash; dry. Use the times and capacities specified for your paper and chemicals.
Or dry first and tone later
Expose; develop; stop; fix; wash; dry and evaluate. When ready to tone: rewet the unmounted print; tone; rinse; final wash; dry again. The following sections explain this separate-session method for RC and fiber paper.
Why beginners may prefer drying first
A dry print lets you judge exposure, contrast, and shadow detail before choosing the toning effect. Make two matching prints and reserve one as an untoned reference. Drying first is optional; complete fixing and the post-toning wash are essential.
Prepare the toning station
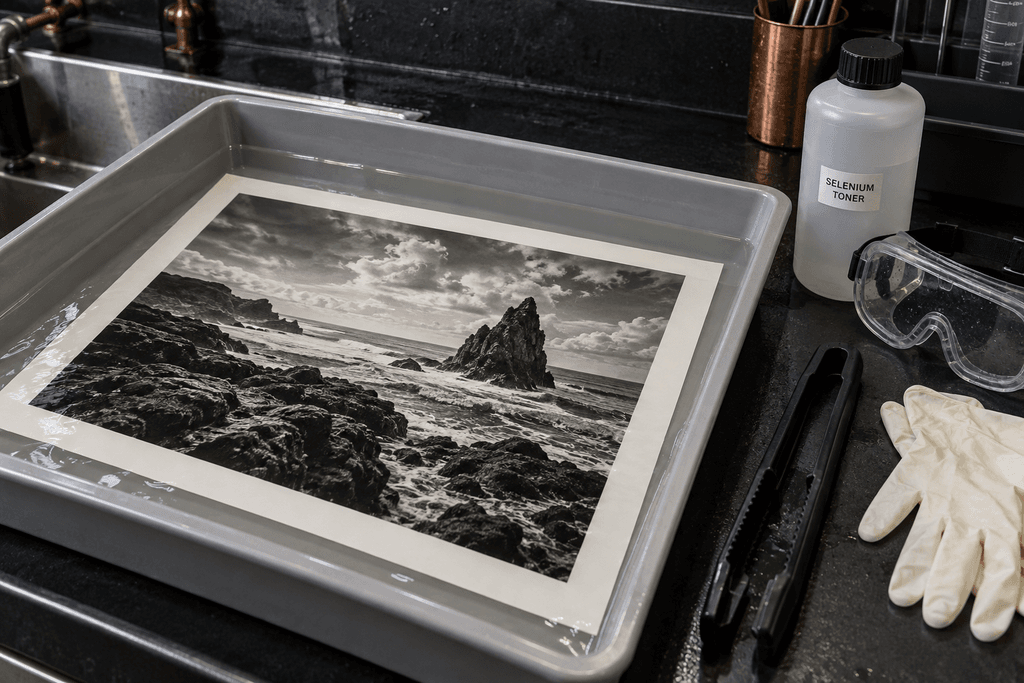
Use dedicated labeled trays, a timer, effective ventilation, chemical-resistant gloves and splash goggles. Mix commercial toner to its label instructions. Keep a wet reference print in a separate water tray; compare periodically under consistent light.
If you tone during the printing session
After the initial processing and wash, continue while the print is wet: skip the drying and rewetting stages. The specific ILFORD sequence later in this guide is a separate documented method that intentionally goes directly from fix to tone. Do not mix the shortest stages from different recipes.
Dry to dry: RC prints.
01 Start with a finished print
Use a properly developed, fully fixed, thoroughly washed, dry, unmounted RC print. Choose non-hardening fixer during the original processing. Check the dry image and test a spare print first.
02 Rewet evenly
Place the print in clean water until evenly wetted. Keep this stage brief and follow your RC paper instructions; do not automatically use the long presoak recommended for fiber prints.
03 Tone and compare
Immerse completely in working-strength selenium toner and gently rock the tray. Follow the product dilution, temperature, and timing guidance. Compare with a wet untoned reference and watch the shadows as well as the color.
04 Rinse, then wash
For HARMAN toner, transfer to a separate fresh-water bath and agitate for 30-40 seconds, then wash RC prints for a further 2 minutes in fresh running water. Follow the temperature guidance on the technical sheet. These times are product-specific.
05 Dry and evaluate
Drain excess water and air-dry on a clean rack, or use an RC-compatible dryer. Judge the final appearance only when completely dry. Record the materials, dilution, temperature, and toning time.
Keep the wet session short
RC paper has a resin-coated base and does not need a fiber-paper washing routine. ILFORD MULTIGRADE RC guidance advises avoiding total wet times over 15 minutes because of edge penetration and curling. Count rewetting, toning, and washing together; do not leave RC prints in a holding tray indefinitely. Hypo clear is generally unnecessary.
Dry to dry: fiber prints.
01 Start with a properly processed print
Use an unmounted fiber print that was fully developed, stopped, fixed with non-hardening fixer, washed, and dried. Toning cannot repair incomplete fixing. Evaluate the dry shadows before deepening them.
02 Rewet for about 10 minutes
Soak in clean water until evenly wet and flexible. ILFORD suggests a 10-minute soak for previously dried prints. Support the wet sheet carefully when moving it between trays.
03 Tone with gentle agitation
Fully immerse the print in working-strength toner. Gently rock the tray and compare periodically with a wet reference. Use the chosen toner instructions; remove the print when it reaches your intended appearance.
04 Rinse, then wash thoroughly
For HARMAN toner, rinse with agitation for 30-40 seconds, then wash fiber prints for at least 30 minutes in fresh running water, or follow its documented alternative permanence sequence. Keep sheets separated so water reaches both surfaces. A brief rinse is not the final wash.
05 Dry, then flatten
Drain and air-dry on clean print-drying screens. Allow the print to dry completely before judging tone or flattening it. Use an appropriate fiber-print flattening method, then spot, mount, or frame.
Where hypo clear belongs
When your selected procedure calls for a separate washing aid: toner, water rinse, washing aid, final water wash, dry. It helps remove processing chemicals; it does not replace the final wash. Follow a complete product-specific sequence, including its wash-aid time. Do not assume all hypo-clear products are interchangeable.
One published fiber-paper sequence
ILFORD’s optimum-permanence sequence with selenium specifies: Rapid Fixer or HYPAM at 1+4 for 1 minute; selenium toning to the desired result; running-water wash for 5 minutes; WASHAID at 1+4 for 10 minutes with intermittent agitation; then a final running-water wash for 30 minutes. Its stated processing range is 18–24°C (65–75°F). No hardener is added.
This is a specific ILFORD sequence, not a universal fixing time for every paper or fixer. Its direct fix-to-tone order is intentional. For a separately washed and dried print, use the separate-session preparation described above. Do not combine the shortest stages from different recipes. Check the current instructions for your exact materials before working.
Choosing a dilution: a labeled starting point
For HARMAN Selenium Toner, the technical sheet lists 1+20 for minimal image-color change, with a nominal 2–4-minute treatment, and 1+3 for normal visual toning, at approximately 20°C (68°F). These are product-specific starting points, not guaranteed looks or proof of complete protection.
Here, 1+20 means one part concentrate plus twenty parts water: 50 mL + 1,000 mL = 1,050 mL total. A 1+3 example is 250 mL + 750 mL = 1,000 mL total. Label the tray with the full notation to avoid confusion.
Do not begin by choosing the strongest solution simply because it sounds more effective. Choose a manufacturer-supported dilution that suits your aim, test a spare print, and learn how quickly your paper responds.
Safety is part of the process
Read the current Safety Data Sheet for your exact toner. HARMAN’s US sheet classifies the product as harmful if swallowed and a possible skin sensitizer. Diluted toner still requires careful handling.
Work with effective ventilation, preferably extraction at the work area. Wear chemical-resistant gloves selected for the product, protective clothing, and splash eye protection. Use dedicated tongs; keep food, drinks, children, and pets away. Do not heat or spray the toner. Wash hands after handling. [8]
Keep chemical and waste bottles labeled, closed, and secured. Never use beverage bottles. Do not improvise mixtures with other darkroom chemicals. Collect spent toner for an appropriate hazardous-waste service; do not pour it into the drain. Arrange handling of selenium-contaminated rinses and cleanup materials with your facility or local waste authority.
For skin contact, wash with plenty of water and remove contaminated clothing. For eye exposure, rinse continuously and follow the SDS. If swallowed, rinse the mouth and immediately contact Poison Control or a doctor; do not induce vomiting unless directed. In the US, Poison Control is 1-800-222-1222. Seek medical help for symptoms.
Troubleshooting and a useful first test
Yellow or brown stains: stop and review fixing capacity, chemical contamination, and washing. Toner can reveal processing defects that were hard to see before. Do not keep toning a stained print in the hope of hiding the problem.
Uneven response: check immersion, agitation, and whether the print was evenly wetted. Keep prints separated and avoid trapped air. Little color change: your paper may respond subtly; compare with the reference before deciding the toner is exhausted. Too much color or heavy shadows: shorten the next test or choose a weaker supported dilution.
For your first session, make three identical prints with delicate highlights and textured dark areas. Leave one untoned. Give the second a restrained treatment. Tone the third further, within the manufacturer’s guidance. Finish and dry all three alike. Choose the version that best serves the image, then keep it beside your processing notes.
Toning remains a creative choice. Making it part of your normal workflow simply gives you a consistent opportunity to make that choice deliberately.
Sources and further reading
- Kodak, Toning Black-and-White Materials, G-23 (2006; manufacturer publication, hosted copy)
- ILFORD, Processing B&W Paper
- HARMAN Selenium Toner technical information
- ILFORD optimum permanence wash sequence for FB papers
- ILFORD Rapid Fixer product information
- ILFORD selenium toning tips
- Toning and Permanence of Silver Gelatin Prints: research discussion by Douglas Nishimura, IPI
- HARMAN Selenium Toner US Safety Data Sheet (issued July 2024)